With the fall season upon us, there is new music to learn for marching shows, concert band, and district/state auditions. Students are apt to use the “play it again” technic, but there are several other choices that are quicker and have better results.
Confusing Notes
John Mack, the legendary oboe pedagogue, often remarked when students make mistakes, it is often because they are confused about something in the passage. The trick is to figure out what is confusing. I suggest students take a passage note by note, tonguing each pitch four times, then three, then two and finally once. Often seeing the notes slowly and without rhythm solves a confusion. Look at the following run in the Fauré Fantaisie.
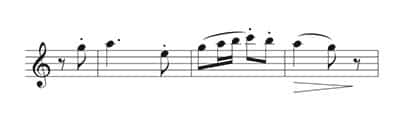
Fauré Fantaisie for Flute and Piano, Op. 79
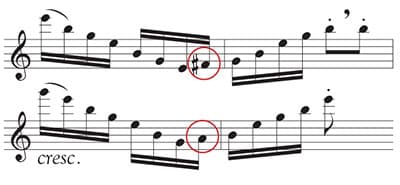
Almost every student stumbles over this passage. I wondered why this particular group of sixteenths is so confusing. At a lesson, I circled the F# in the first measure and the A in the second measure. Every time after that the student played the passage correctly. What I circled was the one note in each measure that was not a chord tone. The F# is a passing tone as is the A. Often a non-chord tone may indicate to the student a different chord than what is written. As you see, both measures are an e minor chord. This reading error is easily corrected by pointing out the non-chord tone and identifying the proper chord.
Learning to read by chords offers huge benefits. This is why students should memorize major and melodic minor scales and at least the major, minor and diminished chords. Having these theoretic technical materials in the mind and on the tip of the fingers aids in playing by chords.
Flutter Tonguing
Now once students have the right notes what should they do to make the passage sound better? One of the quickest ways is to flutter tongue the passage several times. Flutter tonguing is sometimes compared to rolling r’s in language. I have experimented with starting the flutter with the tip of the tongue on the roof and also with the tip of the tongue behind the lower front teeth. Whichever is easiest for a particular student is fine. Some cannot flutter and will need to produce the flutter with the throat as if they are gargling. That works almost as well as fluttering on the roof of the mouth. It usually take a few attempts to figure out the coordination to flutter the passage, but then becomes easy. The next step is to have students play the passage as written without the flutter. You will be surprised at the improved tone quality. This works because players must have a constant air flow or air pressure to flutter. This is exactly the kind of air stream needed to play with a great tone. I use this idea on fast passages as well as on slow, melodic ones. I was working with a French horn player on the slow movement of one of the Mozart horn concertos. I had him play a phrase fluttered and then natural, alternating phrase by phrase through the movement. By the end, he could remember what a good air stream was and where adjustments needed to be made to play the correct intervals. The phrases also seemed to be more lyrical.
Extend the Legs
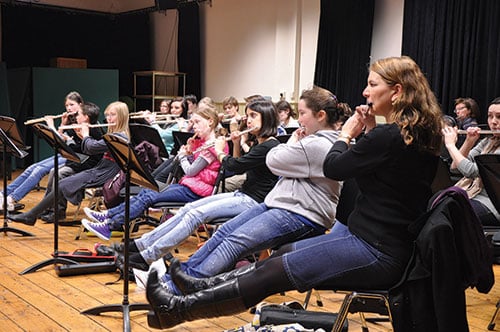
Another breathing technic to improve tone (and intonation) is to have students, when sitting, extend the legs out in front. In this position, the abdomen is as tight a position as it should ever be when playing. Alternate playing with the legs extended and with the feet on the floor. I showed this trick to a band director colleague, and he had his college students alternate raising and lowering their feet throughout the rehearsal. That evening, he was conducting a middle school honor band for a two-day clinic. After teaching college kids, the sound of the middle school students was a bit of a shock. He decided to employ the extended legs idea throughout the clinic. He said hour by hour he could hear the students’ tones maturing. Encourage students to incorporate this technic into their at home practice especially when playing scales and tone exercises.
Playing Musically
When encountering a new composition, it is important to identify the phrases and place breath marks to highlight them. When playing each phrase, consider the melodic shape or contour of the melody. Generally if the notes go up, they get louder, and as notes go down, they should be softer. Of course there are exceptions to this rule, but it is a good starting place. Students should also undertand the strength of the beat concept where in 2/4 or 6/8, the first beat is strong and the second weak. In 3/4 or 9/8, the beat importance is strong, weak, weaker and finally in 4/4, it is strong, weaker, less strong, weakest (beats 1, 3, 2, 4).
Five Ways to Learn Anything
Even after doing this, the passage may still feel stiff or uninteresting. The following is a clever practice idea. In this execise, take a small section and get rid of the printed rhythm. All notes are now played as equal in length. First, slur the notes by threes.
As written:
Without the printed rhythm:
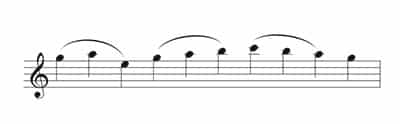
Repeat, omitting the first note and slur by threes. Repeat once again, omitting the first two notes and slur by threes. Students may need to do this quite slowly until they train the eye not to see the printed rhythms.
Steps four and five are to play in a dotted eighth/sixteenth rhythm tongued. Once again each note is of equal importance. Then, repeat with the opposite rhythm sixteenth/dotted eighth (or Scottish Snap rhythm).
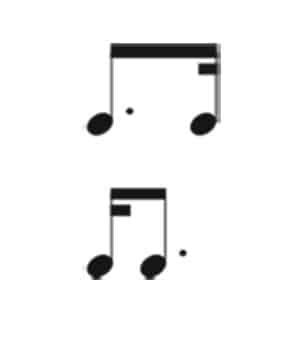
Finally repeat all five steps each time increasing the tempo. Then play the melody as written. Both teacher and students will hear an improvement. This gets rid of the rhythm and only works the pitches. Each pitch is placed in importance from one to three. This changes the perception of the melody and offers phrasing and grouping ideas when the passage is played with the printed rhythms. This exercise should be repeated each day for a week.
The Traveling Fermata
The traveling fermata exercise highlights each of the notes in a phrase. Start by putting a fermata on the first note of a phrase and then continue the phrase as written. Then remove the fermata on the first note and place it on the second note and continue the rest of the phrase. Repeat until each note has had a fermata. While playing this exercise students should also strive to create the best sound on each fermata note. This exercise works well on slow passages as well as technical ones.
Chunking
Chunking is playing a group of notes (phrase-let) followed by a rest. Start by chunking by groupings of music about one inch long, as this is the amount of information the eye takes in when reading. With a group where there are a variety of notes and rhythms occurring at the same time, chunk by beat. In other words, everyone plays only the notes on the first beat of the measure and then rests for the rest of the measure. Play an entire section playing only the first beats. Repeat playing only the second beats, then third beats, etc. This exercise helps students understand where the beats are and because they are resting for a certain number of counts, they are able to better prepare for the beat they are playing. This exercise also helps the ensemble play on the ictus and have good ensemble. Utilizing these methods can produce great results and raise the level of the your ensemble.