Editor’s note: This is a continuation of “A Flute Masterclass,” which ran in the December 2008 issue.
Assessing what the students know (point A) and what you want to achieve (point B) is the first step in creating a masterclass curriculum. How to progress from A to B depends on the level of the class, the students’ learning styles, and ages. A prominent teacher once remarked that you can teach anyone anything if you break the information down into small enough units.
.jpg)
Review Class 1
A good second masterclass curriculum begins with a general review of the previous session. The goal is to build a foundation of flute playing and musicianship. Masterclass #1, to simplify the instruction, used the headjoint alone.
To present the review, you could ask students to:
Play some slurred half-note octaves. Hold the headjoint with your thumbs and index fingers. Remember that the embouchure hole should face the ceiling and that your head is at the bottom of a small nod. Separate the vocal folds by panting.

After a series of several octave patterns with the class, ask students to close the open end of the headjoint with the right palm and play half-notes on all three possible notes (low, medium, and high). Then repeat these instructions with the tonguing (thi, thi, thi, rest) and vibrato (hah, hah, hah, rest both staccato and slurred) exercises.
Add the Flute Body
The second masterclass uses the headjoint and the flute body but no footjoint. At the beginning of the class, check the cork placement again, particularly if several weeks have passed since the last class. Changes in weather and the bumping and jiggling of a headjoint in a case can alter cork placement.
Students should grasp the barrel (where the name plate is) from above with their right hand. The left arm should just hang down to the side. Holding the instrument in this position helps students stabilize the flute firmly against the chin. It also helps them discover that the flute should angle down slightly rather than being horizontal with their shoulders. This position is necessary because of the asymmetrical cut of the embouchure hole.

Later when the left hand is added, the left thumb should be straight and point up toward the ceiling. The size of each student’s hand determines where the thumb touches the thumb key. Generally, touching the key close to the first knuckle is best.
Interestingly, the distance between the elbow and the wrist is approximately the same length as the foot, so knowing a student’s shoe size will help determine whether the left wrist should be slightly bent or not. When the shoe size is larger than a women’s size 7, the wrist will need to bend to align the nose, aperture, embouchure hole, and crease in the left elbow with the center of the music stand.
Headjoint Tenon
After a few months of study, many young flutists discover that the end of their headjoint is no longer round. This is due to improper and hasty assembly of the flute. Prevent this damage with a little instruction. Explain that a good seal between the headjoint and the body of the flute is necessary and requires the end of the headjoint to be round. When students assemble the flute, they should insert the headjoint into the body slowly and carefully. Demonstrate how to align the headjoint and the body, and then ask students to imitate.
To align the flute and headjoint, look down the body to the headjoint from the D-key end of the body and draw an imaginary line through the center of the right-hand keys and the center of the embouchure hole. The headjoint should be pulled 1/4" for proper tuning. On your handout page, make a top border of lines 1/4" apart with a ruler so students can see what an accurate 1/4" looks like.
Once the flute is aligned and the headjoint is pulled out, mark a line on the backside of the headjoint and flute body with fingernail polish so the student can accurately align the flute at home. Now the class is ready for a series of exercises and activities to do as a group. Be sure to explain the goal of each one.
Follow the Leader
The left hand notes of the flute spell the word bag or gab. Call out each letter or note name as the students finger the note called. Start slowly, B A G and G A B; then call the letters in random order. Most students must repeat the process about eight times before remembering it, so be patient. Remind students to relax their fingers, yet close the keys with a rhythmic motion. The fingers should be close to the keys. After the students can finger the notes easily, add C, which only requires students to remove their left thumb. This is also a good time to teach that, as the fingers are removed from the flute, the pitches go higher and vice versa.
Once the class can play the step fingers motions of C, B, A, and G descending and ascending, they are ready for skip fingerings, such as B, G, B, G or C, A, C, A. Check to be sure that the students can execute this first while watching their fingers and then without looking at their fingers.
Finger Drill
Sometimes when doing the previous exercise, students have trouble making their fingers move correctly. If this is the case, have the entire class place their flutes in their laps. Number the fingers on both hands from index finger through pinkie as 1 to 4, and then call out numbers while students touch the appropriate finger with their thumbs. At first students can look at their fingers, but after a few times through they should drop their hands to their sides and repeat the exercise without looking. Call out the numbers in an even rhythm, first slowly and then more rapidly. I find that today’s students are much less body aware and dexterous than students were just 5 to 10 years ago.
Into Action
Repeat the finger drill, but this time ask students to play the note that you call out instead of touching their fingers. Do a sequence in the lower octave and another in the second octave. Remind students to start each note with the tongue. The tongue releases the air. I prefer thi for tonguing because the syllable comes through the teeth and is off the top lip. Encourage articulate, rhythmic fingers that are relaxed and close the keys quietly and gently.
Soloist Exercise
Ask for a volunteer. This allows the rest of the class to evaluate what the volunteer is doing. I have found when a student has a problem, another student can quickly tell him what he needs to do to fix it. Sometimes the student’s language will speak much more clearly than a teacher’s words do. Be sure to encourage the class to praise as well as criticize.
Left-Handed G Major Scale
With the right hand on the barrel, have the class play G, A, B, C in the second octave with quarter notes and quarter rests between the pitches. Repeat several times, reminding the students to keep their fingers close to the keys. When the class has mastered this, repeat the fingering sequence again followed by the same fingerings sounding at the third harmonic partial – D3, A as an E3, B as an F#3, and C.
.jpg)
Continue to work this drill with each note as a quarter value followed by a quarter rest.
Add in Skills
With this left-handed scale, play three eighth notes followed by an eighth rest on each pitch using the following syllables: thi, cka, hah, rest. Then try t, k, t, rest. The right hand is still holding the flute by the barrel.
To teach vibrato very naturally and easily without too much explanation, repeat these notes (G, A, B, C, and overblown G, A, B, C) with the hah, hah, hah, rest several times. Then have the students slur the hah, hah, hah, rest as in vibrato bumps.
The G Exercise
Now slur the G scale with the right hand still on the barrel. The first time up, place four slurred vibrato bumps on each pitch (hah, hah, hah, hah), then three bumps and finally two. Then ask the class to play the ascending scale as fast as possible.
Add the descending scale slurred. For a fun exercise, ask each student to play the ascending and descending G scale while twirling in a circle going toward the left (counterclockwise). Once the student can play with the twirl, they better understand lifting into the third octave, independence of the air and fingers, and playing with a long musical line.
Low, Low, High, Rest
To develop embouchure fluency students start on low G and tongue low, low, high, rest as shown in the example below. If the students are advanced and familiar with flute fingerings, use chromatic notes G, Ab, A, B flat (thumb fingering), B, C, and C#. This careful laying out of flute fingerings often produces some aha moments from the class.

Repeat the exercise with vibrato and use three vibrato cycles and a rest on low G, another three vibrato cycles and a rest on middle G, and eight vibrato cycles on the high G.
Chromatics
This exercise teaches the motion the left-hand thumb must learn in order to switch from B to thumb B flat. It also helps stabilize the flute against the chin and keeps the left hand relaxed. Remember that the left thumb should point up to the ceiling.
On the chromatic sequence G, Ab, A, B flat, B, C and C#, play the scale articulated and slurred in the first and then second octaves. Be sure the right hand is still on the barrel.
Songs
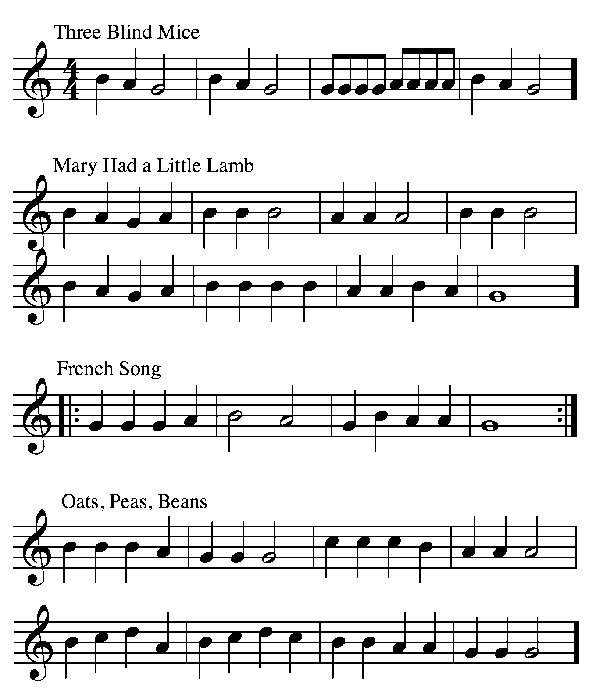
Some students learn musical notation quickly, while others struggle to remember note names. Here are some melodies that can be played just with the left hand. Let the student choose the octave. These melodies also work well with counted vibrato. Teach the counted vibrato aurally.

Round of Trills
To exercise each finger, practice a cluster of trills on each note. This is a subtle way to teach students to keep fingers close to the keys and separate the finger movements from the air stream. Start with a G-A trilled dotted-half note followed by a quarter rest. Do about eight clusters. Then repeat with A-B and B-C. If the class is quick, you can add tremolos such as G-B, A-C or C -A and B-G.
Extra Time
If there is still time remaining, I suggest some rhythmic drills on a middle B with the right hand on the barrel. If students are seated in chairs, ask them to extend their legs in front of them off the floor and tap their toes (both feet) to the quarter note. Start by playing a rhythm in 4/4 and ask the class to imitate what you play. Use whole, half, and quarter note values to fill the 44 measure.
Review
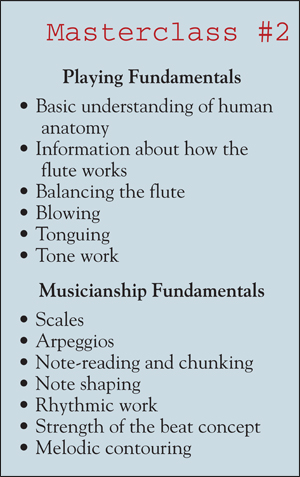
Every good curriculum provides a review at the end. Concepts that have been taught during this lesson are shown in the box on the left. List these topics on your one-page handout.


