Recording a musical ensemble can be rewarding and challenging. Marching bands are particularly difficult to record because they are best recorded outdoors in their natural environment. Outdoor marching recordings require attention to acoustics, weather, temperature fluctuations, speed and change of wind direction, and external noise. This article is designed to help directors successfully produce a high-quality outdoor marching band recording. The advice comes from our experience recording the Go Pack! album by the University of Nevada, Reno’s “Pride of the Sierra Wolf Pack Marching Band.”
Why Record the Marching Band?
Our goal was to produce an up-to-date collection of the band’s most popular selections. The last official recording occurred in 2007. When the current marching band could not attend certain sporting events, these older recordings were often used. Since that last recording, the school’s fight song and Alma Mater were revised several times. Once-popular songs had become dated and replaced by more modern ones. There was also no recording of the national anthem. A new recording would include updated versions of the fight song, Alma Mater, the national anthem, and more modern pep tunes familiar to students.
The recording would strengthen the band’s musical performance, and listening to the quality and style of music performed by the marching band could encourage high school musicians to attend the university. The recording would be made available on the school of music’s website and other outlets, and the recordings could be provided to high school students using a QR code.
Pre-Production: Preparation
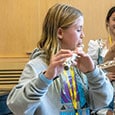
The recording project included roughly 25 minutes of material, with 17 of the band’s most popular songs and two percussion features. Once the repertoire was set, a schedule for music preparation was established. Music was introduced during August marching band camp. Sectional rehearsals ocurred throughout band camp, conducted by section leaders, along with full ensemble music rehearsals. The band’s recording repertoire was emphasized during the early weeks of the football season in advance of the recording sessions.
Tom Gordon, UNR’s Recording Arts instructor, agreed to be the recording engineer on the project. He is an alumnus of the USC Trojan Marching Band and the engineer of Nevada’s 2007 album.
In researching the tech requirements, we were surprised by how little data is available on marching band recording or mic techniques. The information is pertains to live sound reinforcement micing for soloists and modern pit percussion, which is not the same thing. Mr. Gordon had to refer to his experiences with the USC Band, consulting colleagues in the film scoring industry, and his visit to the 2014 DCI Finals in Indianapolis for direction.
A few considerations he incorporated from these experiences included:
• In a 1990 USC Marching Band recording, while playing in the band, Tom Gordon observed a pair of Neumann U67’s on tall stands approximately 11′ high and 15′ wide splitting the 50-yard line (mostly likely an omni).
• A colleague, Chris Fogel, who recorded the scores for Oppenheimer and The Mandalorian, had worked with marching bands on films like The Campaign and TV shows like Severance using an M3. Based on his experiences, we started our set-up with three omni mics approximately 11′ high with a center at the 50-yard line and the other two set at approximately 75% of the width of the ensemble, in other words, they were placed about 2/3 of the distance from the center to the furthest out player on each side. The only additional spot mics were overhead mics over the snares and tenor drums because their sound travels down to the field compared to everyone else facing forward.
• The DCI Finals used what appeared to be a large-scale M5 with 5 omni mics spanning the field. This is the same array used for 100+ player film scores such as The Matrix. Sadly, there are no interviews or articles from DCI’s audio people to confirm that.
Choosing a Location
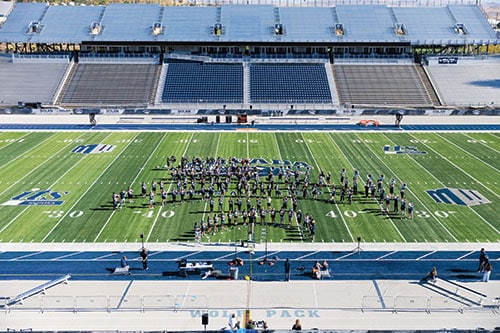
The recording location was an important decision for this project. An open-air location was the most appropriate venue and after considering several possibilities, we selected the university’s football stadium because it was familiar to band members and offered the best chance to capture the band’s true sound.
The stadium also had minimal noise pollution from traffic, construction, reflections off nearby structures, air conditioning units, and wind. It was also an easy site to move gear into and had a remote location to listen to the recordings on speakers rather than headphones.
Choosing a Recording Date
We scheduled recording sessions based on several variables:
• The time of year. Weather in Reno, Nevada, is unpredictable and can change quickly.
• The academic calendar. Recording at mid-semester seemed the most appropriate option because students would be experienced with the music by this point.
• The athletic calendar. The venue’s schedule is tight between games and team practices. Coaches and administrators in the athletic department were always kept in the loop. After analyzing the home football schedule, consulting long-range weather forecasts and historical trends, and considering mid-term exam schedules, we chose two dates in mid-October. The first day of recording took place on a Friday afternoon during the ensemble’s normal class period. The second session occurred on the following Saturday morning, six hours before a home football game.
Testing the Equipment
One week prior to the first recording session, the recording team attended a band rehearsal to make decisions about mic selections, band field locations, and instrument arrangement. They also evaluated problems such as wind and nearby noises.
They brought a Sound Devices MixPre-10 recorder and 13 sets of microphones in over 20 variations to audition. It is difficult to predict the best microphones; you have to listen to all of the options. The team only had one set of 3 matching mics to try a true M3 and Decca Tree. All others were stereo pairs. During the rehearsal, the team would set up a pair of mics, record a 30-second sample, and swap out to the next set. All sample recordings were reviewed in a controlled studio environment to make decisions on mic selections.
In most cases, critical listening choices should be made on speakers rather than headphones. Headphones do not account for the sound wave interaction, also called “phase,” coming from a pair of speakers in air, which alters perception of many things, especially intonation. We went out of our way to monitor on speakers in controlled environments rather than on headphones when possible.
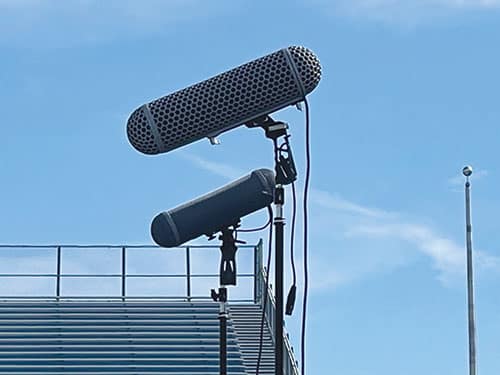
The Omni-directional microphones were really the only useable mics auditioned. Even with wind screens, the cardioid mics had so much more wind noise due to their design. They were basically unusable whenever a gust of wind came up. The Omnis were far quieter with superior low frequency response.
The winning mics were a pair of Telefunken Elam 260 tube microphones in Omni. The imaging, dynamic range, and frequency response was impressive. Here is the list of mics we tested, ranked in order of preference:
Telefunken Elam 260 (omni and cardioid)
AKG 414 XLS (omni and cardioid)
AKG 414 BULS (omni and cardioid)
Sennheiser MKH20 (omni)
Royer 121 Ribbon (Figure 8 in a “Blumlein” array)
Schoeps CMC6/MK4 (cardioid) [if we had the omni version, these might have won.]
Neumann U87 (omni and cardioid, M3 and Decca Tree)
Neumann M147 (cardioid)
Neumann KM184 (cardioid)
AKG C 460b (cardioid)
Audio Technica 4033 (cardioid)
Rode NT5 (cardioid)
CAD GXL 1200 (cardioid)
Production: The Recording Sessions
Day One:
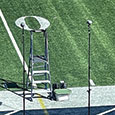
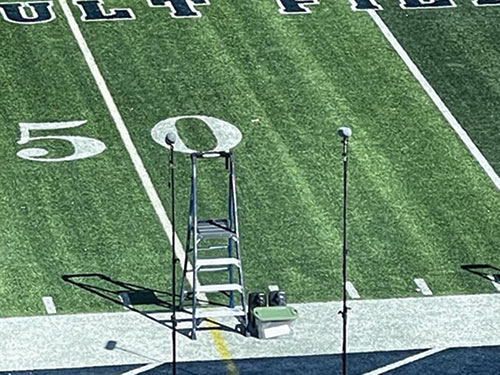
The recording team arrived at the stadium two hours early to place the mics and stands on the stadium sidelines. The stands were secured with sandbags in the event of wind gusts. The mics were set 6′ wide (splitting the 50-yard line), 11′ high (though in hindsight, we could have gone a foot higher), 5′ from the edge of the field, and at a 22-degree tilt. Narrower than 6′ wide sounded too mono, and wider than 6′ sounded like there was a hole in the middle. The mics were also put in classic film industry microphone holders called “wind jammers,” which work well to diffuse any remaining wind noise.
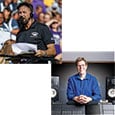
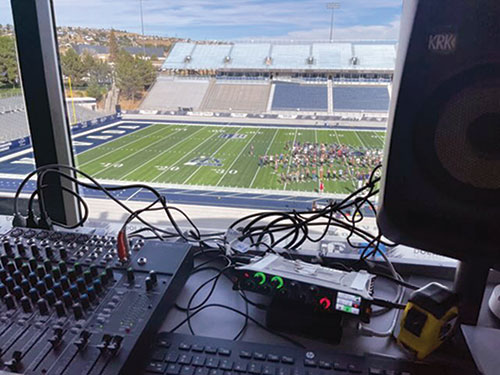
A room in the stadium press box, far from the live band sound, served as a control room for the first day Mics were wired from the field using 200′ of cabling straight to the recorder in the booth. We monitored on KRK V6 S4 speakers but created temporary muting of reflective surfaces in the room by placing packing blankets on tall boom mic stands. That ensured that the sound coming out of the speakers wasn’t colored too much by the room’s imperfect acoustics. This allowed the production team to take notes on the ensemble’s performance and provide immediate feedback to Dr. Eubanks and band members on the field. Mr. Gordon, the Director of the School of Music, Dr. Reed Chamberlin, and others from the marching band staff listened and gave production feedback during the recording session.
While recording, we had to make sure we had handles on either side of each edited piece. For example, if take 1 was the beginning up to bar 100, and take 2 started on bar 100, the best practice is to start recording take 2 about 2-4 bars before bar 100. That way, when the ensemble gets to bar 100, the energy matches the previous take. This makes post-production editing much easier.
The longest songs were recorded during the first recording session. Full runs were first taken on each piece followed by smaller sections that might be troublesome. In some cases, only a small number of complete recordings were necessary. For others, there were as many as ten different smaller sections stitched together. There was no click used, so consistent tempos were achieved by assigning specific drum majors to conduct every take of the same song. At the conclusion of the two-hour recording session, we had completed the seven longest songs.
Day Two: Game Day
We began day two in the morning before a home football game. Because this game was televised, we constantly mitigated additional noise in the stadium as people from Athletics and the national television crew quietly prepped the stadium for the game. Everyone involved was respectful and compliant with our recording project.
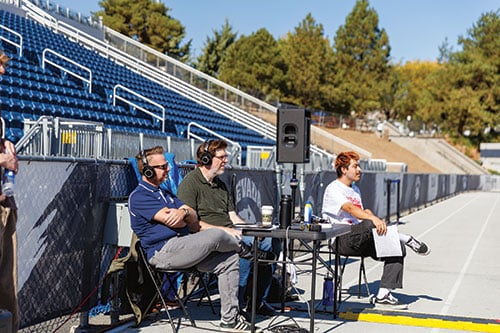
L-R Co-producer: Dr. Reed Chamberlin, Head Engineer: Tom Gordon, 2nd Engineer: Luis Gonzalez-Claro
Because it was a game day, we couldn’t use our press box control room. The recording team had to set up on the sidelines approximately 15′ away from the front of the band. Dr. Chamberlin had to produce the recording using headphones at close range to the band. These constraints made the second day of recording more challenging because the bleed from the live band was almost as loud as the headphones. This made it much harder to hear clearly what was getting recorded and to give feedback. Plus, we just had to trust that the positions from day 1 were sounding just as good on day 2. We couldn’t tell for sure on the headphones. Fortunately, when we listened to playback in a studio later, they did.
After the second two-hour session, we had completed the additional nine shorter marching band selections as well as two percussion features.
Post-Production: Editing, Mastering, & Release
Editing:
The recording team created rough mixes of each take for Dr. Eubanks to review. He then selected the preferred takes at home on consumer speakers and headphones over the course of a month.
Then two, 9-hour sessions were scheduled at Mr. Gordon’s studio to edit the desired takes together. Because it was just a stereo recording, there was no need for remixing, saving considerable time. Thanks to our thorough mic choice and placement testing during pre-preproduction, there was no “fixing it in the mix.”
In the studio, each preferred take was carefully reviewed by Dr. Eubanks and Mr. Gordon. Occasionally, comparisons were made between the selected takes and alternate ones to confirm that were no better takes hiding somewhere. Some things just sound different in the studio. We also discovered that not all of the takes were at the same exact tempo. Many of the DAWS available today have time compression and expansion options. This allows the recording engineer to stretch the audio a touch either way to match tempos between takes. Volume differences were corrected with level automation within the DAW. Software can also address pitch issues in stereo mixes, but we opted not to go that route.
Mastering:
We assembled the album in the song order that Dr. Eubanks selected. This included carefully reviewing the transition times between the songs for flow. During that process Dr. Eubanks came up with a name for the project – Go Pack!
To get recordings to match the modern standards for streaming, radio, and album replication, the final step of any album is the mastering process. Mastering combines equalization, compression, and other bits of wizardry, such as analog tape emulation or stereo widening on the final mixes, to get all tracks at a consistent volume and tone levels from song to song. Mastering also involves adjusting the overall volume to comply with common delivery platforms.
Once completed, the final audio files were exported as WAV files and MP3s for general use as well as DDP files for CD manufacturing. Metadata was encoded in the audio files containing the artists’ name, album name, and song name in each audio file. International Standard Recording Codes (ISRC) can also be encoded in the metadata to serve as virtual barcodes in each song to track when digital versions of the music are played for broadcast, downloaded, or streamed. For every song, only one ISRC Code may be assigned.
Archiving:
Every hard drive, SSD, or thumb drive has a 100% failure rate. It’s just a matter of when. We created a set of backups at the studio and another set in the University’s data archives. Having backups in two different locations gave us reliable long-term storage.
Licensing:
Many of the songs were copywritten works and not public domain. Publishing licenses were secured to make sure that the songwriters received their appropriate percentages. The Harry Fox Agency in New York represents most publishers in the US. However, we recently discovered Easy Song Licensing, a company that lives up to their name. The typical fee for such a license is 0.091cents a copy. So, a thousand sales of a song would give $91 to the songwriter.
Copyright:
The new recording, legally called a “mechanical master,” needed copyright protection. On the Library of Congress’s Electronic Copyright Office (eCO) website, we filled out the Sound Recording (SR) form, uploaded audio files, and paid for the copyright. Having the contributing writers’ names and birth years are important during this process. It can take several months for the paperwork to process but it will be retroactive to the payment date for the transaction.
Distribution:
With the final masters ready for delivery, licenses secured, and copyrights in place, a distribution avenue is usually needed. Many independent distribution sources are available including Distro Kid, CD Baby, or Tunecore. All of them can provide ISRC codes. We used our School of The Arts website in addition to CD Baby to release the music for recruiting purposes as well as popular streaming sales sites such as Spotify and Apple Music.
Final Thoughts:
Recording a marching band can be a tedious yet rewarding experience. Participation in a recording project of this magnitude requires a commitment to excellence in every detail. If you are considering recording your marching band, take the time to plan ahead, rigorously rehearse the material with the band, work with a knowledgeable audio engineer, test the recording technology available in advance, and do not attempt to do it all in one session. Record outdoors during a time of year that has conducive weather. It should be a comfortable space for the ensemble and close enough to a room to set up speakers. The result will be a recording that captures the best of what your band has to offer.
A link to this project can be found at:
wolfpackmarchingband.hearnow.com
Some helpful recording terms:
Polarity: the pick-up area of a microphone.
Cardioid: A mic that picks up mostly in front.
Omni: A mic that picks up 360 degrees.
Figure 8: A bidirectional mic that picks up front and back, no sides.
Decca Tree: triangular mic array of 3 omni mics for classical recording.
M3: 3 omni mics array in a straight line for classical recording.
M5: A M3 with two more wide omni mics in a straight line for very large classical recordings.
Phase: The interaction of two or more soundwaves.
DAW (Digital Audio Workstation): Recording and mixing software such as Pro Tools, Logic, Ableton, and many others.