There are a number of aspects of musicianship and being a good ensemble member that students who are new to playing in band or orchestra may not know. Here are some tips to share with your students.
The Music
Let students know that music is expensive and should be handled with care. Remind them to follow the directions carefully. Usually directors ask students to place music in a folder. While some music folders are overly-large and do not fit conveniently in a backpack, students should still use the folder so the music stays clean and undamaged.
Where to Sit
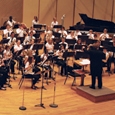
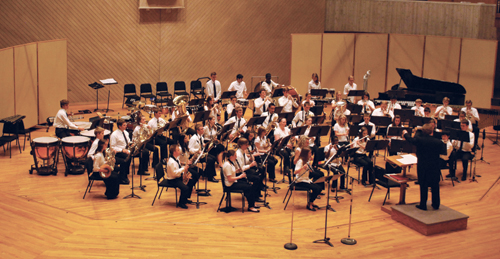
Students have a tendency to sit where the chairs are placed. If the chairs are not properly placed, encourage students to move their chairs and stands so the can see the conductor. In an orchestra, when the conductor looks straight ahead, the principal flute is on the left and principal oboe is on the right in the first row. The second row should have the principal clarinet and the bassoon, and usually the principal horn and principal trumpet are in the third row. This arrangement allows the conductor to communicate directly with the principal wind players.
Flute, bassoon, horn, and trombone and players should turn their chairs 45 degrees to the right because their instruments are played off to the side. There should be a reasonable amount of distance between each chair, with perhaps a bit more for flutists.
For good sound production and healthy body alignment, there should be a separate music stand for each player. The music stand should be placed 30 inches away from the musicians’ heads, and players should learn to perform with the music stand as low as possible. A stand set too high may cause neck pain and interfere with projection. Flutists should take care to place the stands so there is empty space between each stand. If there is no space between the stands, the flutist will have to work harder to be heard as the stand will reflect his sound to the back of the stage.
Feet
When playing in ensembles, many students cross their feet at the ankles. A sectional with fewer students than the full ensemble is a good place to identify this problem. Tell students to place their feet firmly on the floor. This will improve their posture, avoid pain, and help with breathing. Crossed ankles puts undo stress on the base of the spine. A good test to see if feet are properly placed is to ask students to sit as usual and then try to stand up. If they have to move their feet to stand, then they are in the wrong place.
The Conductor
When playing in orchestra or band, the conductor is responsible for total shaping and pacing of each composition. Respect his leadership and try to accommodate his wishes. After playing in an ensemble for many years, you will experience a wide range of ideas presented from the podium. Some will be good; others strange. It is your job to follow the conductor’s suggestions at all times.
Conductors like musicians who follow them. In rehearsals and especially concerts, look at the conductor every measure or so. Always look up for changes in tempo, at railroad tracks, and at the end and beginning of sections. When a conductor makes a suggestion, pick up your pencil and mark your part. Keep your handwritten instructions to a minimum. One-step directions are the best. If you write long descriptions, you will be bogged down reading the message when performing.
Before asking a question, section members should ask their section leader the question. If the section leader does not know the answer, then it is the principal player that talks with the conductor.
Playing Together
To play together, someone has to give a cue. The old adage “Those who breathe together, play together” is a good thing to remember. Usually it is the principal player who initiates the cueing breath. The principal player may also make a slight movement of his instrument showing where the entrance is to be placed.
Learning to cue clearly is a goal of every chamber and orchestral performer. Most players cue downbeats well, but are unsure what to do when cueing an upbeat. This topic is best discussed in private lessons and practiced by playing duets with a colleague.
Principal Player
The principal player makes the choices of timbre, note-grouping, phrasing, dynamic, amount and type of vibrato, and how to interpret articulation marks and note length for the section. Section players follow his lead. However, if the second player is playing at an interval of a fourth or more, the lower part is played slightly louder for balance control.
Dynamics
In the score, if a part is marked forte for the flute section, this does not mean that each flutist plays forte. It means the section plays forte; each player should play softer that forte so the sum total of all the players will be forte. The best players in the world have a wide range of dynamics and use them; however, students tend to default to forte and fortissimo.
Counting Measures of Rest
Each performer should count measures of rest. Generally the first measure is counted by slightly tapping the left pinky finger on his lap. Measure two would be his ring finger; measure three the middle finger, measure four the index finger and measure five the thumb. When the player approaches a rehearsal mark, he slightly lifts his entire left hand a small bit to signal to the rest of the section the location in the music. This lifting of the hand insures that the entire section makes the next entrance accurately. If a player gets lost, then he can look at other member’s left hand to see the count.
Soli or Solo
If a part is marked soli, then it is a section solo. If the part is marked solo, then one player performs the solo.
Turning Pages
If there are two players sharing one piece of music, the inside player turns the page. Be sure to turn early enough so no notes will be omitted. When turning a page after a long rest, write the number of measures rest at the top of the new page.
Guide to Notation
In 1983 Frank Bencriscutto and Hal Freese published Total Musicianship: A Comprehensive Approach to the Development of Today’s Musician (Kjos). This 48-page book offers an abundance of good advice for the performer.
Bencriscutto writes “Be conscious of the three parts to every sound: beginning, core, release . . . Some find it helpful to think of a cylinder where the end of the sound has as much air power behind it as the beginning.” Today we teach this as using fast air at the beginning of a note to prevent football-shaped notes. The goal is to have the strongest part of the note at the beginning of the note unless the composer indicates something else. This means that the vibrato starts at the beginning of the note too.
Bencriscutto also suggests in Baroque, Classic, Contemporary music, and in marches (except for melodic expressive lines) notes are played shorter than written. This ungluing of the notes was first suggested by J.J. Quantz in 1752 in his treatise On Playing the Flute. This use of the articulatory silence is also useful in dance movements of the Romantic era. Since music notation is not a precise art, there are several discrepancies concerning what a rhythm looks like and how it is performed.
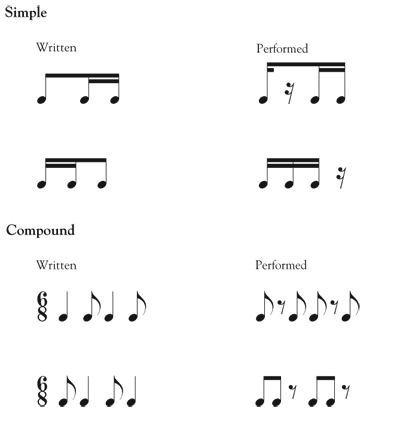
In articulated passages, the dot after a note-head is performed as a rest or silence.

This statement is true when the dot is replaced by a tie. Many conductors actually say, “Never play the tie. Cross it out. The tie becomes a rest. If you play the tie, you will be late for the next note.” In a string of dotted eighth and sixteenth note patterns, having the group count by saying day to day to day to day is a useful tool.
When students begin instruction on the piano, strings, or percussion, it is possible to count aloud. However, wind players cannot do this, and it leads many wind players to think they are counting when they are only feeling the pulse. Counting is counting, and it is imperative that each player knows what beat he is playing so he can follow the hierarchy of the beat rule.
To help wind players learn to count numbers in their heads, use a metronome with a voice feature. This auditory reminder offers surprisingly excellent results.
Basic Musicianship Ideas
Be sure the first attack of the phrase is clean and the end of the last note is planned. Generally notes should not be stopped with the tongue. Practice tapering note ends, so you have the skills to end notes tastefully.
Follow the melodic contour of the notes. You may select whether you wish to become louder or softer at the high or low point of the phrase. The main objective is to become aware of where you are in the melody.
Melody is played louder than the accompaniment. Be sure you always know who has the melody.
An accent has two definitions; it can mean to put stress on a note or it can mean a little diminuendo (thus the shape). Do not forget the second definition.
When playing two slurred notes, the second note is played softer than the first.
Follow the composer’s directions. If there is a word you are unfamiliar with, look it up.
When entering after a rest, begin subdividing your counting so you enter at the correct speed. During the rest look ahead and place your fingers on the keys for the next note.
Always subdivide. Learning to subdivide takes practice and patience, but it is a worthy goal for everyone including the conductor.
Bowing
At the end of a piece, the conductor may ask a soloist or section to stand. Pay attention so if the conductor signals you to stand, you can do so quickly. When bowing as a large ensemble, it is now in vogue for every player to face the audience, so if you are facing the wings of the stage, you will need to turn and face the audience. The conductor will bow for the group.
Focus
A musician friend told me the first time he played in a professional orchestra he was playing second clarinet. The principal clarinetist told him to place five dimes on his stand. Each time the conductor stopped, he should ask himself “What is he going to say?” If he got the answer correctly, he could move one of the dimes to the other side of the stand. Once he knew what the conductor was going to say every time he stopped, he would be truly engaged in the rehearsal.
Concert Behavior
Before the Tuning Note
Major warming up and tuning should occur in a practice room, not on the concert hall stage. When playing on stage before a concert, play longs tones and/or scales. Do not play major solos or tutti passages from the repertoire the audience is going to hear during the concert. Playing difficult or worrisome parts repeatedly will make your audience lose confidence in your abilities. Do not noodle on concertos or solos that other ensemble members will play later in the concert. For this concert that is their repertoire and theirs alone.
Keep your warmup dynamic in the mf range. Loud piccolo or trumpet fanfares should be saved for the climax of the pieces on the concert program. Most performers should only take a cleaning cloth on stage with them. Single and double reed players may bring reed-making equipment for on the spot touchups and brass players may bring mutes and valve or slide oil.
Giving and Taking the A
The first sound the audience hears is the tuning A. Whoever gives the A (most likely the oboe) should pay critical attention to the attack of the note. Since most oboists will be using a tuner to give the A, wait to tune until the oboist lifts his eyes from the tuner signaling that the A is now ready to be taken. Tune quickly so others will be able to hear the A clearly. Tune with the type of tone and dynamic that you expect to play the first note of the piece with. Many oboists are giving the tuning A with vibrato as they have found that players tune more correctly when they do so.
* * *
Hierarchy of the Beat
• In 2/4 or 6/8: The first beat is the strongest and the second beat is weaker.
• In 3/4 or 9/8: The first beat is strong, the second beat is weak and the third beat is weakest.
• In 4/4 or 12/8 : The first beat is strong, the second weak, the third less strong than the first, and the fourth is weaker.
