
Beginning clarinetists often make rapid progress in their first year, and then the progress is halted when they reach secondary school. The reason for this, I believe, is because students are trying to play advanced literature with the same fingerings they were taught in beginning method books. Too often, clarinet students are forced to play in the top range of the clarinet without having a firm foundation in the fundamental and alternate fingerings of the chalumeau register, which includes the intonation problems found in throat range from open G4 to Bb4. There are numerous possible fingerings that will help students develop a smooth technique and better intonation in the chalumeau register. Alternate fingerings should be taught as soon as practical, before they are found in the music. Here is the method that I used while teaching in the Cassville Public Schools from 1969-1977.
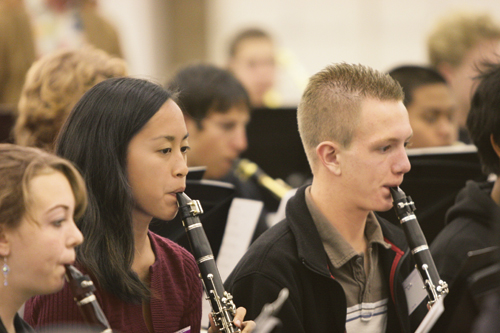
I start explaining the different fingering combinations by beginning with the lowest E. There are three different fingerings for the low E, but most fingering charts only list two. Use the left little finger in playing combinations from low E to F. This is the regular fingering for low E and the one used most often in elementary repertoire because the left E key is used in combination with the right F key.
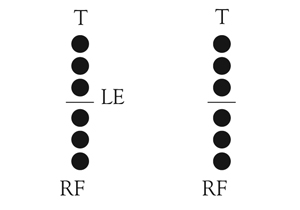
When the fingering combination is E-F#-G, use the following fingering. It is possible to play low E without holding down the low F key, and this will help students reach the F# without stretching their fingers out of place.
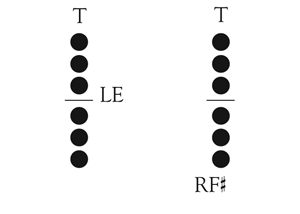
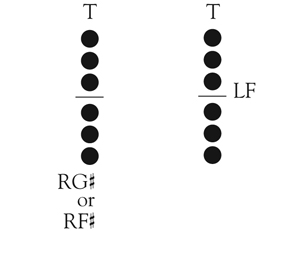
If the fingering combination is E-F#-G#, start the low E on the right side, finger low F# on the left side, and return to the G# on the right side.
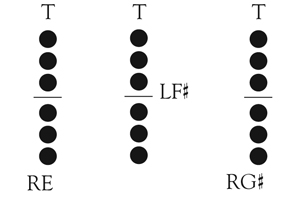
To keep students from sliding their fingers when going from low F# to F natural, or low G# to low F, start with the F# or G# fingering on the right side and go to low F on the left.
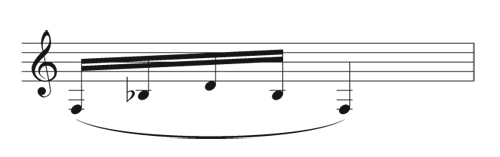
At times young clarinetists will have a fast passage as shown in figure 6 and their fingers will tend to flop all over the place. A good solution is to keep the low F key down when playing Bb-D-Bb returning to low F.
G#3, A3, Bb3, F#4, and the throat tone notes (G4 to Bb4) are some of the sharpest notes on the clarinet and I suggest that when these notes are exposed and have to be sustained the intonation can be improved by using the following fingerings.
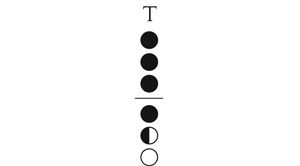
When playing low G# or low A, add the left E key to lower the pitch. The fingering for low Bb is tricky to learn and requires practice but it does help to lower the pitch of Bb. Finger low A but only use half of hole covered to lower Bb.
To lower the pitch of F#, use the following fingering. Keep the corners of the embouchure firm or the pitch will go too flat.
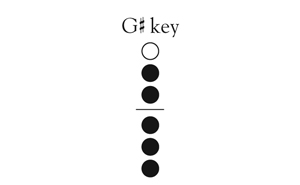
I learned this alternate fingering for the sharp open G from a student of Daniel Bonade. Keep the right hand down but add the second finger of the left hand to bring the G in tune.
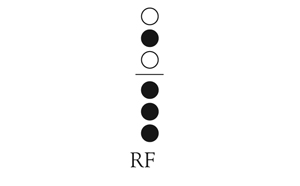
Figure 12 for G# requires the right hand down, but add the second and third fingers of the left hand with the G# key to lower the pitch.
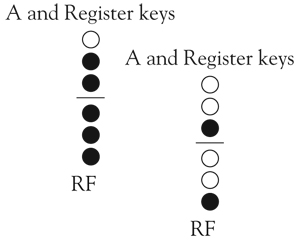
For A4, use the second and third fingers of the left hand and the second and third fingers of the right hand with the A key to lower pitch. An alternate fingering would be to use A key plus the second and third fingers of the left hand and first finger of the right hand with the B lever key.
The most troublesome note on the clarinet is the thin-sounding and often sharp Bb4. Here is another useful suggestion from Daniel Bonade is to use the register key, A key, plus second and third fingers of the left hand, plus all fingers of the right hand down with the low right-hand F key. An alternate fingering for the Bb is to use register key and A key, plus the third finger of the left hand, the third finger of the right hand, and the low F key to help lower the pitch.
The Bonade fingerings for the Bb and the open G work well in the third movement of Holst’s First Suite. The open Gs and Bbs are extremely sharp with the regular fingerings, but will come down in pitch when the alternate fingerings are used.
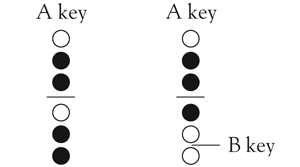
Throat tone trills are often confusing to students who do not know which of the four side keys to use on the trills. To trill from A4 to Bb4 or A# to B, use the right-side Bb key, which is the second side key from the top. To trill from A to B natural or A# to C trill right-side C key that is at the top.
To trill from low B to Bb finger low B natural with the thumb hole, first four fingers, and the B key lever with the right hand and trill the B key. Similarly, to trill from D4 to Eb4, finger D and trill the D# key lever.
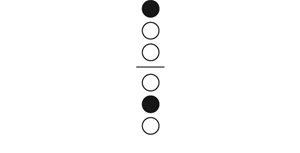
When going from low C to Eb use the side Eb key, the bottom of the four side keys.
When F# ascends upward use first finger only, but when F# descends downward use the thumb hole and the side Gb and Eb keys, the bottom two side keys. This fingering is also the trill fingering for F to F#. Students should finger the F and trill the bottom two side keys.
When going from low Bb to Eb, play Eb with the thumb hole and first finger on each hand. The same principle applies when going from low B natural to D#. Lift the second and third fingers of the left hand, and leave the right hand second finger down.
Young musicians who are struggling in the chalumeau range will have better pitch with these fingerings. In addition, having knowledge of these fingerings will allow students to be flexible with appropriate fingering when playing soli with other instruments.