From the music of Percy Grainger to that of Gordon Goodwin, ensemble directors commonly ask their talented middle school, high school, and university alto saxophone students to pick up the soprano saxophone for select literature. However, switching from alto saxophone to soprano saxophone comes with certain challenges. Here are common pitfalls to avoid.
Equipment
As with any musical instrument, have someone play-test it before purchasing. Even the top tier models of saxophones have varying intonation tendencies, air resistance, and finger height. Students with a properly functioning, high-quality instrument may be more motivated to practice than those without. As an ensemble director myself, I feel responsible to procure the best possible instruments I can for our students. Most certainly you feel the same.
If the soprano saxophone comes with a mouthpiece, check that the table of the mouthpiece is level by placing the flat portion of the mouthpiece on a plate of glass or other mechanically level object. If there is play between the mouthpiece and plate of glass, the mouthpiece may be warped or swollen and will have difficulty maintaining a proper seal. Also, be sure there are no chips, nicks, or cuts on the tip or rails of the mouthpiece.
Thin reeds will be easy to use immediately, but unfortunately the response may quickly fade. Thicker reeds might be a bit stiff and challenging for students at first but become more playable over time. When an alto saxophone student is beginning to practice the soprano saxophone, I recommend well-known brands and models: Vandoren Traditional strength 3, 3 V2, or 4; Vandoren V.12 strength 3, 3 V2, or 4; D’Addario Reserve strength 3.0, 3.0+, or 3.5; D’Addario Royal strength 3.0 or 3.5; and D’Addario Grand Concert Select strength 3.0 or 3.5.
Many saxophone teachers feel the ligature has the smallest contribution to sound quality, but having a properly functioning ligature is important. The ligature is responsible for maintaining a proper seal between the reed and mouthpiece. Selmer, Vandoren, BG, and Rovner make high-quality ligatures that are reasonably affordable and good choices for students beginning to play the soprano saxophone.
Embouchure
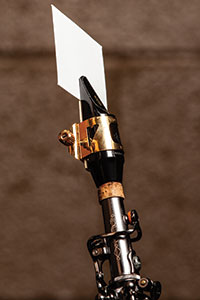
To form the embouchure, the student’s top teeth should rest on top of the mouthpiece at the location where the reed separates from the mouthpiece. Find this spot by setting up the reed, ligature, and mouthpiece and then turning the mouthpiece on its side. The player should be able to hold the mouthpiece up to the light and see the slit between the reed and mouthpiece to find where the two separate from each other. If this spot is difficult to find, carefully slide an index card, between the reed and the mouthpiece until it doesn’t go in any further. Too little mouthpiece inside the mouth can constrict or deaden the sound, while taking in too much mouthpiece can create a brittle, bright, and undesirable sound. Take care to find the correct spot to place the teeth; taking in the wrong amount of mouthpiece is one of the most common problems of saxophonists.
The student’s lower lip should be curled or rolled over the bottom teeth. The amount of lower lip varies from one saxophonist to another. Some state the general location where the lower lip separates from the facial skin should rest above the lower teeth.
When the lips and teeth are set, close the mouth, making the corners firm. There should be a somewhat equal amount of pressure around the student’s embouchure. This is often referred to as a drawstring approach or embouchure wheel, and it affords the lower lip more strength than the smile technique, in which the lower lip is less supported and spread thin.
With mouth closed, the student should place the tip of the tongue on the tip of the reed and then take a deep breath through their nose to build up air pressure behind the tongue. Release the tongue, allowing air to blow freely.
I encourage practicing this routine many times on an open C# before playing any other exercises. I would also encourage practicing this routine one note at a time from open C# down to low Bb every stage the student begins to warm up on the soprano saxophone. This simple routine will encourage proper embouchure, tonguing, and breath support, fostering a student’s long term success.

Playing Position
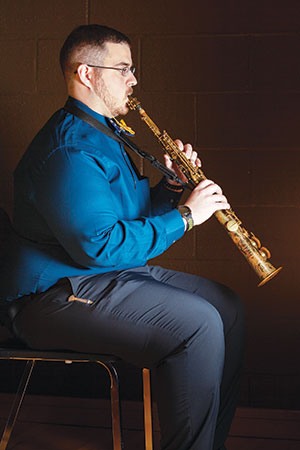
An additional pitfall for soprano saxophone novices is playing position. Improper playing position could hamper the airstream and technique, as well as foster muscle strain. Most professional saxophonists use a neckstrap when playing soprano, but not all. For the safety of the instrument, however, I would encourage all players to use a saxophone strap. When seated, most professional saxophonists position the soprano between their knees, however younger students who may have a challenge holding a soprano saxophone for longer periods of time can keep the bell of the soprano saxophone on the right knee.
Pay attention to the angle at which students hold the soprano saxophone. Young players may think of the soprano saxophone as similar to the clarinet and hold it too close to the body. Others might hold the soprano saxophone too far away from their body, which is equally troublesome. Another concern is pulling the chin too close to the body or lifting it too far up. The photo below shows a correct playing position and angle.

Finger Position
Finger technique might suffer when switching to the smaller soprano. Make sure students keep their fingers close to the keys of the saxophone so they can play rapid passages quickly and efficiently. This is especially important for the pinkies. Some students keep their pinkies far above or below the pinky keys. I recommend keeping the left pinky finger resting on the G# key or the middle of the left-hand pinky table while the right pinky finger rests on the rollers of both the Eb and low C keys.
If students are unaware of their flying fingers, record video of them playing; this will help students see the problem. For students who continue to struggle with finger technique, stick double-sided tape to the pearls of the keys, and have students play painstakingly slow full-range major scales. This will help students understand how it feels to keep the fingers close to the keys.
Sound Quality
To teach proper air support, I use a simple pinwheel toy. Have a student blow a consistent stream of air on a pinwheel, then blow an inconsistent stream of air (fast, then slow, then fast again) and compare how the pinwheel moves for each. Then record your student performing a musical phrase or scale once using what feels like proper breath support and once with what feels like inconsistent breath support. Have students listen to the recording and ask whether they can tell the difference.
Shaping the airstream with the tongue can affect sound quality as well, and different tongue positions will work best for various parts of the saxophone’s range – or even individual notes. Have the student play an open C# with good air support and then slowly shape their tongue to the vowels a, e, i, o, and u. Students should notice a slight difference in sound quality and practice reproducing it over the full range of the instrument. When performing fast passages that move between the upper and lower registers of the soprano saxophone, shape the tongue for the lower notes. If the tongue is shaped for the higher notes, the lower notes might not sound correctly.
Intonation
Intonation on the soprano saxophone can be incredibly problematic. Tuners train students to place the proverbial needle in the center. This promotes flexibility but creates two potential problems. First, students are adjusting to equal temperament although pure intervals are more desirable for a more mature ensemble sound. Also, this process employs a student’s eyes, but training the ears is more important. I recommend using commercially available tuning drones containing equal tempered tonics and pure fifths.
On the soprano saxophone, it is relatively easy to adjust for pitch problems from open C# down to low Bb. However, each saxophone make and model is different, and the octave vents on the soprano saxophone are placed where the manufacturer believes they are most effective. This creates difficulties because one octave vent is used for D5 through G#5. Acoustically the octave vent should be in the middle of each length of tube in order to correctly activate an octave where the node is. This means that one octave vent cannot work for seven different lengths of tube. Because of this, the upper register tends to be more problematic than the lower.
Perhaps the most problematic intonation concern on the soprano saxophone are the upper register palm keys. Most tend to be flat, especially if a lighter reed or stronger airstream is used. My first recommendation would be to try a slightly harder reed. The response will be more challenging for the player at first, but the palm key intonation may be noticeably better.
If a palm key note is unusually sharp, have students train themselves to open that palm key only two thirds of the way – or even halfway. Another option is to add the left-hand B or C key to slightly lower the pitch. If a particular palm key note is quite flat, have your student try different palm key fingerings and see what works best, such as using the Eb palm key for high D or palm key D and the right-hand high E key for high Eb. If your student still struggles, have a professional repairman open up the palm keys.
Tongue/Finger Coordination
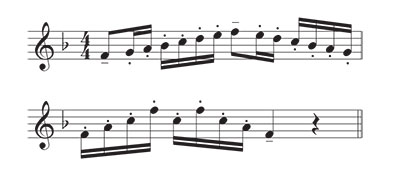
One final pitfall when picking up the soprano saxophone is tongue and finger coordination. The keys or pads on a soprano saxophone are closer to the body of the instrument than on the alto saxophone. The shape of the tongue and distance of the tongue from the tip of the mouthpiece is also different. One of the best ways to improve tongue and finger coordination is to practice articulated major scales and arpeggios in every key throughout the entire range of the instrument. Here is a pattern I use:

I begin in F major at quarter note = 56 and ascend by half steps, moving from F the top of the instrument. Once reaching the top of the instrument, I descend by half steps from the highest F# major scale to the bottom of the range, then back up to the F scale I started with. When the exercise is comfortable, increase the tempo to quarter note = 60, and increase it an additional four beats per minute every time the exercise becomes easy.
Conclusion
Switching from alto saxophone to soprano saxophone comes with challenges, but watching for the most common pitfalls can make the switch easier on everyone.
Classical Soprano Saxophone: Branford Marsalis, Amy Dickson, John Harle, Claude Delangle, Eugene Rousseau, Kenneth Tse, Joel Versavaud, and Stathis Mavrommatis are good names to begin with. Introduce younger saxophonists to Marsalis’s album Romances for Saxophone as soon as possible.
Jazz Soprano Saxophone: Start with Grover Washington Jr., Sidney Bechet, Kenny G., Dave Liebman, John Coltrane, Steve Lacy, Lucky Thompson, Jane Ira Bloom, and Wayne Shorter. Introduce younger jazz soprano saxophone students to Washington’s album Love Songs with Come Morning, East River Drive, Cassie’s Theme, and In the Name of Love.
Saxophone Quartets: Prism, H2 Saxophone Quartet, Quatour de Saxophones Marcel Mule, New Century Saxophone Quartet, American Saxophone Quartet, New York Saxophone Quartet, World Saxophone Quartet, and Rascher Saxophone Quartet.


