
Now that marching band season is over and rehearsals have moved inside, it is worth taking the time to review with flutists the difference between the two types of performance.
COA – Clean, Oil, and Adjust
Most flutists play the same instrument for marching band and concert band, and it may need some attention. It has been jiggled around while marching and traveling and been subjected to the elements including dust and rain. An experienced technician can clean the flute of all tarnish and fingerprints, change the oil, adjust the screws and springs, and shim the pads. In some cases, they will also remove dents. Most COA’s also include replacing the cork. All of these things are necessary for a flute to sing again. A typical COA costs several hundred dollars because it takes a few hours to perform these tasks. Every three to five years, the flute needs to be overhauled.
Checking the Cork Assembly
If a student does not have a COA on the flute, then check the headjoint cork placement with the cleaning rod. The jiggling of the instrument while marching often displaces the cork. It is easy to check the cork placement since each cleaning rod has a line on one end. When inserted into the headjoint, the line should appear in the center of the embouchure hole. If it is not in the center, then the overall instrument is not in tune with itself. A repair technician can quickly adjust the cork position. It is a simple fix that you can learn and do yourself though.
Pull Out
To begin with, the headjoint is pulled out from the body about ¼ inch. Have students use a ruler to check this amount. Then with a sharpie, mark this placement. I also like to mark the alignment of the relationship of the headjoint and the body with several marks with the same sharpie. The final goal is to have the embouchure hole level and the keys level when playing. Proper adjustment makes this easier to achieve. Adjust the footjoint to accommodate the length of each player’s little finger.
If all flutes in the section are the same length (headjoint cork placement is the same and the headjoint pulled), intonation should improve.
Stance and Sitting
For flutists and other instruments that are played off to the side, there are several important issues to review. In marching band, the feet are side by side, but when playing standing or sitting in concert band, the left foot is placed pointing to 12:00 and the right at 2:30. The center of the player’s torso is no longer facing straight ahead, but is positioned 45 degrees to the right. When sitting in a chair, the chair is turned 45 degrees to the right for this accommodation. Ideally, for flutists, it is best to have a music stand for each player. If this is not possible, then there should be no more than two players to a music stand. Flutists simply take much more room than instrumentalists who play with their instrument in front of them like the oboe, clarinet, or trumpet. Ophthalmologists suggest placing the music at a distance of about 30 inches. The flute is 28 inches long, so may be used as a guide.
.jpg)
Angle of Flute
During marching band, the flute is held parallel to the shoulders, and the end is held parallel to the field. In concert band, the end of the flute is slightly lower and is pushed forward often to the point where the end of the flute is in front of the player’s nose and right ear. This means the flute is not equally placed in the chin but is placed more on the player’s left side of the chin, and the flute angles away from the right shoulder.
.jpg)
Shoulders and Flute Placement
The reason for this placement has to do with the evolution of the embouchure hole. Many flutes made before 1850 had an embouchure hole that was circular in shape. With the work of Theobald Boehm and others in the next 150 plus years, the embouchure hole has morphed into a unique design. While the riser or chimney is still relatively the same, the cut of the embouchure hole has evolved tremendously. Since the 1980s, specialists who only make headjoints have created innovations including under and upper cutting with a scalpel on the riser and embouchure plate. Each headjoint is slightly different, and it is up to players to find the sweet spot of each instrument.
This reshaping of the embouchure hole means that the player angles the flute more away from the right shoulder (no longer parallel) to find the ring in the instrument’s sound. A good project would be to have all the flutists in the section compare their flutes’ embouchure holes. Generally, a smaller hole means that there is more agility in playing, and a larger embouchure hole offers a bigger sound, so selecting a headjoint becomes a compromise situation. As an aside, the embouchure hole should be no larger than the players natural aperture (the opening in the lips). In recent times, several manufacturers have made unusually large embou-chure holes that are difficult to control in all types of passages.
Head
During marching season, a player’s head is often held high for appearance reasons. In concert band, make sure that the tallest part of the head is at the back of the part in the hair. This balances the head on the spine and prevents the instrumentalist from becoming injured. To find this optimum position, have students nod a few times. They should play flute with the head positioned at the bottom of a very small nod.
Panic Time
For many students the end of marching season marks the beginning of district, regional and all-state auditions. During marching season, flutists have most likely played the same music for several months with an outdoor sound. Now that audition season is beginning, they need to find an indoor sound and learn new music. For some students this may occur within a month’s time, which may cause some mental stress. Unfortunately, students tend to work only on the audition materials and omit working on fundamentals. This is a mistake. The best thing they can do to be successful is to work on the basic fundamentals of flute playing.
Headjoint Work
Playing on the headjoint alone allows flutists to focus on the element of blowing. Have students hold the headjoint at the end with the thumbs and index fingers and with a level embouchure hole. They should play a string of quarter notes listening for the attack and quality of the tone. The beginnings of the notes should be clean with no chipping. Have them listen carefully to develop a good attack. If the tone lacks core and is fuzzy, then ask them to stand with their feet at 12:00 (left)/2:30 (right) and then direct the air towards their left big toe while keeping the embouchure hole level. This is what many teachers call blowing down. Notice that only the air stream is directed down, and the head remains in the small nod position. This will focus most tones immediately.
Right Hand on the Barrel
Playing with the right hand on the barrel places the embouchure plate firmly in the chin. Ask students to play the following scale: G2, A2, B2, C3 beginning in the second or middle octave and then continue with the same fingering sequence while over-blowing to the third harmonic partial or D3, E3, F#3, G3. Practicing this scale slurred produces marvelous tonal benefits.
Nine-Note Scales
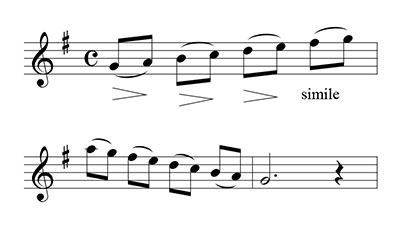
When working with the flute section only, the goal is to play all scales two octaves; however, in a band situation with all of the instruments, nine-note scales are preferred by many directors. Practice the following rhythmic patterns, concentrating on each note to be perfectly centered and focused. Listen carefully for clean attacks and following the dynamics precisely.
These two patterns are the key to musical phrasing. The first (slur by 2s, strong/weak or down/up) is called the sigh figure. Its origins were in the Renaissance when composers used text painting in their writing. Words like sing-ing, lov-ing, May-ing were written as two-note slurs to imitate softness of the second syllable.
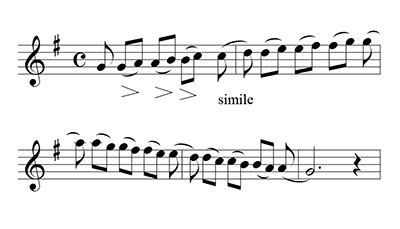
The second scale pattern is also slurred by twos only rather than going from a strong beat to a weak beat, it is reversed. The two-note slur begins on a weak beat going to a strong beat. In both cases the two-note slur is played more/less.
Make a Melody Book
Many flutists use Marcel Moyse’s 24 Little Melodic Studies with Variations (Easy) and 25 Melodious Studies with Variations (Moderate difficult) in their daily practice to develop expressive phrasing. Both are published by Leduc. While these books are quite beneficial, a book of favorite melodies that a flutist collects and transcribes into a melody book may resonate more to each individual student. The melodies might include favorite Christmas carols or songs they enjoy listening to. Some students also include favorite passages from their band and orchestra music. The important thing is that students play something they love and that they try each day to play it more musically.
Audition Deadline
As the audition deadline comes closer, have students record the audition materials daily. A cell phone is excellent for this type of recording. For the first few recordings, listen with the student pointing out the good things that are happening and then what needs to be improved. Their ears will not be as critical as yours, so you can help them develop active listening skills. For many just the idea of recording something makes them nervous. Daily recording can help overcome this fear.
For mountain and valley shapes, tell students to play to the high or low note. Listen for a continuous vibrato, not one that stops and starts again when changing a fingering.
For going up and coming down the choice is forte to piano or piano to forte. Melodic shaping with the use of dynamics makes music more interesting.
2. Write in the breath marks. Learn to play the melody breathing in the same place each time.
3. Clean attacks with no chipping of the notes are the goal.
4. Play articulation patterns exactly as written.
5. Consider vibrato speed and width. If the melody is quite fast in tempo the vibrato speed is faster than when playing slow melodies.
6. Use a tuner to check pitches of all the notes. This will help students learn the pitch tendencies of the instrument.
7. For rhythmic accuracy, fill in the background of each beat with articulated sixteenths. This helps students learn to subdivide.
8. Play the melody an octave higher or lower. Notice how the character may change due to the register it is written in.
9. Some students may be able to take the melody and transpose it up a half-step. This is good practice for the ear and also shows the benefits of knowing one’s scales.