The oboe is known as “the ill wind that no one blows good.” There’s no question that it is a challenging instrument, but how did it earn such a dismal description? After spending a career with the oboe, I see clearly that it is the number of finicky components that we juggle. It is more of a moving target than most other instruments as the components of instrument, reed, and human are constantly shifting under our literal fingertips. We have a wooden or plastic instrument with fine key work, and screws that are often going out of adjustment due to weather fluctuations. Performances, despite hours of practice, rely on tiny mouthpieces carved ever so delicately out of literal swamp grass, and each one only lasts for only a couple rehearsals or practice sessions. Last but not least, when students are still in the learning process of the instrument, it is easy to fall into the habit of changing the physical approach in reaction to the daily state of the oboe and reeds. How do oboists ever expect to find consistency and a solid foundation amidst all of this chaos?
Over the years I have taught many beginning oboists, but I have also worked extensively with young professionals who are college-aged and beyond. This dichotomy of varied abilities has granted me the opportunity to observe the threads of problems that often start with beginners and, that left unchecked, become hurdles for more advanced players. This article will focus on smoothing the trajectory from beginner to advanced oboist, and offer guidance in bypassing a few of the most common pitfalls before they become ingrained habits.
Starting at the Top:
The balance of the oboe reed is as important as the instrument itself. Stable and functional reeds are a major part of successful learning as they determine response, sound, intonation, flexibility and the ability to establish a concept of air/embouchure balance, an important pillar of wind playing. I have found that even the least experienced students seem to have a concept of how they would like to sound, or at least know what sounds bad. If the oboe and reed set up sounds far from desirous, students often contort physically to get closer to that desired sound. Physical contortion is where bad habits are born.
As an example, students often play with their heads down and oboes up to tame unstable or too-open reeds, thereby biting, shrouding vibrations, and choking off a free airstream. With equipment stability, students feel no lack of control when they hold the oboe at the angle at which it balances with the right-hand thumb rest, and they blow over the reed, releasing vibrations and encouraging a fluid airstream. With the embouchure out of the way, endurance improves drastically, and students are free to explore the many colors that can be accessed by allowing the instrument to vibrate. The formation of a strong and flexible embouchure with powerful endurance is a result of the equipment carrying its share of the load. I always tell students that I expect my equipment to carry 98% of the load of stability so that I am free to be musically creative.
Students must have access to balanced reeds from the start of study. I strongly recommend that any beginning oboist study with a teacher and, if possible, one who makes and supplies reeds. While it can be tempting to start a beginner on longer-lasting and nearly-unbreakable fibercane reeds, the lack of refinement of sound will have lasting effects on the student’s long-term playing. If it is not possible for a student to get reeds from their teacher, I recommend ordering high-quality reeds online. (A list of a several resources is a available at the end of the article.)
People vary in body size, lip shape, and sinus cavities. A reed that feels excellent to one person may not fit another and will need to be adjusted. Students will need to try a few different types of reeds before finding one that feels best.
I recommend that students have at least three reeds of varying ages (and others on order) in their case at all times, since they break and change with the weather and shifts in humidity. Beginners will likely break many reeds, but that should not be a deterrent to seeking out top-quality reeds – which do tend to be more expensive and delicate.
The process of reed making begins as soon as I feel students have an understanding of what result they like, have established a good balance of air and embouchure, and can be responsible with sharp objects. This is a long process best learned when not under pressure, so starting early allows time to solidify the steps and for the whole process to settle into a natural routine.
The Oboe
Beginner oboists should have a good-quality instrument with a full conservatory system of keys. There are many student oboes offered on the market that are lacking significant keys: left F keys, low Bb keys, split D-ring keys, forked-F and Bb resonance keys, trill keys, etc. There are other ways to bypass those fingerings and still play the notes, but the result of missing keys will be faulty technique that will have to be corrected once the student switches to a full conservatory system.
It is also important to know when shopping for instruments that oboes, unlike instruments like violins, trumpets, and flutes, do blow out. While a 30-year-old instrument may provide the full conservatory system at a lower price point, the oboe may well be past its prime. Blown-out instruments are more challenging to play in tune regardless of reed quality, and students will quickly hit a ceiling on such an instrument. I recommend that students who are considering a used nistrument, buy something five years old or less.
Some brands of oboe with a full conservatory system that I consider excellent for beginners include: Lorée (there are many used ones on the market), Cabart (Lorée’s student model), Fox 450 (wood), and Fox 300 (resin, but with full conservatory). Students should have their teacher help pick out the instrument or have a professional player test the oboe thoroughly before purchasing.
Beginning Students
Once a solid set-up of oboe and reed has been established, a teacher can put full focus on the student with a fair expectation of developing consistency. Students should also be taught that even when (not if – it is the oboe after all) something goes awry with equipment, they should resist contorting their physical approach. I always tell my students that they are playing the oboe – not the other way around.
Important pillars of playing include:
• Formation of the embouchure
• Hand position
• Articulation
• Air and embouchure balance
• The angle at which the instrument is held
• A good posture that promotes excellent support through use of the full air column
Teachers should always explain the why behind the do, so students know what they are pursuing in each exercise and can link the physical feeling to the desired outcome.
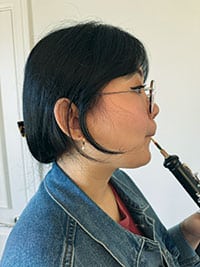
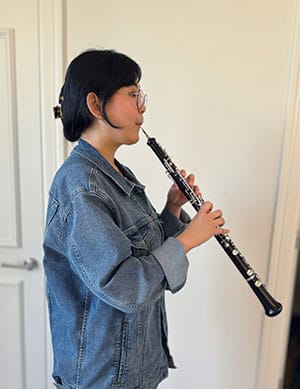
The embouchure will fall into place quickly with a stable set-up, as the physical requirements fall easily within the natural use of the human mouth and jaw. It is not an easy subject to write about in detailed description and without any knowledge of equipment, but a general description for a starting point is: place the reed on the lower lip, roll the lower lip in, bring corners in like you’re saying “O”, then bring the top lip down. Everyone is different physically so this will vary, but a rule of thumb is that as little reed as is possible should be placed in the mouth, with the concept being that the player will roll the embouchure out towards the tip for the low register, and further in towards the reed thread for the high and extreme high registers. (See below for some examples of a well-established embouchure.)
A Well-Established Oboe Embouchure

Hand position should be relaxed, and fingers should glide over the keys – never grabbing or squeezing. If the oboe is in good adjustment, there should be no need for heavy finger pressure. The right hand thumb and forefinger should form a backwards C while engaged with the thumb rest and F# key. The half hole technique may take some time to establish, but creating an exercise that reviews that motion will solidify it pretty quickly. Make sure that the left-hand pointer finger slides rather than rolls to perfect this technique. Fingers themselves should not be straight or locked. Think of loose rubber bands that are completely free of tension.
Articulation should be explained in several categories. I always start with showing where on the tongue the reed should contact (slightly above the tip). Have students play a few notes and then stick their tongue out with reed on it to make sure it is contacting the correct place.
After that, introduce the process of starting a note beautifully: breathe through the mouth, set the embouchure on the reed, place the tongue against the reed, establish the correct air/embouchure balance for the note that is about to be played, and then pull the tongue back from the reed. It is also good to introduce articulating on the wind, which is easiest to demonstrate by comparing it to the articulation of human speech. Tongue (speak) on a solid airstream, touching but not breaking through the air in the process.
The air column should be without constraint, so good posture is extremely important. Remind students often that the oboe should come to them rather than them bending to the oboe. Playing the oboe requires involvement of the full upper body.
The oboe is held at an angle, where it balances perfectly on the thumb rest. Bringing the oboe to the player results in excellent posture.
Another subject I feel strongly about regarding the airstream is that students should not be introduced to vibrato before they have had the time and experience to truly establish a well-supported airstream. Vibrato needs to fit within the sound, which isn’t possible if students are not supporting consistently.
Air/Embouchure Balance
For the past few years, I have asked every student who has walked through my studio door why we practice long tones, an exercise that I think encapsulates everything important to oboe playing. Out of dozens of students, I have gotten perhaps two somewhat correct answers, and a lot of puzzled looks. The physical knowledge is key to the success of the exercise: the oboe is an ongoing study of air/embouchure balance, and long tones are a study of that. They take us from a niente attack to the oboe’s loudest dynamic, and then back down to niente again. Pitch should not fluctuate, crescendo and diminuendo should be metronomically measured, and attacks and note endings should be beautifully controlled. It is all about the embouchure/air relationship.

While the perfection of this exercise may be a tall order for beginning oboists, the concept of this ongoing balance is one that should be imparted at the beginning of study and reminded often, so that students never forget the significance of the airstream. There are many beginning (and even advanced) oboists who bite their reeds for control rather than using their air. It is easy to fall into that trap.
The oboe is a difficult instrument, but success in teaching students lies in reducing the many inconsistencies the the oboe naturally brings to the table. This allows students to become the main focus for teachers as they help them develop a solid foundation.
Online Reed Resources
RDG Woodwinds: www.rdgwoodwinds.com
Bocal Majority: www.bocalmajoritystore.com
Wildflower Reeds: www.wildflowerreeds.com