
When I listen to a flutist play, the first thing I hear is the sound. Next I observe the rhythmic organization, musicianship and general presentation of the performer. This evaluation occurs in the first few seconds of the performance or lesson. I am confident that most teachers and competition adjudicators have a similar rubric. Just knowing that a rubric exists should help us set priorities for our practice plan.
Sound And Balance
Because sound is the number one topic on my personal rubric, I start with the topic of sound in my practice. First I check the list of things that I can control in my flute performance. (See the side box for specifics of what you can control each time you play.) Next I check the angle/speed of the air, the size of the oral cavity, and the separation of the vocal folds to insure that I am on the correct path. It took me years to realize how important it was to have the flute well-balanced in my hands. If the flute was not balanced equally between my hands, there was no way to control the timbre or color from one note to the next. Two octave scales were a disaster, no matter how great my air control was. This uncontrolled balance meant that some notes were clear and ringing while others were airy and unfocused.
This type of playing does not lead to an exciting performance for the audience. I decided that if I could find good balance at the beginning of the practice session each day, my tone would be consistently good. To check for balance I used my ears and also a mirror. If my elbows and hands were still and all fingering movement came from the knuckles, then I was on my way to better balance and control.
Control of the balance not only improves the tone quality but it also develops better pitch control. This article explores some thoughts and exercises about how to develope good balance.
Five-Note Patterns
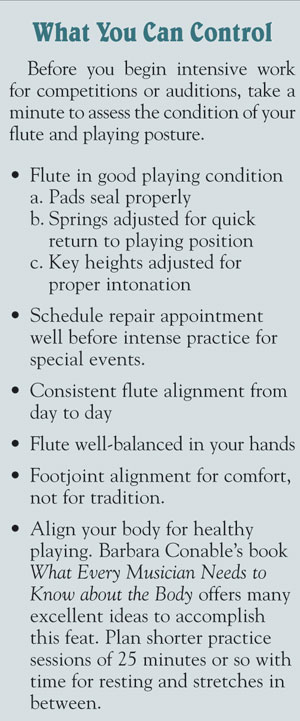
Practicing the first five notes of a major or minor scale slowly provides enormous benefits in terms of learning to balance the flute in your hands. Each key has its own unique balance point. One of the most difficult keys to play well is A major. Natural problems occur between B and C#, C# and D, and D and E. The five note pattern in the key of A major is: A, B, C#, D, E, D, C#, B, A.
Play this pattern while looking in the mirror. As you ascend from the B to the C#, check to see whether there is any movement in the left wrist or arm. If there is, that is a sign that the flute is resting on the left hand thumb, not just above the left index knuckle, which is where it ought to rest. When the flute rests on the left-hand thumb, it must roll out (away from you) in order for you to open the thumb key.
Learning to trill from B to C in the first and second octaves without any left wrist or arm movement help stabilize the balance. Remember, the left hand thumb should be straight and pointing to the ceiling. The bottom of the thumb key should touch close to the first knuckle of the left thumb. Many flutists touch the thumb key with the tip of the left thumb, but this incorrect position forces the left wrist to bend outwardly away from the flute and eventually causes pain.
Playing from C# to D poses similar problems. The flute is heavier on the side nearest you because of the long rods that run the length of the body. If the flute is not balanced well above the left index knuckle, it will roll in towards you when you finger C#. A perfectly balanced flute avoids the tendancy to roll in, and the pitch/timbre of the C# improves greatly.
Flutists also develop movement in the right arm and elbow when moving from second octave D to second octave E. The exchange of the right-hand third and fourth fingers is challenging, even for the most experienced playerth, particularly when they use the correct fingering for D.
To learn how to clearly and articulately achieve this movement without additional movement in the right arm or elbow, practice in front of a mirror. Setting the right hand differently may improve this situation. Try placing the second finger (middle finger) on the E key and then place the remaining fingers into position. Setting the balance of the hand centered around the E finger is beneficial for most flutists. If the right-hand thumb is placed too high on the back of the flute, the right hand notes will not be even. Experiment with varying thumb placement for different passages. One of my colleagues, Dr. Susan Fain, has found that placing the right-hand thumb lower on the flute helps with the fingering of footjoint notes.
All finger movement should occur at the third joint back from the nail (the hand joint). The only exception to this is the left index finger, which moves at the second joint because the flute is resting just above the third knuckle. Gently curved fingers work more efficiently than super arched ones. Practice trills using each finger to develop a light touch. Practice in a mirror or video yourself to check for unwanted motion.
Changing Stacks
Repair people refer to the keys of the right hand as the lower or south stack and the keys of the left hand as the upper or north stack. Passages that require moving from the lower stack to the upper stack or vce versa are a challenge. When playing five-note patterns or scales throughout the range, you may hear a bump or fluctuation of the sound when moving from one stack to another.
The first occurrence of this is playing from a first octave B flat, B, C or C# to a second octave D or E flat. The B flat, B, C, and C# are all upper-stack notes while the D and E flat are lower stack notes. Unfortunately, most beginning band methods require that beginners play B flat to D or C to D within the first few pages. This is one of the most difficult fingerings on the flute, and in a perfect world it should be postponed until students have articulation and sound control.
The second occurrence of this problem deals will playing F to G and E to G. If players hold the flute mostly with the right hand or the left hand, there will be a bump in the scale with a change of timbre and uncontrolled intonation.
The balance point of a flute with a C foot is about where the flute is balanced on the left index finger knuckle. With a B foot the balance point is slightly toward the footjoint end of the flute. The right hand helps steady this balance point. When players balance the flute too much with the right hand or the left, scales sound uneven and out of tune as they shift the flute’s weight from one hand to the other. The trick is to become “handed.” To do this, hold the flute overhead while fingering a third-octave Eb; then bring the flute down into playing position.
Trills For Balance
Once again, practicing trills develops balance of the flute. Trills and tremelos from second octave F to G, E to G, and D to A will solve the lower to upper stack problem. Exercises that require the flutist to rotate from the first octave B flat, B, C, C# to a second octave D or E flat improve the switch from the upper stack to lower stack. Practicing slow scales in thirds is beneficial for developing excellent balance and light, articulate fingers. On repetitions play each third rotation several times before moving on. Check your progress in the mirror.
Uneven For Evenness
When confronted with an ascending run of an uneven numbered group of notes, we have taught students to create small groups within the whole. If the run contains five notes, then group the run by two notes and three notes or a 2+3. If the run contains seven notes, then group the run either as a 3+4 or a 2+2+3, depending on the placement of the intervallic skips. If the run contains nine notes, group 3+3+3 or 4+5. Experiment to discover the best solution for individual passages. The basic rule is to group using small numbers before large numbers.
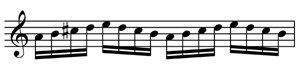
Another solution, which in my opinion provides better results, is to group the notes in relationship to where the notes change from the upper stack to lower stack. For example, play a G-major scale starting in the low octave. The first four notes (G, A, B, C) are upper stack notes. The first note of the lower stack notes is the fifth note of the scale or a D. Slightly linger on the D as you play the scale and observe how much more smoothly the scale sounds. The time of this linger should be about the same is if you are “high 5-ing” a friend. In my studio we simply say: high 5 the D.
This grouping of the G-major scale, played in 16ths, could be 4+7+high 5 the next D etc. The rule is to always high-5 the first note of the lower stack or the first fingering in the upper stack third-octave note when approaching from a lower note. Once again, experiment to find the best solution. Each group of notes offers a different set of challenges. There is no one answer.
While this feels as though you are playing unevenly, to a listener, the scale sounds even. Studies have analyzed how violinists perform elaborate runs in concerti. Passages were digitally slowed down so the listeners could hear the note groupings. The overall conclusion was that the most controlled uneven playing, produced the most seemingly even results. Working in this way maintains a clean, well-executed run of notes, which sounds cleaner and more even than a run of messy notes that are out-of-control.
Balance Of The Hand
In your daily warmup routine of scales, scales in thirds, arpeggios, and seventh chords, experiment with which key to begin with. For years, I always started in the key of C and then progressed around the circle of fifths to the left, the flat side. Starting in the key of C displaces the right-hand pinky from the hand’s natural position, so a few months ago, I began starting my daily routine in the key of F and played the key of C last.
I was pleasantly surprised at how much better my hands were balanced by starting in F. By the time I had practiced around the circle of fifths and approached the key of C, I was in control of the balance of the flute, and the key of C was easier and sounded better than ever before.
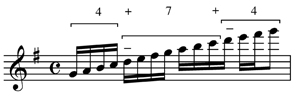
I also wrote an exercise called “Gruppetto” scales, which has become a staple in my warmup routine. The exercise consists of a gruppetto (Italian for a group of notes) placed on each note of an ascending two octave scale. Playing repeated gruppettos truly balances the hand.
Developing a truly balanced flute will take any flutist’s playing to a higher proficency level. What is truly remarkable, however, is that learning to balance the flute improves even the most advanced flutist’s playing.


