Flutists spend a lot of practice time trying to make passages sound smooth. This is an admirable task because everyone likes to listen to a difficult passage navigated with ease and grace. The practice method most often employed to achieve this is repetition – playing it again and again. A better solution is to analyze the type of difficulty that is presented and utilize specific practice techniques to solve the issue.
In playing any interval, there are two things to consider: the air stream and the fingerings. The first step in playing smoothly is to separate the air steam from the fingers. Thinking of them as two different systems helps many flutists. To demonstrate this separation, have the student finger a middle octave G with the right hand on the barrel. The teacher stands to the right back side of the student and holds the end of the footjoint with the right hand to steady the flute. Then while the student is blowing the G, the teacher lowers the F key. Every student I have tried this with has been surprised at the ease of making this slurred connection. This effect should happen with every interval.
Air Speed
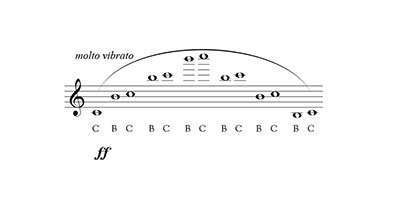
Joseph Mariano, flute professor emeritus at the Eastman School of Music, warmed up with the following exercise. It was played slowly, loudly and with an enormous vibrato.

He stretched the intervals as if stretching a rubber band to the point of breaking. It was the first thing he played in the morning before orchestra rehearsals. After I heard him play it the first time, I knew that he was getting the air moving. A constant air stream is necessary to play smooth and articulated passages. Mariano was famous for his comments: “Play on the air.” “Tongue on the air.” The air is the system used to move through notes.
Mariano also advocated setting the embouchure not for the starting note of a passage, but for a higher second octave note. (This is interesting because Marcel Moyse used the second octave B for his starting point in the De La Sonorite, p. 6). Mariano said, “You can play low octave notes on a high octave embouchure setting, but not high notes on a low octave setting.” With experimentation you will find many intervals are easier to navigate if the embouchure is simply set for a higher note.
Playing Out of Time
William Kincaid suggested that when playing an interval larger than a fourth to slightly lengthen the note before the skip. He also advocated changing the embouchure to favor the next note while still on the first note. He said sometimes he increased the vibrato speed on the note before the intervallic skip. These are excellent ideas, and with experimentation flutists will figure which concept works best for specific passages. Generally, in skipping to a higher note, make the aperture smaller and in skipping to a lower note, make the aperture larger.
.jpg)
Scales or Small Intervals:
Whole- and Half-Steps
These are the easiest intervals to conquer because they are the ones where the fewest fingers move to change the pitch. However, the setup of the notes on the flute pose some problems that many flutists never consider.
My first teacher was the legendary Frances Blaisdell who was one of the first flute female soloists and orchestral players in the United States. Time after time as I struggled with a passage, she stopped me and put a small line before a note in a run and said, “Try it again.” It was always perfect after that. I asked her how she knew where to put the line, and she said, “Experience.” Since I had little experience, I thought about the reasoning of where these lines were placed in relationship to the fingerings. Here is what I discovered.
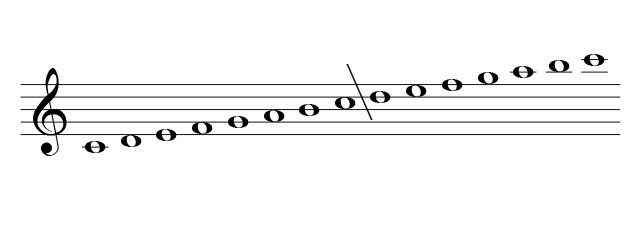
Set your flute on a table with the headjoint to the left and footjoint to the right. Start with low C and notice that all of the fingerings for a C major scale start at the right and proceed to the left by lifting a finger until reaching the second octave C. At this point, the fingerings move back to the right and begin again. It is at the point where the fingering changes direction that the small line is placed. The small line slows the flutist’s reading just enough to make the fingering connection. Look at the following C major two-octave scale with the lines placed where the fingering changes direction.

Obviously where the lines are placed will be determined by the scale being played. A good studio exercise is to hand out a page of one octave scales and have students place the line in the appropriate places.

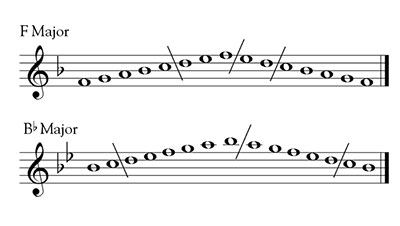
One time Michel Debost and I were talking pedagogy. I drew the following on a napkin and asked him what he thought it meant.

In just a few minutes he said, “It’s a G major scale.” I had asked this question to many flutists through the years, but he was the first to get it right. Accomplished flutists think about flute fingerings similarily to how string players think about the fingerboard. It is mapped out in their minds. Mapping the fingerings for many passages is the way to conquer them.

When playing scale like passages at a slow tempo, it is imperative to subdivide. Set the metronome to tick the background beat for accuracy. Also, use a mirror to study your hand position to be sure that the fingers are being used economically and articulately.
Larger Intervals
When playing thirds, at least two fingers will move to achieve the next note. (More fingers move as you progress over the bridge from the first octave to the second). This is where coordination comes into play. When ascending, the fingers closest to the top (or crown end) of the flute will move a bit more quickly than the fingers close to the footjoint. Conversely when descending, the fingers closer to the footjoint will move first. The goal is to eliminate any extra notes from sounding that are not written on the page. For example, when playing from an E to a G in the second octave, it is possible to hear the F, if the fingers are not moving correctly. So, when lifting the right-hand two fingers, lift the F slightly before or exactly with the E. Each interval should be examined, and the movement planned if all is to be clean and smooth. Practicing a tremolo between any two notes of a wider interval helps develop coordination.
Filling In
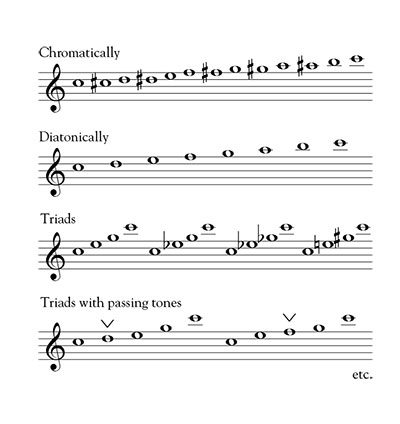
I had the privilege of interviewing Robert Willoughby a few years before his death. I told him I could always tell if a flutist had studied with him because they play seamless slurs. He smiled and said, “Yes, I worked very hard on that.” What did he do? He filled in the interval so the flutist knew exactly where the goal note was. The following shows how he worked the interval of an octave.

Playing smoothly is something all flutists should continue practicing throughout their careers. After analyzing a passage, having some practice techniques to apply will save hours of doing it again and again and again.


