
.jpg)
Andersen etudes were the cornerstone of Harold Bennett’s teaching. He believed that every serious flute student should study Opuses 33, 30, 15 and 63. (Each opus contains 24 etudes, one written in each major and minor key.) Opus 33 is the foundation, as each etude is short, concise, and can be repeated in many different ways. They are just challenging enough technically to warrant concentration, but not all-consuming, so other musical aspects can simultaneously be considered. Each etude deals with different musical and technical challenges that flutists should overcome to control the instrument and perform musically.
During the early 1960s Jack Furlong, who was one of Bennett’s recording studio colleagues and also his student, commissioned him to record a lecture and demonstration of Opus 33. It was not intended for commercial use. However, after Bennett’s passing, this recording was made available in a limited quantity on a 33 1/3 LP record album. I have taken quotes from this album, not only to supplement my memory of intensely studying these etudes with him, but also to capture his down-to-earth personality and method of relaying profound concepts in simple terms.
After 40 years of teaching these etudes at the university level, I have supplemented Bennett’s approach with my own ideas as well. (HB in the text refers to Bennett’s comments, and JB to my ideas.) This has metamorphosed into a combined approach to Andersen’s Opus 33.
The main idea is to thoroughly dissect each etude and get as much benefit as possible from each one. A few general guidelines are:
1. Perform finger exercises on fragments of each phrase. Start each fragment slowly and repeat, while gradually accelerating until a smooth evenness is reached at a fast yet controllable tempo. Repeat each fragment in all octaves possible.
2. Using a metronome for the rest of the practice session, play the etude three times (ff, mf and pp) slurred. Do not leave any notes out or add any rests in which to breathe.
3. Articulation practice: play the etude staccato with air pulsations only (no tongue); play the etude with single-tongued staccato added to the air pulsations; play with all Kahs (the weaker double-tongued syllable); play double tongued (Tah-Kah).
4. Play the etude as written, with the dynamics, articulations and all repeats and da capo markings.
5. Breathe in the most musical places according to Andersen’s phrase construction.
6. JB: I have students play each previously studied etude at least once before concentrating on the etude currently assigned. After studying an etude intensely for a week, playing it once per day keeps it under the fingers and continuing to improve. Once a student has reached the half-way point and beyond, the previously studied etudes can be divided up. For example, before practicing etude 13, play etudes 1-6, then 7-12 at the following practice session.
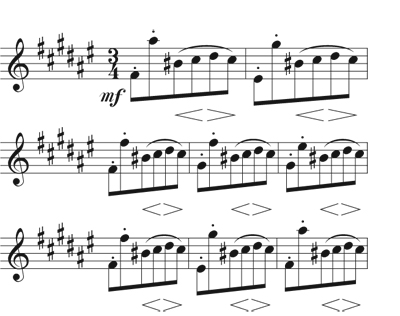
Etude 1
HB: “Finger exercises in etude #1 are two-beat fragments. Repeat the fragments slowly and when the tone and evenness of rhythm are established, begin speeding up the repetitions. Play the finger exercises slurred and double tongued in all octaves possible.”
JB: Practice finger exercises the first 5 or 10 minutes. Start the next practice session where you left off. Practice the most difficult finger exercises daily.
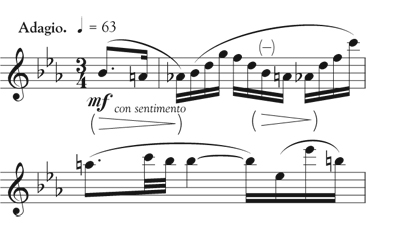
HB: “Breathe every two bars. When breathing on the bar line, rush the last four notes before the breath a tiny bit to create a breathing space. Make certain the proceeding downbeat is not late.”
JB: This idea of creating a breathing space is very subtle and with practice will become almost imperceptible. Bennett’s idea of always playing these etudes with a metronome forces the students to conserve air, breathe quickly and efficiently, and work through the suffocation stage. To maintain the dynamic level, crescendo slightly when descending into the low octave.
.jpg)
Six bars after the first second ending, the word cresc. is written. Many students tend to forget to continue the crescendo in the proceeding bars. In the final section (A minor), make sure to bring out the accents. For clear phrasing, emphasize the first note of each slur in this section (not the last note).
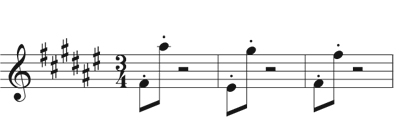
Etude 2
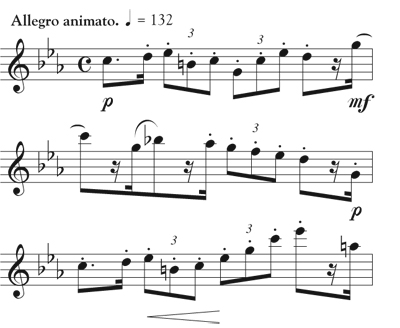
HB: “Practice #2 at various speeds, begin at 100 and work up to 116 as indicated. Practice single and double tongued. Finally, practice double tongued with two repeated sixteenth notes per eighth (Tah-Kah squared). Since the eighths are staccato, breathing between eighths is not a problem.”
JB: Breathe at the phrase endings even if it’s on the bar lines. The breaths will be least noticed if taken just before the phrase pattern repeats. A common practice on etude 2 is to breathe after the downbeat. This works in many situations, however, in this case the breath would occur after the first note of the new phrase. The breath then becomes musically disruptive and more noticeable. This etude is also good for catching a bad habit that most flutists have. When slurring, flutists move their fingers in rhythm. However, when articulating they tend to depress the keys slightly ahead of the articulation, especially on right hand low notes. This creates an unnecessary popping or clacking sound of the keys. I call this pre-articulation fingering (PAF). When the keys are depressed, air is moved within the flute. Therefore, when depressing the keys simultaneously with the tongue release, articulation becomes more effortless and the key noises disappear. Logically it makes no sense to move the fingers in rhythm for slurring yet out of rhythm for articulating. Pianists don’t do this.
Etude 3
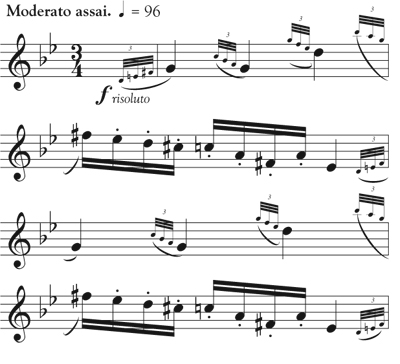
HB: “Finger exercises are six-note patterns. Breathe practically in every bar, just before the last group of notes. Begin at MM=52 and work up to 66. Bring out the downbeat low notes.”
JB: In the first bar lean on each downbeat as the other notes are accompaniment. Exaggerate all the subtle dynamic changes. Be careful to keep all sixteenth note passages even.
.jpg)
Etude 4
HB: “Finger exercises are two beats long. Work for smoothness in the octave higher finger exercises. Bring out the accents.”
JB: This etude is good practice for distinguishing between the two types of accents Andersen uses: those at the beginnings of slurs (articulated) and those under slurs (breath accents). When executed correctly, there should be an audible difference.
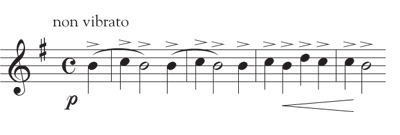
To perfect this technique, sustain each accented note, without vibrato, until the next accent and then sustain that note, etc. The trick is to stop the air behind the tongue momentarily on the articulated accents, without cheating the length of the previous note. Therefore, the overall effect should be legato. When that has been accomplished, the other notes can be re-included around the accents. Also practice etude 4 an octave higher.
.jpg)
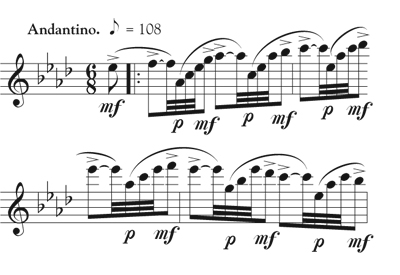
Etude 5
HB: “In etude #5, finger exercises are one beat (6 notes). Breathe every two bars. The trick is to get to the lower notes as soon as possible from the highest note. Start at MM=50 and work up to 58. Also practice double tongued, Tah-Kah squared and triple tongued.”
.jpg)
JB: I encourage students to treat this melody as a compound line (melody and accompaniment) with the melody being the downbeats. Bring out the melody and treat the other five sixteenth notes as pick-ups.
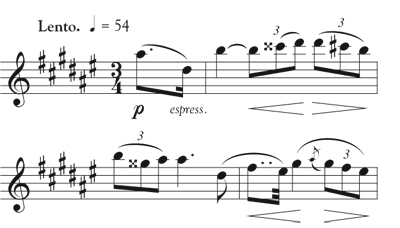
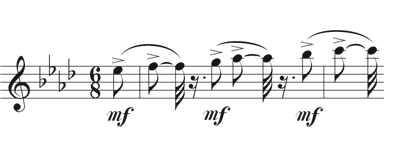
Etude 6
HB: “Be extremely careful of your rhythmic matters. Practice with the metronome at e =88, subdivided. The last note can be played an optional octave lower. [In the] third bar from the end, beat three should have a triplet (3) marked over it. This is one of the nicest exercises I know. Play an octave higher where possible.”
JB: This etude taught me to hear the subdividing voice in my mind while playing, a huge rhythmic breakthrough for me. Before practicing this etude as written, I have students actually play the subdivisions as repeated notes in place of the sustained notes.
.jpg)
Then when playing etude 6 as written,
.jpg)
they begin to hear the internal subdividing voice. Since I have students first play the subdivisions, they set the metronome at q =44 from the start. This etude solidifies the two main subdivisions in music: duple and triple.
Etude 7
HB: “Finger exercises are two or three beats. Breathe every two bars and after the long notes. This is a good exercise for double tonguing.”
JB: This etude is good for practicing evenness of technique, as Andersen alternates between ascending and descending scales and arpeggios.
.jpg)
Many students tend to rush in the first bar, yet play the second bar in time. This is understandable, since putting down fingers in the first bar has less resistance than lifting the weight of the fingers against gravity in the second bar. Anticipate key resistance, as ascending requires more work than descending (lowering the fingers with gravity). Etude 7 is also beneficial for maintaining a strong tone throughout. Since the low octave speaks softer, a crescendo is necessary on descending passages to maintain a consistent volume. The most difficult skip occurs in the second bar, between middle D and low E. To practice executing this interval, sustain the low E. While sustaining, switch the fingering to middle D, still maintaining the low E embou-chure position. The D will automatically speak as the first finger in the right hand has been lifted. Therefore, in context play the middle D with the embouchure position for the low E and move the fingers to low E while continuing to crescendo. The E should speak more readily.
Etude 8
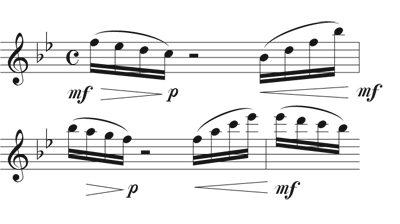
HB: “#8 is excellent for finger exercises. Do finger exercises carefully – legato and staccato. Breathe every four bars or eight bars at tempo. Start at MM=60 and work up to 76. Crescendo as you go down to the low notes.”
.jpg)
JB: In order to breathe, almost every student clips the last eighth note of the phrase too short. This breaks the etude’s lyrical mood. Get to the last eighth on time or a bit early in order to catch a breath after playing a long eighth note. To make dynamic sense out of the last four bars, the penultimate dynamic should be mp to create the hairpin (crescendo/diminuendo).
.jpg)
This one is also excellent for checking the right pinky position when negotiating to and from middle D. Bennett, along with his teacher Kincaid, was adamant about the right pinky being depressed on all fingerings where applicable. Only the Ds should have the right pinky up during this etude.
Etude 9
HB: “#9 is especially good for fingering E to F#. Start at 52 and work up to 66. Breathe after staccato downbeats. Also play an octave higher.”
JB: Careful attention must be paid to the rhythm of the first beat of the melody.
.jpg)
The F# sixteenth receives 1/8 of the beat, while the proceeding G# receives 1/6. The tendency is to play both notes 1/6 of the beat. This melody is also a compound line. Bring out the staccato sixteenths and treat the slurs as accompaniment (played slightly softer). Be mindful of the specific dynamic changes. In the first phrase, for example, the melody sixteenths should make a gradual three-bar crescendo leading to the subito piano. The second section should be absolutely pp. The final eight bars are a steady crescendo from p to f. There is often a rhythmic inconsistency during the slurred notes. The descending notes tend to rush, due to the change in key resistance.
Etude 10
HB: “Play #10 in both octaves. This exercise has spaces between every single note. It’s more or less an exercise of style. Watch the individual eighth so it doesn’t get out of place rhythmically. The triplet must be very clear and accurate. Start at MM=116 – single tongue.”
JB: Since etude 10 is marked agitato, each note should be rendered crisply. This is very good practice for clear articulations within the muddy middle register (especially middle D# and E). Since middle D# and E tend to be flatter than the surrounding notes, most flutists avoid cracking and going flat by blowing across slightly. Unfortunately, they lose resonance as a result. A better way to avoid cracking, while maintaining pitch and tone, is to slightly uncover the embouchure hole (mostly with the top lip), while continuing to blow downward. When playing this etude an octave higher, the last phrase is good practice for negotiating high C#s and the occasional high E.
Etude 11
HB: “Get the grace notes in the proper proportion. Grace notes (should be) on the third part of the triplet. Start at 88 and work up to 120 – also triple tongue. No finger exercises for #10 & 11.”
JB: This is yet another compound line. First practice the melody only.
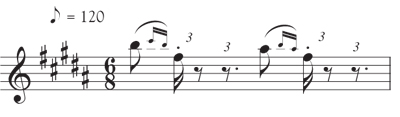
The remainder of the sixteenth notes forms the accompaniment (played slightly softer). In contrast to etude 10, the articulation in 11 should be light and effortless to conform to the dolce mood. Breathing can be very uncomfortable for both the performer and listeners. When performing continuous note melodies, often the best and least noticed place to breathe is right before the repetition of the phrase. In this case, breathe on the bar line after each four bar phrase.
Etude 12
HB: “[There are] some very good finger exercises in #12. Breathe every two bars after the quarters. Try to get a nice full tone. Start at 80 and work up to 104 – also double tongue.”
JB: The phrasing often sounds too heavy. Students tend to emphasize every downbeat. In the first phrase, the downbeat of the second bar is the end of the slur and a resting point, a comma in the middle of the two-bar phrase.
Therefore, only emphasize the quarter notes on the downbeats, not the ends of slurs. Louis Moyse always said, “Lean on the first note of a slur.” Execute the dynamics exactly. In the middle section, the forte is under the second note of the second and fourth bars.
Etude 13
HB: “#13 seems to have as its main purpose, this crescendo in the second part of the bar.
Play B# as soft as possible. Make finger exercises on each bar. Start at 104 and work up to 126. Breathe after the second note in any bar or every four bars.”
JB: This is yet another compound line melody. This etude is all about playing a clear staccato melody note on the downbeat of each bar, after the preceding slurred notes. First practice the melody only, leaving out beats two and three.
Next leave the melody out and play all the slurs,
making sure each hairpin is symmetrical. Make sure the highest note in each slur is the loudest. Concerning the best breathing places, since each bar is heard as a complete motive, I prefer breathing on the bar line every four or eight bars.
Etude 14
HB: “#14 is a real pretty exercise. One of the main reasons for this is to differentiate between the sixteenths and the triplets. The triplets want to dominate, so emphasize the sixteenths so they won’t get swallowed up. Don’t play eighths as part of the triplet.”
JB: As with etude 6, play the subdivisions on repeated notes in place of the written long notes. A common phrasing error here is emphasizing the long note at the end of each phrase. This makes each phrase sound too heavy and not espressivo as indicated. In the first phrase, for example, the emphasis should go on the downbeat of the second bar.
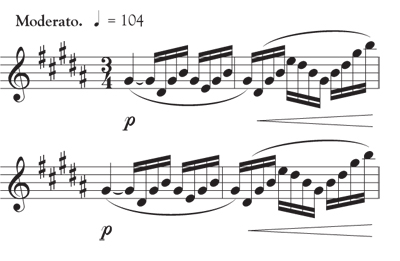
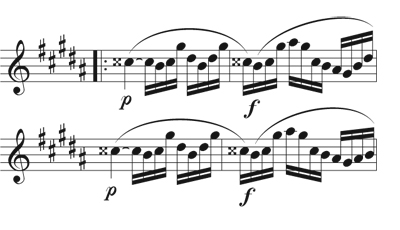
Etude 15
HB: “Single and double tongue and mix them up – four bars each. Make sure they sound the same. Breathe every four bars before the upbeat. Start at 80 and work up to 100. Also do Tah-Kah squared and in dotted rhythms.”
JB: Having repeated notes at the beginning of each beat creates a great way to examine the evenness of double-tonguing. The tone tends to suffer when articulating as opposed to slurring. This is because notes tend to speak sharper when articulated. To compensate for the pitch and improve the tone as well, cover slightly more embouchure hole when articulating.
Etude 16
HB: “#16 is just a group of one bar phrases with a nice big crescendo in each bar. Practice at 92. Make six-note finger exercises disregarding the quarters. Be sure you get a good legato between the first two notes. Drive the low note up into the top note. You have to do this with your diaphragm – your air pressure. As soon as you hit the first note, start the crescendo into the tied note.”
JB: This is a great exercise to practice making large skips sound proportional and effortless. Do most of the crescendo during the first note. Make certain the first note ends louder than it started, as there is not much time to achieve this. Then execute the top notes in proportion to the crescendo made on the lower note – not suddenly louder. A phrasing mistake is often made on the sixteenths, making them sound too heavy. Notice in this example that the sixteenths are in groups of two. Emphasizing the highest note of each group, which happens naturally on the flute, sounds heavy. Instead, emphasize the first note leading to the second.
Etude 17
HB: “This is a kind of pretty exercise. Breathe every two bars before the final beat. The accented notes represent a melody. Don’t punch them too hard, but they must be brought out. Start at 88 and work it up to 108. Not much we can do about finger exercises on this one. Get a nice slowing vibrato. Make sure there are no gaps, etc.”
JB: Andersen forces the compound line issue by writing the accompaniment thirty-second notes p. This is excellent practice for subito dynamic changes. This is what I call jaw-shifting. First practice the melody only with a comfortable amount of air and comfortable jaw position.
Then practice only the p thirty-seconds using less air with the bottom teeth slightly forward of the top teeth.
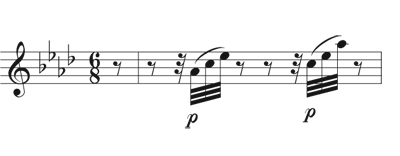
Then put the two together.
Etude 18
HB: “On the crescendo/diminuendo, these three notes should be brought out.
Always take a breath after four bars before the last three notes, except when you have slurs. Start about 76 and work up to 88. Single tongue and double. It’s fun to play this one all double tongued (Tah-Kah squared). No finger exercise on #18.”
JB: With so many hairpins, students often forget to make the middle note the loudest all the time. Make certain the three repeated notes, during the first two bars of every phrase, sound like one gesture. This can be accomplished by not emphasizing the last repeated note which is on the beat. Also, the second note of each two-note slur should be short (even though Andersen and many other composers don’t mark it). This creates space for the proceeding staccato.
Etude 19
HB: “#19 is another one of those pretty ones. I like a little slower tempo, quarter equals 56. Put a little schmaltz on this one.”
JB: To create the sentimental mood as Andersen requests, do not crescendo to the downbeat of the first phrase, but diminuendo instead. This creates a more nostalgic mood.
This motive occurs again in diminution, in the first bar on the upbeat of two. Bring it out a bit in the same manner. Reflecting on the first three notes is truly sentimental. As in etude 14, do not emphasize the last note of the phrase – lean on the downbeat.
One detail almost always overlooked occurs three bars before the first ending. The loudest note of that phrase should be the high G. The p dynamic is marked under the note after the G. Practicing 19 with the metronome is a good way to explore measured rubato. Experiment with changing the distribution of the notes while keeping the overall tempo steady.
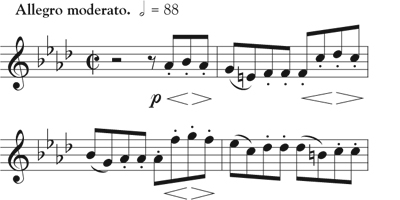
Etude 20
HB: “Make a difference between sixteenths and triplets. Watch your dynamics in this one – no finger exercises. Start at 108 and work up to 132. Be very careful of the note values in this. In the first bar the eighths are staccato. In the second bar the first two eighths are a little bit longer.”
JB: A very common mistake is made in bars six and seven. The low Gs are mistakenly played an octave higher. Make sure the last four bars are very powerful throughout, making a crescendo on descending lines.
Etude 21
HB: “The breathing is one of the big problems here. Of course, the main problem is the dynamic. I find it easier to get the repeated notes by double-tonguing, but I think you should practice it both ways. Again, you have to rush the repeated notes slightly, in order to get a space for the breath. The breath will occur in the second bar just before the last group (of sixteenth notes) and that pattern will maintain throughout the exercise, except where it returns to the original theme. Breathe every two bars. On the eighth bar, breathe at the end of the bar. Start at 84 and work up to 100. Be careful of the dynamics – that’s the main purpose of this. Double-tongue the entire exercise and also use dotted rhythms – no finger exercises.”
JB: To help students pay close attention to these very detailed dynamics, I have them first practice the repeated notes only.

This makes them more sensitive to the individual dynamics of each group. When repeated notes crescendo, make certain the last note is the loudest. Then practice only the slurred notes.
Then put them all together:

Etude 22
HB: “This is a real loud one. Pound this one out. Start at 72 and work up to 96. Play the triplet grace notes as fast as you can. Play as loudly as you can.”
JB: Breathe at the end of every phrase, which is after beat three of the fourth bar (not after the downbeat of the fifth bar). Notice that the first sixteenth in the second and fourth bar is not staccato. During the middle section, breathe at the end of the phrase, after beat three of the second bar (not after the downbeat of the third bar).
Etude 23
HB: “#23 is just the opposite of #22 – more effeminate and sweet sounding. Breathe after the lowest note in the phrase, every two bars. Start at 54 and work up to 63 – no finger exercises. The hang-up here is that crescendo down to the low note. Watch your accidentals in this one.”
JB: Do not cheat the length of the eighth note before taking a breath. Make the sixteenths sound as if they grow out of the dotted eighths. To achieve this, accelerate the air (slightly crescendo) on the dot of the dotted eighths, into the sixteenths.
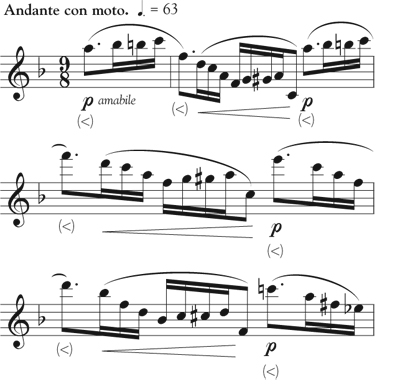
If the dotted eights decay, the phrases don’t flow together in the indicated amabile mood (warm and tender).
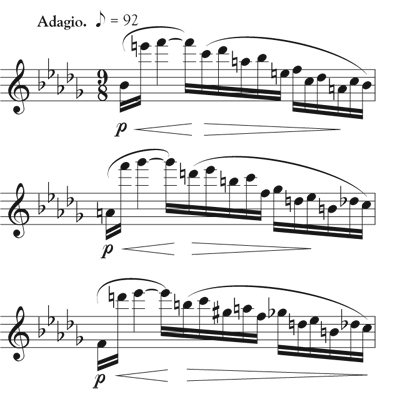
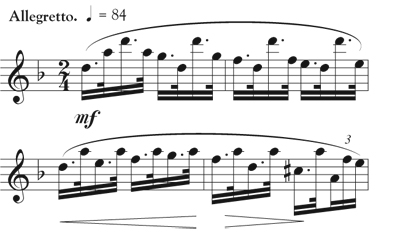
Etude 24
HB: “#24 is one of the more difficult ones. Make each bar a finger exercise. Make them absolutely even. The trick here is to play the thirty-seconds as rapid as you can. Start at 60 and work up to 84. Breathe before the last four notes of the last bar (of each phrase) – single and double tongue.”
JB: Even at the slower speed of 60, the thirty-seconds are really fast. To make sure a triplet rhythm is not played, replace the dot of each dotted-sixteenth with a repeated thirty-second note.
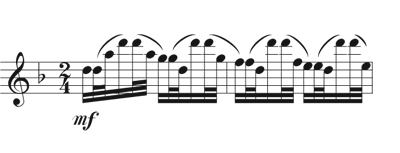
This is a way to feel the duple subdivision and get the sense of just how fast the thirty-second notes must be. Then perform as written.
I firmly believe that a careful study of Andersen’s Twenty-four Progressive Studies for Flute, Opus 33 will bring the level of flute playing, phrasing, and paying attention to musical details to a higher standard. Before studying these etudes with Bennett, I studied them with John Wummer (former principal flutist with the NBC Symphony and New York Philharmonic) as an undergraduate student at the Hartt School of Music. Wummer called Andersen Etudes Opus 33, “the Bible.”
* * *
Harold Bennett (1913–1985) was principal flutist of the Metropolitan Opera Orchestra from 1944–1965. He was originally from Sheridan, Wyoming, where he studied with his older high school friend, Maurice Sharp. They both played flute in Sharp’s father’s vaudeville theatre. When Sharp left Sheridan to study with William Kincaid at the Curtis Institute, he encouraged Bennett to also apply. Bennett began his studies with Kincaid at Curtis several years later. From 1940 to 1944 he played assistant first flute and piccolo in the Philadelphia Orchestra alongside his teacher William Kincaid. He also did stints as principal flutist of the National Symphony, Radio City Music Hall Orchestra, and the Pittsburgh Symphony. He taught extensively throughout his career and joined the faculty of the Manhattan School of Music in 1962.