If I were playing a word association game and given the word intonation, I would probably respond with bad, because intonation is one of those musical components we only single out when we are disturbed by it. What exactly is good intonation? A beautiful performance contains many integral parts which disappear into, or are transcended by, the whole. It follows then that if musicians are to find good intonation, it is first necessary to sidestep the labels of good and bad altogether and search for something more. Think of intonation as being the very heart of musical expression, that which gives clarity and sincerity to a musical utterance. With this concept as the goal, the following is a step by step process to more beautiful, in tune playing that goes beyond striving to be correct and rings out with confidence and authority. Spend five minutes each day on this process, with one week on each step.
I believe that any player is capable of playing in tune. I am also not surprised that so many do not. The complexity of playing music is great, with so many demands on a musician’s attention, that it is perhaps more remarkable that some players succeed. How do these players succeed? Clearly there are specific skills which should become automatic through practice until they can be performed without requiring much attention. However, given that pitch center is a fluid situation, simply memorizing the placement of notes would only get one about halfway towards beautiful. When an excellent violinist plays, almost every note begins sharp or flat, as revealed in slow motion playback, but the violinist’s finger makes corrections so quickly as to make the flaws undetectable. Flutists also should be able to make this kind of instantaneous correction.
Meaningful change starts with a pivotal moment. For some reason, I remember very clearly the moment I started thinking about intonation. I was sitting in a Julius Baker masterclass. It was the first week-long music camp I had ever attended, and I was not advanced enough to play for Baker so I simply listened for six days. Each day I heard Baker tell the players, who all sounded great to me, that this particular note was sharp or this one was flat. One day I started listening to every single note of every piece, measuring it in my mind, and tried to guess whether it would be called sharp or flat. After the class this weird new habit persisted anytime I listened to music, and I still do it. This experience forms the basis for step 1, which I believe is the most important one.
For the 5-step process, you will need the following equipment:
Step 1: recordings of a violinist
Step 2: tuner and metronome
Step 3: pennies
Step 4: grand piano
Step 5: recording device
Step 1: Practicing Pitch Navigation
This step does not involve the flute. Choose a professional recording of a solo violinist playing with keyboard or orchestra. Listen intently to the solo line and follow the melodic contour. Sing along inwardly; do not sing aloud. If your mind wanders, trace the contour of the melody in the air with your hand. Notice any pitch nuances or adjustments.
Anticipate the next note and its pitch placement. If you notice a discrepancy between your imagined voice and the recorded one, consider it a good thing. The point of this exercise is to strengthen your instincts and opinion, and at the same time to develop a quick comparison of what you hear in your head in relationship to the performer’s playing. It is an activity of measuring and steering.
It is important not to fall into a critique of either the performance or of your own ear. Stay playful and engaged with the music. After several practice sessions you should be able to turn on this listening skill easily, and may find yourself doing it even when passively listening to music. If, on the other hand, you feel at a loss, you may have more success with this after completing step 3.
Step 2: Pitch Bending
To play in tune you must be able to play out of tune. With a metronome set at quarter note = 60, play C5 for two counts, mf, in tune with the tuner. After the pitch has stabilized, raise the pitch one cent for two counts, and then return to the in-tune note. Next, lower the pitch one cent for two counts and then return to the in-tune note. Repeat on each note ascending chromatically to C6. Listen carefully to learn how much one cent really is.
Begin again with the metronome set at quarter note = 60. Play C5 for two counts in tune. Then begin making an upward pitch glissando over the next four counts raising the pitch as high as you can. Then hold this final pitch for several counts. Repeat the process, but this time make a downward pitch glissando over the next four counts, once again holding the final flat note for several counts. The goal is to glissando for one half step, using techniques such as blowing louder or softer to help raise or lower the pitch, and rolling the embouchure hole in or out.
Step 3: Whole and Half Steps
This step is a fast track toward ear training prowess by examining the smallest intervals, the whole-steps and half-steps that are the building blocks of scales.
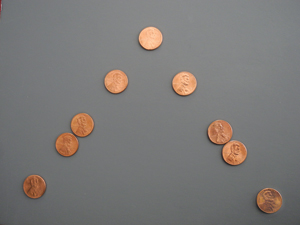
Arrange nine pennies in the general contour of a five-note ascending and descending minor scale. Adjust the placement of the pennies to illustrate where the whole-step and half-steps are. A G minor five-note scale is G, A, Bb, C, D, C, Bb, A, G. The intervals of these notes are whole-step, half step, whole step, whole step, whole step, whole step, half step, whole step.

Play the G minor five-note scale very slowly and legato while looking at the pennies. Notice the distance between the whole steps and the closeness of the half steps. Exaggerate the placement of the pitch to make the half steps close together and the whole steps large. Transpose the passage to begin on other notes, and also experiment with other scale patterns.
Step 4: Harmonic Series, Finding Overtones
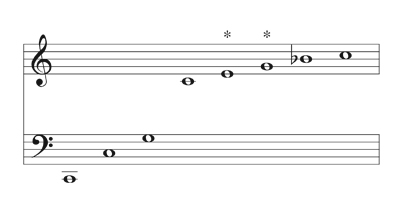
At a grand piano play a C2 with the damper pedal down. Let the note sustain until it decays and listen intently to the overtones which emerge. These notes will be C2, C3, G3, C4, E4, G4, Bb4. Listen especially for the fifth partial E4 and the sixth partial G4. Then play these two notes on your flute while the C2 is still sounding. Repeat this exercise at the octave and on other pitches. Mimic the rich, overtone-laden sound of the piano as one of the goals of this practice. Try to imitate the piano’s long natural decrescendo, that is so stable in pitch. This exercise also lays the ground work for familiarity with tuning to the natural overtone series.

Step 5: Recording Yourself
For the final step, work on playing in tune with yourself. Use a small recording device, smart phone or tablet – a video recording is preferable. Sound quality is not important, but ease of playback is. Record some of the same five-note scale patterns from step 3, or melodies with stepwise motion from your repertoire. Play it back and listen, making observations about the intonation. Next, play along with the recording, matching pitch and timing. Try to place the half and whole steps the same way twice in a row. Notice whether you can lock your ear onto the recorded pitch and match it exactly. Experiment with the blending quality of the sound when you play along. Often blend fixes intonation.
Practice one exercise per week for five minutes each day. After five weeks, these skills of navigating, measuring, pitch bending, interval awareness, hearing overtones, and tracking and blending sound should be becoming second nature. This will allow you to think about intonation all the time but still have attention left over for other details of playing music. As you become more aware of the nuances of pitch and timbre, you will find that there are more options for expressing yourself musically. These five steps will also lay a foundation for finding a successful approach to the many challenges that arise when playing and performing in different situations, including taking an A, playing in tune with piano, or playing chord tones with other winds in orchestra. In five weeks you will be ready.


