Band directors frequently comment that it is difficult for them to know how to work with their marching percussion sections. Teaching a section without confident understanding can be intimidating. Here are some ideas of what to look for when working with the marching percussion.
Sound Quality
Sound quality is the basic idea of how the drum should sound. Think of drumming as the art of manipulating the rebound of the stick to do what you want. Whether you are playing legatos, accent tap passages, roll passages, or variations of these, the stick should always be rebounding off of the head. This is accomplished by turning the wrists, letting the stick stay cradled in the hands, and not pinching the fulcrums.
The ideal sound is bright and open, which is referred to as a long sound. The more relaxed students can play, the longer the sound is going to be. Long sounds make rhythms sound correct. It is impossible to play correct rhythms with a short sound. Short sounds will make rhythms weak and feel inaccurate. Students should always strive to play everything with a long sound by keeping the stick vibrating at all times and letting it rebound naturally off of the drum. This is more difficult to do, but it makes a big difference.
Before Rehearsal
Be sure that the battery drums are tuned at the start of each rehearsal to get a consistent sound from player to player. If any heads need to be changed, this should be done prior to rehearsal as well. Low-quality heads and poor tuning can adversely affect progress.
Metronome Placement
The metronome in rehearsal is important for any ensemble or musician. In marching bands it is used to establish one consistent beat for the ensemble. Never put the metronome on the front of the field and force students to listen forward. The tempo should always come from the back of the field to account for time delay as sound travels forward. Ideally, the metronome should be run from behind the marching band, near the center of the field. Some groups have begun to mount a speaker with the metronome on a marching percussion carrier and give it to a staff member who marches behind the drum line in rehearsals so that the tempo stays centered and consistent with them. Try to have the metronome just loud enough for only the drums to hear, so that the rest of the group gets used to listening to the percussion (or other listening center, such as tubas, if appropriate in the drill design).
Warmup Time
One of my favorite quotes is “If you don’t have time to warm up, you don’t have time to be good.” I would recommend that 20-30 minutes be allotted at the start of a rehearsal for the percussion to have a playing warmup. Most directors probably want at least this much time to warm up the winds anyway. In a perfect world, the percussion will have a separate instructor or a strong section leader who can take charge of working the percussion section through the warmup sequence. If not, a sequence similar to this can also be constructed if reality dictates that the winds and percussion need to stay together for the daily warmup sequence.
In this case, adapt the following exercises to be a rhythmic foundation for the exercises the winds play. It is important to keep in mind that full-band warmups should be written in a tempo and meter that will give the percussionists a proper warmup. Wind exercises are often at a slower tempo than what is needed to get percussionists’ hands moving at the correct speed. In such cases, alter the base rhythmic structure of the percussion exercises. For example, if eight on a hand seems too slow, use a triplet- or 16th-note-based variation on the exercise.
In all cases, warmups should begin with stretching. It is important to stretch the muscles and get the blood flowing through the body before starting to play or march. Be sure to stretch the legs, back, arms, wrists, and shoulders.
Movement
Technique is the foundation of a successful program, and for a marching percussion section technique work should include both hand and foot warmups. I recommend having students mark time as much as possible while playing during warmups. Another option is marching through a basics sequence while playing the exercises. After all, it is marching band. Watch the feet while listening to the line; many errors in playing are actually caused by timing problems in the feet as much as they are in the hands. It is also becoming more common for body movement to be involved in marching shows, and many groups are starting to incorporate movements from the show as a part of their playing warmup as well.
If the drumline is standing in a warmup arc, it is best to use stands to help prevent back injury. I also have to emphasize having percussionists wear hearing protection while playing. Hearing cannot be fixed, and the amount of time considered safe exposure to marching percussion is mere seconds.
Getting Exercises Started
For the battery, exercises will typically start with either a count off from a section lead played on the drum or a verbal counter, usually called a dut. Many groups use a combination of the two with the section leader giving the first four beats and then everyone dutting the second four for each exercise. Because there will not be a tap off during the show, the section should work on getting everyone to verbalize a consistent beat. Although they are necessary at times to be sure everyone enters together, duts can distract from the show and should not be audible to those in the stands.
Usually the front ensemble should use a visual count off, with four counts from the section leader followed by four from the full section. The best motion used to count off is a nearly full stroke that does not strike the bars. This is done because often the members of the front ensemble have to watch each other for timing, with one player specifically designated to listen for the timing from front to back. This can prevent too many interpretations of the beat from the front ensemble.
Flow
There are many ways to interpret the concept of flow, most of which are correct. The aim is to create a sense of phrasing and minimize mental and physical fatigue. Students should strive toward a balance between the stress of concentration and playing and keeping the muscles and mindset relaxed. This can be achieved by using a comfortable technique and by consciously breathing more while playing. Flow is an integral factor for any percussionist who can make it look easy.
Battery Exercises
Legatos
Often legato work will be some form of an eight-on-a-hand exercise. Look for a continuous motion of the sticks, which should be moving straight up and down in an even, consistent motion. Check the grip and be sure that the hand position is even and consistent between the hands. Experiment with different dynamic levels to work on making sure the stroke is consistent at multiple dynamic levels. Listen for a consistent sound from all players. Alternate having individuals and the full line play so that you can hear the sound being produced by each player; this is worth doing with all of the exercises. Maintain even spacing between all notes in the sequence. Look for the stick continuing in an up and down motion and not stopping over the drum other than after the last stroke on each hand. Watch the hand that is not playing to be sure it stays low and over the head.
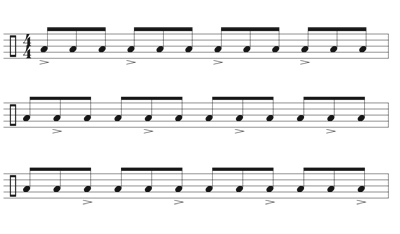
Accent/Tap Exercise
This exercise can take the form of single-hand eighth-note accent and tap (non accent) patterns or can also be a grid pattern, which is taking any sort of rhythmic base and moving the accents from subdivision to subdivision. For example, a triplet grid would accent the down beat for each beat in a measure. The second measure would be an accent on la and the third measure an accent on li. The key is that there must be two different stick heights present in the approach to the drum. The accented note should not be played with any more force than the tap; the difference is the starting height of the stick. Make sure there is a clear visual distinction between the accented and non-accented note.
Students should strive for evenness of sound between the hands, even with notes at different stick heights. Beware of a tighter or more forced stroke on the accented note; this will distort both the sound of the drum and the rhythm. Also watch for added tension in the hands on the accents. Students may have difficulty keeping the feet on the beat; the tendency is to want to adjust to fit with the accent patterns.
Double/Triple Beat Exercise
This exercise is used to start developing the open, or double-stroke, roll technique. The goal is to work toward getting both notes of a double stroke to have an identical stick height and sound. Often there is a noticeable decrescendo from the first note to the second, but both notes should be the same volume. This takes adequate stick velocity to create the rebound. One way to demonstrate this is to have students press towards the head with the hand gripping the stick while the other hand pulls the stick back. When they release the second hand the stick should move with enough speed to create two notes from the stroke. Listen for evenness of sound between the first and second notes. Also be sure that the spacing between the notes is rhythmically even; the second note should not come too close to the first. Check students’ fingers; if they relax the grip too much, they can lose control over the stick.
Stick Control Exercise
This is typically a 16th-note based exercise taken from the first few exercises in George Lawrence Stone’s book Stick Control. This exercise is designed to start developing evenness of stroke and sound while playing different sticking combinations. The goal is for every note to create the same sound from the drum. Listen for even-sounding 16th notes (no agogic accents) all the way through the exercise. Also be sure that the tempo stays consistent as students switch from one sticking pattern to the next. Look for a constant flow of the sticks and even heights for every note.
Paradiddles
This exercise again will involve two stick heights with accents and taps. The goal here is to develop the coordination necessary to play these different sticking patterns, which are some of the most common in contemporary marching music. Most exercises will be some form of combination of paradiddles (rlrr, lrll) and paradiddlediddles (rlrrll, lrllrr), which are the two most commonly used patterns, although double paradiddles (rlrlrr, lrlrll) can also be used in the exercise.
Listen for evenness of sound between the hands and the notes at the different stick heights. Make sure that the accented note is not played with a tighter or more forced stroke, because that will distort both the sound of the drum and the rhythm. Look for added tension in the hands on the accents. Make sure there is a clear visual distinction between accented and unaccented notes. Watch to be sure that the feet are staying on the beat and not trying to adjust to fit with the accent patterns.
Rolls
Rolls in marching percussion are most commonly open (double strokes), although there are many instances where an orchestral (buzz) roll will be used as well. Both should be practiced in the roll warmup sequence. Listen for clearly articulated double strokes. These should sound most commonly like 16ths, 32nds, or sextuplets. A good roll will sound akin to a clearly articulated double-tonguing passage in the brass. Watch for decreased stick heights as the rolls get faster. Slightly more arm will often come into the stroke as the roll speed increases, but do not let students build tension in their hands.
Orchestral buzz rolls can also be substituted for open rolls. Students should work on getting a full and even sound along with a consistent rhythmic base to the roll. When playing the show music the rhythmic base of a buzz must be defined for all players to ensure uniformity of timing. This base is necessary so students will attack and release the buzz at the same time.
Flams
In the immortal words of Dennis Delucia, “Keep your grace notes down!” As with accents and taps, flams must have two different stick heights to be played correctly. Most students err by lifting the grace note while also lifting the main note. Keep the grace note much lower to the head for accurate spacing. The most common patterns used in marching percussion will be flam accents (rlr lrl with a flam on each first note) and flam taps (rr ll with a flam on each first note). Listen for the grace note being slightly before and much softer than the accented note. Be sure that the grace note does not come too early rhythmically, creating a dotted rhythm sound. In marching percussion the grace note is often played much closer to the main note than in concert percussion. Also be sure that both notes do not hit at the same time. Look for two different heights from the sticks. Watch to be sure that the grace note does not lift to a height too close to the main note.
Technical Aspects to Check
Snares
Students should play in the center of the head. If the music designates a passage to be played at the edge or over the guts, be sure all players hit the same position for the most consistent sound possible.
Tenors
Minimize arm motion as much as possible. Do not play in the center of the heads; the ideal striking area is closer to the edges nearest the performer. The basic motion from left to right on the drums should be fairly close to a straight line. Make sure that accents and taps are clearly delineated and not just a product of the changing pitches of the drums.
Basses
Be sure everyone has a good sense of where the center of the head is. The mallets should be at roughly a 45-degree angle from the instructor’s viewpoint, with the head of the mallet in the center of the head. This will mean that the hands are closer to the bottom portion of the drum. Get a good rotation out away from the drum to produce a full sound. If playing halfway or at the edge for musical reasons, be sure all students know exactly where to strike.
The Front Ensemble
If staff or a strong section leader is available, the front ensemble can either warm up by itself or as a full ensemble with the battery. In many cases the basic front ensemble exercises can be adapted to fit with the battery exercises. One advantage to having the front warm up with the battery is that it can be used to consistently work on listening back to the battery for timing. In very few instances should the front be watching and playing with the drum majors’ hands, so every opportunity to get them used to listening to the battery can be beneficial. I highly recommend the book Up Front by Jim Ancona and Jim Casella (Tapspace) for anyone whose band uses a front ensemble. This book contains a myriad of exercises, technical breakdowns, writing examples, and even care and maintenance tips for the front ensemble.
Front Ensemble Warmups
The front will need a warmup sequence that gets the hands moving while also covering common keyboard patterns seen in the show music. You also want the front to work on playing in multiple key signatures. Front ensembles that use timpani should include a timpani part for all exercises. Good timpani exercises cover tuning (playing root notes and scalar patterns) and working to produce a good tone from the drums. Make sure that for both keyboards and timpani the stroke starts and stops from the same height, which is called a piston stroke. This is something to watch for on all exercises. Mallet players should avoid playing on the nodal points of the bars.
Octaves
Most fronts will start with some form of exercise that works on moving up and down the keyboard in octaves using double stops. Often these are just basic scale patterns and can fit nicely over the first couple of warmups in the battery sequence. Listen for note accuracy, and make sure that the sound of each hand occurs at the same time and does not become a flam sound.
Green Scales
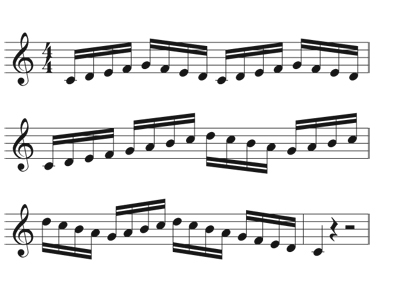
These are patterns taken from George Hamilton Green’s Instruction Course for Xylophone and are very similar to the Kraus scales used by many other instruments. With these patterns students will work on moving up and down the keyboard in alternating hand scale patterns. Listen for note accuracy and make sure that the sound of each hand is even and balanced without accents as students move up and down the keyboard.
Spatial Exercises
The aim of these exercises is to work on the hands being able to expand outward in opposite directions on the keyboard. This can be done both diatonically and chromatically. Many great exercises can be found in Gordon Stout’s Ideo-Kinetics Workbook. Listen for note accuracy and an even, balanced sound.
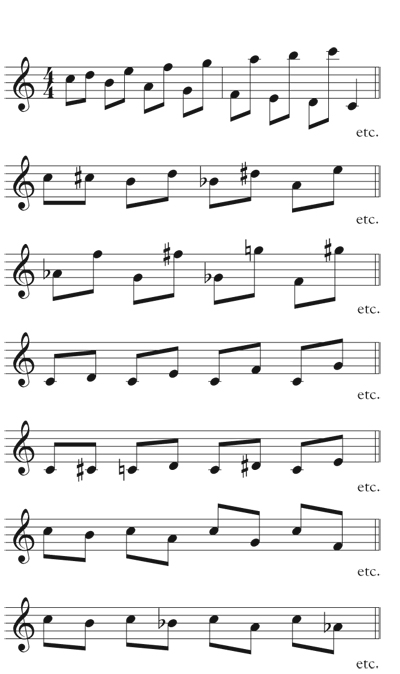
Arpeggios
Students should work on moving up and down the keyboard in patterns. As with other exercises for mallets, the sound should be unaccented.
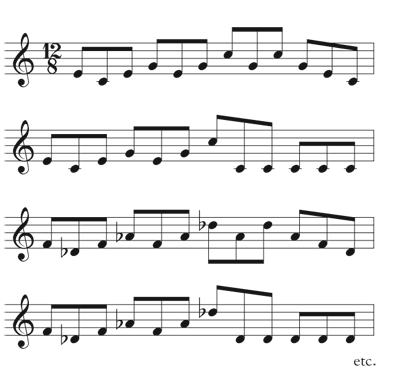
Block Chords
Block chords are the foundation of four-mallet technique. This can be done using actual chord progressions as well as using intervals of fourths and fifths in each hand. As with two-mallet playing, watch to make sure that the students are using a good piston stroke. All four notes should be at the same volume and hit at the same time; there should not be a flam sound. Look for control over the mallets.
Permutations
Permutations are the various stickings that percussionists use to maneuver around the keyboard with four mallets and are most simply defined as the order of the mallets hitting the bars. The mallets are typically numbered 1-4 from left to right in a player’s hands. Typical permutations are 1-2-3-4, 4-3-2-1, 1-2-4-3, 4-3-1-2. The most common form of exercise for permutations is to alternate eighth notes and sixteenth notes on each pattern. In addition to checking for evenness of all four notes, be sure that students are not compressing the rhythmic spacing between the notes of each hand. Also check for a good rotation of the forearm with each set of strokes.
Marching percussionists often have an analytical side that drives them to define the things they do; such details are part of the gig. However, students should also avoid becoming constrained by definitions such as stick heights or stick angles. These concepts are merely reference points, and a good percussionist should remain flexible to adapt to the needs of the music and ensemble.
Sample exercises can be found at http://media.wix.com/ugd/2c8168_33102a6b2e0b5ca8850ee19f1387f68a.pdf.
* * *
Stick Heights
Stick heights will be dictated by musical expressions. Remember that the tension and force should not change with these different heights.
pp – 1 inch
p – 3 inches
mp – 6 inches
mf – 9 inches
f – 12 inches
ff – 15 inches
Common Marching Percussion Terms
Clean: The precise performance of music where all timbre, notes, rhythms, and dynamics are consistent throughout the entire section.
Dirty: A performance in which one or many areas of timbre, notes, rhythms, or dynamics are inconsistently performed by members of a section.
Playing to the Feet: Ensuring that the battery performers’ feet hit precisely in time with the tempo and then using that to establish the beat for the performers’ hands.
Rhythmic Integrity: Keeping the rhythmic performance of music accurate regardless of physical or musical demands.
Dynamic Integrity: Keeping the dynamic performance of music accurate regardless of rhythmic or physical demands.
Quality of Sound: Consistently producing a full and consistent sound from the instrument regardless of musical or physical demands.
