Reeds are often the biggest equipment headache for any clarinetist or saxophonist. Here are some simple tips to ensure that single reeds are always ready to go.
Select High-Quality Reeds
While good-quality reeds may seem quite expensive, it is inadvisable to have students play on bargain-bin brands. From the beginning, students should be playing on the finest reeds available. Cheaper alternatives can cause all manner of problems. The cane used may be of inferior quality, the reed may not have been cut correctly, the strength marked on the reed may be inaccurate, etc. The two most commonly used, reliable reed brands are Rico and Vandoren.
There are warning signs that a reed might be trouble. Make sure that the fibers of the reed are straight. They should not slope off to one side or the other. If they do that, it might be unsalvageable. Usually reed manufacturers catch these and discard them, but one occasionally slips through.
The heel of the reed should also be checked. Ideally the two sides of the reed should be relatively similar in size. If a reed is uneven to the point that one side is twice as thick as the other, the reed might take a lot of work and still play poorly.
Although both novice saxophonists and clarinetists frequently play on softer reeds until embouchure strength is built up, after the first few months all players should be using medium-strength reeds (3 or 31⁄2 for saxophone; 31⁄2 for clarinet) and should probably continue to use that strength for as long as they continue to play. A moderate reed is ideal for almost any situation. Students should buy reeds by the box; it is unwise – and expensive – to only buy one or two reeds at a time.
Breaking Reeds In
Reeds can be made to last much longer if they are broken in. Taking a reed out of the package and immediately playing it for long stretches of time will put undue stress on the fibers of the cane and prematurely weaken it. Instead, students should play on each new reed for about five minutes the first, second, and third days, avoiding extreme ranges or dynamics. The reed will gradually adjust to the stresses of striking the edge of a mouthpiece several hundred times a second, and the reed will, generally, show its true performing-character.
Many woodwind specialists recommended prolonged soaking of reeds in a glass of water before using them. I have always found the best method of dampening reeds to be the simplest: Soak the entire reed in the mouth a few minutes before playing.
The first playing is not an indication of how the reed will perform; a reed’s sound and tendencies will not be set until after it has been put through its paces with those five-minute break-in sessions. A reed that is at first difficult to play might be fantastic after it is broken in, and an initially wonderful reed might prove to be junk. Cane is a natural organic material, and with a bit of controlled use in the beginning, you can greatly prolong its life. If you start playing on a reed from the get-go, it will be worthless in a week and a half, but if you break it in properly and rotate it, it will last six to eight weeks.
The Life of a Reed
It is important that these expensive and fragile pieces of cane are sufficiently protected and kept from warping. After playing, excess moisture should be wiped off of the reed with the thumb and forefinger, and the reed should be placed in the storage unit. Warping occurs when a reed is allowed to dry out completely, so storage that retains a moderate moisture level is essential.
A storage unit that can hold several reeds at once is most desirable, as students should have four or more reeds in rotation at a time. If a student plays on only one reed for several weeks, the reed will wear out rather quickly, growing weaker and weaker. As this happens, the student’s embouchure will also grow weaker, as it adjusts to the new physics of the softened cane. Then, when it is time for a new reed, the student has to spend several days rebuilding muscle tone in the embouchure. It is a far better idea to rotate through several reeds, and, as soon as any of them begins to weaken, discard that reed and add a new one into the rotation.
When pitch starts to fluctuate wildly both flat and sharp, this is a good indication that a reed is dying. It is difficult to hold a stable pitch on a weakening reed. In addition, the sound will get thinner because the embouchure is doing more to compensate for weakness in a reed. Students playing on such a reed will start squeezing, trying to control that thin reed more and more. If you hear a saxophone’s intonation becoming increasingly squirrely while the sound gets thinner, that is a good indication that the reed is dying.
Basic Reed Working
Extensive reed working is inadvisable for most clarinetists and saxophonists, and will largely be unnecessary if the above advice is followed. If massive changes are necessary to most or all of a student’s reeds, the strength, brand, or method of reed care should be addressed first. However, the occasional adjustment to a reed may be necessary. Many professionals use reed knives, although these are illegal to carry into most schools and require a rather extensive amount of practice to learn to use correctly. The first step for any student doing reed working should be a piece of fine grit sandpaper.
The most common problem for any reed is a back that is not completely flat. The reed must make complete contact with the table of the mouthpiece to work correctly, and most problems with otherwise good-looking reeds stems from slightly inaccurate cutting or warping of the back. To ascertain whether or not this problem exists, place the reed on a completely flat surface, on top of a piece of paper. With downward force, quickly rub the reed back and forth, “shining” the reed on the paper. Once this has been done for about 25 seconds, look at the reed.
A perfectly flat reed will be equally “shiny,” as the surface of the paper rubbed across the entire surface of the reed evenly. However, if any portion of the back of the reed is not shiny, it is not flat, and should be adjusted. The exception to this is the tip, which is too thin to shine.
To adjust a reed that is not flat, lay it on a piece of very fine grit sandpaper (#320 grit works quite well) on a flat surface. Very carefully, rub the back of the reed against the sandpaper. Allow ten or so passes and then check the reed. It may take quite a while to eliminate the high spots, but too much sanding can quickly destroy a reed.
Never sand or otherwise alter a reed before the initial breaking-in phase. Until a reed has been played upon for a few days, it is impossible to correctly evaluate it and gauge its limitations. A reed can change quite remarkably after a bit of playing, and adjusting a reed that has not been broken in may make it entirely unplayable.
Another problem area on some reeds is an uneven tip. One side of the reed might be very slightly thicker than the other, causing the reed to respond incorrectly. To check the balance of the reed, tilt the mouthpiece to a 45-degree angle while holding the head straight. This will cut off one half of the reed against the embouchure, while allowing the other side to be heard by itself. Do this to both sides of the reed and compare their response and resistance.
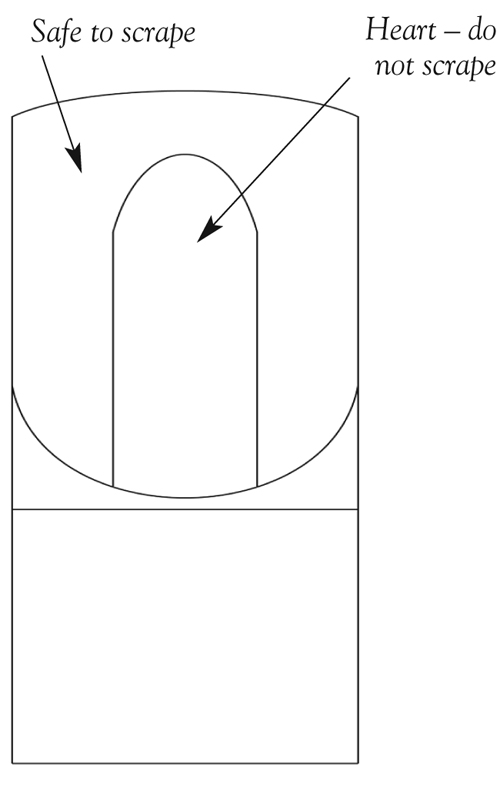
If one side is harder than another, some material may need to be taken off that part of the reed with a reed knife. For students, I recommend an inexpensive single-draw knife. Never scrape the heart of the reed. Take just a bit off of the affected side to balance the reed; one or two scrapes may be enough to fix the problem. Check the response of the reed on the mouthpiece frequently to ensure that too much material is not taken off.