With a severe shortage of string teachers and the rapid growth of string programs throughout the country, many general music teachers and band directors are now being assigned to instruct string students. Although these teachers may have a basic understanding of string pedagogy, most are not equipped to work with players who have already had several years of lessons.
Correct Instrument Set Up
Start the year by evaluating the size and condition of students’ instruments. Especially in middle school years, rapid growth spurts may make frequent changes necessary. Students will have a difficult time producing a good tone if the instrument is improperly sized or incorrectly set-up. Instruments that are uncomfortable to play may also discourage students from practicing.
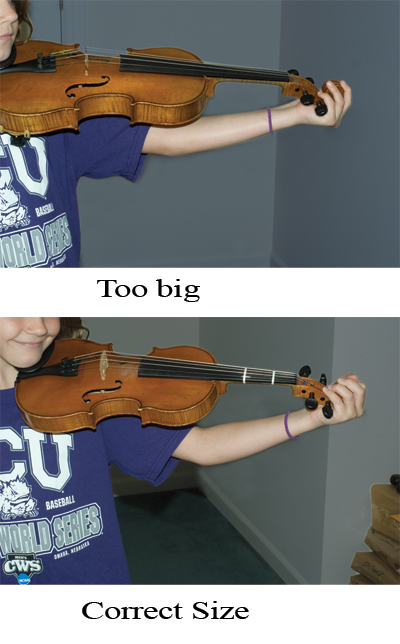
Beginners on violin and viola who play on too large an instrument usually have trouble supporting the instrument’s weight and getting their left hands into the correct playing position. As a rule of thumb, when a student places the instrument on his shoulder, the left hand should be able to curl around the scroll with the fingers reaching over the scroll toward the fingerboard. Having at least five to six inches of space between the elbow and the belly of the instrument means the instrument is the correct size. Measuring sticks are available from string instrument and supply dealers that can help determine the right size instrument for a student.
For cello players, a teacher should hold the instrument in front of a student (while the student is standing) and adjust the end pin to a length so the scroll is even with the student’s nose. Next have the student sit and place his left hand on the string. If the student can comfortably play a minor third between the first and fourth fingers, and the knees can securely hold the instrument, then it is the correct size.
Bass students should stand with the endpin set so that the nut of the bass is near the student’s forehead. The first finger should play a major second above the open string and be at eye level with the student. Students should then be able to play a major second between the first and fourth fingers and comfortably support the instrument with the lower part of the upper bout hitting at or just below the waist. In addition, when the right hand extends down, the knuckles of the hand should be approximately at the bridge of the instrument. The standard high school bass is a ¾ size; most middle school players should use a ¼ or ½ size bass.
Violin and Viola Posture
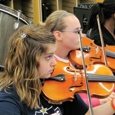
Students should have a balanced position when holding their instrument, whether they are standing or seated. Poor posture can cause unnecessary tension in the body and prevent proper motion of both arms and fingers; this affects tone production, intonation, and the comfort of the player. If a violinist is sitting in a slumped position, for example, it is difficult to draw the bow correctly across the strings. Correct position for both hands should be revisited frequently as it is essential for good technique and intonation.
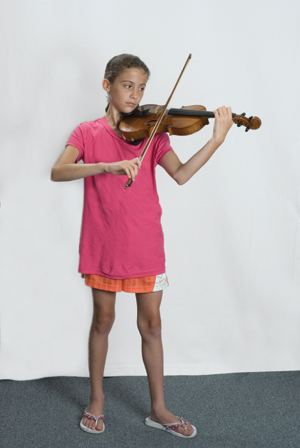 For violin and viola players who are standing (the preferred position for teaching beginners) the feet should be slightly separated with the left foot in front so that the instrument rests on the shoulder in line with the foot. The player’s head slightly tilts to the left to create a straight line from the nose to the bridge to the scroll over the left foot.
Not all young players can comfortably hold their chins on a traditional chin rest. Some students may need to move their chins closer to the center or tailpiece of the instrument so they do not have to turn the head too far to the left. Chin rests come in a variety of styles, from a standard type positioned on the left side to a center-anchored chin rest.
In a seated position, students should sit on the edge of the chair, feet flat on the floor with the left foot forward, knees shoulder width apart, and chairs angled toward the music stand.
.jpg)
In the top photo, the violinist is playing with a slumped position. The scroll is pointed down and her bow arm is drooping. In the bottom photo the violin is held up, and the player’s arms are in the correct positions.
Cello and Bass Posture
Cellists should sit comfortably at the edge of the chair with their feet flat on the floor and knees parallel to the floor. Finding a chair of the correct height is important for young players. Chairs should be angled toward the music stand so students don’t have to twist their torso to see the music.
Bassists using a stool should place their left foot on the rung of the stool so the knee helps to support the instrument. When the bassist stands, his left foot comes forward, with the bout of the bass resting at the waist and the neck resting on the left-hand thumb. Whether the player stands or sits, students should hold the bass at an angle from the center of the body rather than in front of the body as with a cello.
Violin and Viola Bow Hand
By the third year of lessons, students should play comfortably, with good hand formation. The right hand should be relaxed and not squeeze the bow.
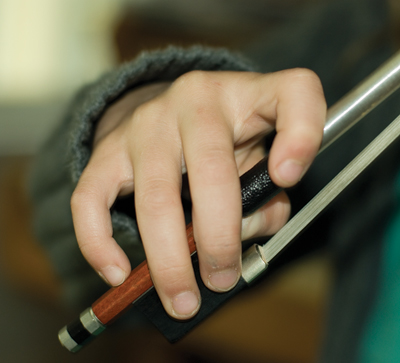
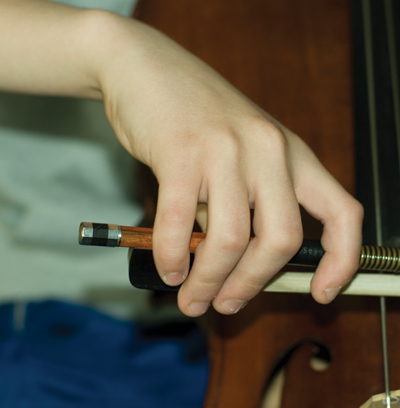
For the violin and viola students, the pointer finger curves gently around the stick of the bow between first and second knuckles with the knuckles angled slightly toward the tip of the bow. The index finger should not hook around the stick. Ask students to wiggle their index finger to check whether it is hooking around the bow.
The middle two fingers hang loosely over the stick a slight space away from the pointer finger, and the pinky stands on top of the stick, relatively close to the two middle fingers (not out on the screw). Check that the pinky finger is never straight or falling over the top of the bow. The fingers should have slight spaces between them, and watch that the hand does not begin to creep up the bow.
The thumb is placed between the grip and the frog and bends outward. It is usually in line with the second finger but may come between the first and second fingers. Beginners may start by placing the thumb under the bow, but should switch to the regular bow hold as they become comfortable with the instrument.
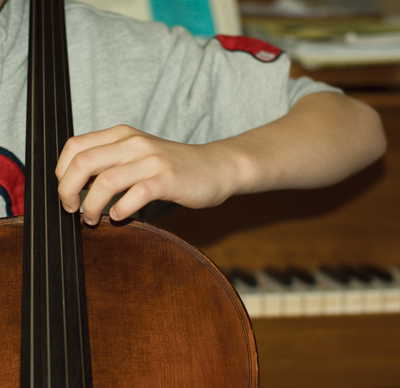
Cello and Bass Bow Hand
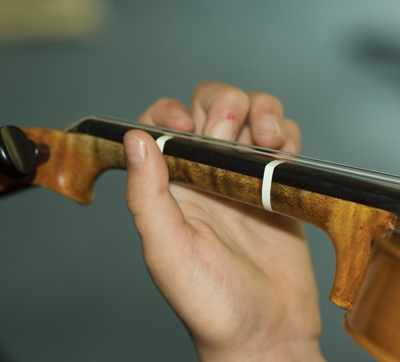
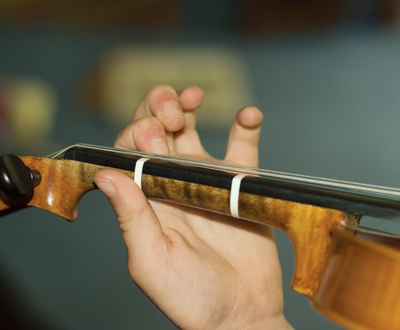
Cello and bass students should place the thumb under the stick between the frog and the grip and arched so that the hand forms a backwards letter C. Check frequently whether the thumb is bent properly as it is hard to see as the student plays. The four fingers contact the bow stick perpendicular to it. The middle finger should be opposite the thumb. The first finger then rests on the stick next to the second finger and contacts the wood between the first and second joints. The third finger covers the mother-of-pearl or dot. The third finger contacts closer to the second knuckle, and unlike the violin, the pinky hangs over the stick at the top knuckle. Teachers should be ready to modify these finger positions, depending on the size and strength of each student’s hand.
.jpg)

The thumb should be bent and not poke through the bow as on the right.
In a cello bow hold, the pinky lies over the stick instead of standing on top.
Violin and Viola Left Hand
Without a good left-hand position, facility on the instrument, shifting and vibrato as well as intonation will be severely hampered. Violinists and violists support their instrument between the jaw and the shoulder. A shoulder rest or soft sponge (either flat or shaped) is often more comfortable and helps support the instrument. Students should be able to hold the instrument up without the support of the left hand.
If the chin rest causes discomfort, place a cloth or a cloth with a small bit of padding over the chin rest. Chin rest covers and a variety of shoulder rests are available commercially.
The elbow should fall naturally under the belly of the instrument with the wrist straight and in line with the elbow and upper arm. Watch that the arm doesn’t move out to the left as it makes it difficult to use the fingers properly, especially the fourth finger. Beginning students should rest the base knuckle of the first finger on the neck of the instrument opposite the thumb.
While the thumb should be relaxed as it holds the neck, some students point the thumb directly up while others are more comfortable leaning it slightly toward the scroll.
Fingers should angle back slightly toward the scroll, and when playing the finger tips should strike the strings while the knuckles stay curved. The fingers should remain over the strings in a rounded position, never straight or collapsed, when not in use. Watch for third and especially fourth fingers that curl back toward the hand when they are not on the string. Ask students to play a slow scale or exercise (pick one that uses the fourth finger) while keeping the fingers hovering over the string to correct it. Fingers that collapse or pull away are no longer flexible and can’t move quickly to the next note or to correct intonation.
Fingers should hover over the strings when not in use; they should not pull back or fly-away as in the picture above.
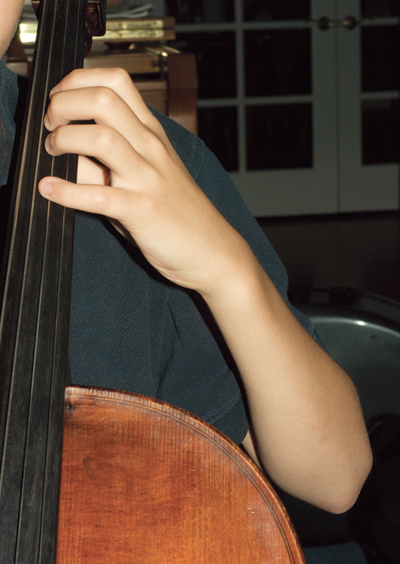
Cello and Bass Left Hand
With cello and string bass players a major problem is too much pressure on the left-hand thumb. The thumb should be behind the neck directly in line and parallel to the second finger. When shifting to different positions, the thumb remains with the second finger and acts as an anchor. Fingers strike the fingerboard a bit more on the fleshy part of the finger than the violin, but they should still remain curved at the knuckles and never flat or collapsed.
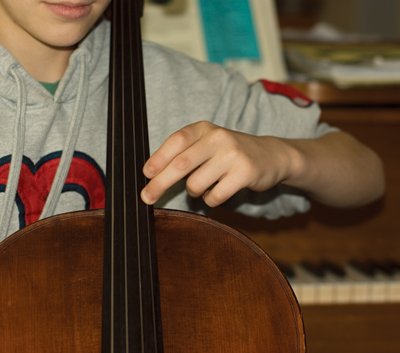
Fingers should be curved, not flat as shown here. The fingers not in use should be curved over the string.
Elbows should be in line with the straight wrists. The height of the elbow depends on its position relative to the fingerboard. As cellists move to higher positions (closer to the bridge) they raise their elbows higher. The elbow should also raise as they move to lower strings. Many young students tend to play with their left elbow down by their side. Slow scales are a good way to teach students to adjust the level of both arms as they switch between strings.
If the cellist plays with the elbow dropped to his side, he cannot position the fingers correctly or move easily to different strings and positions.
The wrist should be straight and in line with the elbow. The thumb moves with the hand when shifting. The elbow rises as the cellists moves to a higher position or lower string.
Finger Tapes
Taping the fingerboard to help beginning players with intonation is a highly debated topic. Finger tapes are supposed to help students learn what the notes sound like to develop listening and intonation skills because many young players do not have the trained ears to recognize when they are playing out of tune.
Teachers usually place tapes on the instruments of first-year students in a diatonic scale pattern for the first four notes for violins and violas (re-mi-fa-sol or 1st, 2nd, 3rd, and 4th fingers), the first three notes for cellos (re-mi-fa or 1st, 3rd, and 4th fingers), and the first four notes for basses (re-mi-fa-sol or 1st and 4th fingers in first position and 1st and 4th fingers in 3rd position). As students learn to recognize correct pitch, teachers should remove the tapes one at a time. Then as students learn the relationships of whole and half steps (far and close fingers on the violin and viola) and their respective finger patterns, the tapes become less necessary.
On string instruments, notes are closer together in higher positions (closer towards the bridge). Scales are a good way for students to hear the distance between half steps and how to position their fingers as they begin to play in higher positions.
A Sequential Curriculum
Many students begin their study of string instruments with the Suzuki method, a rote curriculum that uses simple folk songs as the basis for learning and developing the ears. It has been successfully adapted by teachers for use in public schools. Listening to recordings of professional string players also develops the ears and helps students’ intonation and phrasing skills to improve while developing a sense of the actual sound of the instrument.
Performing duets, trios, and quartets teaches students to become independent players in an ensemble. Chamber music also develops intonation and listening skills as well as phrasing, articulation, and dynamics.
Selecting Music
Students should play good-quality literature that is within the scope of their technical abilities. Pieces in keys with one or two sharps are the easiest for young players. Many beginning orchestra pieces include notes requiring altered fingerings that need to be taught: low second fingers and high third fingers for violins and violas and extensions for the cellos and basses.
Most level-one and level-two pieces for beginning through third-year players include a treble clef viola part so that violinists can help the viola section if the group is not well balanced. There are also many ensemble pieces that include parts for beginning violin, viola, and cello/bass that give young players the experience of participating in a more advanced group.
Play, Play, Play
Most important, keep your students playing. After all, that is why they came to you for lessons or signed up for string orchestra. Offer compliments when each and every student does well or masters new skills; and when an area of playing needs help, focus on one item at a time and work through each adjustment.
Perhaps have a bow-hold month or a left-hand-open cave month. Continue to monitor each student’s posture as well as his left-hand and right-hand positions, even through high school. Do whatever it takes to keep students playing as you help make them to be better musicians. String specialists in your area are a valuable resource. Contact them for questions, suggestions, and maybe even a private lesson or two. Teaching strings can be a rewarding experience, even for general music instructors who are accustomed to singing with students and band directors who are more familiar with woodwind and brass instruments.
Maintenance
Periodic Maintenance
For good tone production, the instrument has to be correctly set up. Bridges should be the correct height, pegs seated securely so they adjust easily and stay in pitch, and sound posts in the correct location. A reliable string repair person can make sure each instrument is properly adjusted and check for cracks or loose seams. Rental instruments should be adjusted by the rental company. Do not be afraid to insist on well-adjusted instruments.
All beginning and intermediate violin, viola, and cello students should have fine tuners on their instruments, which makes tuning a lot of instruments easier for teachers in addition to encouraging students to learn how to tune the instrument themselves.
Check for strings that are frayed and beginning to unravel and replace them at once. In general you should replace strings every year so they will have a full, resonant sound. If an excess of rosin builds up on the strings, you can clean them with an alcohol wipe. Just be sure the alcohol doesn’t get on the body of the instrument because it will damage the wood.
String bows will need new hair periodically. Check to see whether the hair no longer holds the rosin or has become thin and does not cover the full width of the ferrule. Student bows should be rehaired each year by a string repairman; the cost is generally about $25.
Teachers should also watch out for cello and bass end pins. Although they get dull, depending on use, and can be sharpened with a metal file, it is best to have a string repairman show you how to do this. The instruments that do not have rubber stoppers should be kept sharp so they can be anchored securely when students play them.
Student Instrument Care
Teach students to handle their instruments with care. Violins and violas should never be left on chairs, the floor or hanging from music stands. Every student should keep rosin and a clean, soft cloth in their cases. Rosin before playing, and wipe excess rosin off the strings and wood after playing. Students should also loosen the bow hair before putting the instrument away. This keeps the stick from warping and helps prevent the hair from stretching. When this is not done, bows need rehairing more frequently. Encourage students to wash their hands before playing as dirt and oil will damage strings and bow hair.
Additional Resources
Strategies for Teaching Strings, Donald Hamann and Robert Gillespie, (Oxford University Press); How Muscles Learn – Teaching the Violin with the Body in Mind, Susan Kempter (Alfred); Teaching from the Balance Point, Edward Kreitman (Western Springs School of Talent Education); The Teaching of Action in String Playing, second edition, Paul Rolland, (American String Teachers Association); Nurtured by Love, Shinichi Suzuki (Summy-Birchard); Playing the String Game, Phyllis Young (Shar Music); Essential Elements 2000, Michael Allen, Robert Gillespie, and Pamela Tellejohn-Hayes (Hal Leonard); String Explorer, Andrew Dabczynski, Richard Meyer, and Bob Phillips (Alfred); Strictly Strings, Jacquelyn Dillon, James Kjelland, and John O’Reilly (Alfred); All for Strings, Robert S. Frost and Gerald E. Anderson (Kjos). Many other publications are available through the American String Teacher Associ-ation and the Music Educators National Conference.


