The Teacher’s Studio
It seems with each new band composition, the writing for the flutes is becoming higher and higher in range. When students bring in these challenging works, I have often remarked that today’s high notes become tomorrow’s low notes. The fingerings for the third and fourth octave notes are more complicated than the first two octave notes because they are based on overblowing lower partials and then opening or closing other fingers to be in tune. These hybrid fingering are a challenge to learn, execute, and play in tune.
Getting Started
When working on flute intonation, always begin by checking the cork placement. The goal for the flute section is for everyone’s flute to be similar in length. If one person’s cork is ¼ inch off towards the crown, then their flute is longer than the others, and pitch is affected. Use the line on the cleaning rod to find the correct placement of the cork assembly. When inserted into the headjoint, the line should appear at the half-way point in the embouchure hole. If the line is closer to the tenon end of the headjoint, simply screw the crown clockwise until the line is in the center. If the line is closer to the crown, then unscrew the crown a few turns and push the crown assembly in until it is centered. This step may need to be repeated a few times depending on where the line first appears.
Pulling Out
Headjoints are made to be pulled out. This is so the player has the ability to raise the pitch if necessary. Most student and step-up flutes are made on the sharper side of the pitch, so they definitely need to be pulled out. How much should the headjoint be pulled? Start with ¼ inch. For some flutes the amount will be as much as another sixteenth of an inch. Have students play a second octave D with the tuner. This is an excellent tuning note because the flute is quite stable in the hands. (On most flutes the first and second octave A’s are a little flat.) Tune the first and second octave D. When these two are in tune, the headjoint is pulled enough.
Alignment of Flute
Looking at the assembled flute from the footjoint end, align the center of the right-hand keys (D, E, F) with the center of the embouchure hole. This is the classic alignment. Some flutists use the modified Rockstro where the embouchure hole is turned a bit farther back towards the player, but many flutists have found that this alignment may cause pain issues in the future especially in the right shoulder.
Mark It
Once the headjoint is pulled for the best tuning and the center of the embouchure hole is aligned with the centers of the right-hand keys, use a felt tipped marker to place six or eight lines around the headjoint and body of the flute, so students can align the flute properly each day. The felt tipped marker lines will disappear with repeated handling of the flute, so they will need to be redone every ten days or so.
Balancing the Flute
Being able to balance the flute in the hands is one of the most challenging aspects of playing the flute. The goal is to have the flute balanced in the hands so the keys are always pointing towards the ceiling. When playing, the tube of the flute body remains stationary with only the fingers and keys moving. Practicing trills is an excellent exercise in learning to move only the fingers. The fingers (all except left index finger) move from the third knuckle back from the nail and are kept as close to the keys as possible when moving.
Many flutists incorrectly let the keys tilt back towards the player. The downside of this is that the flute is resting on the left-hand thumb. Then, when the left thumb needs to be removed for C, C# etc., the entire instrument changes position. Working on a B to C trill helps students learn the correct balance point. The secret though is to position the flute on the index finger just above the third knuckle back from the nail. Do not place the flute on the side of the finger as there is a nerve running along there that will get inflamed. Rather, place the flute on the palm side of the left index finger.
Flutes Need Space
Every flutist in band should have their own music and music stand. If two or more are sharing a stand, then the alignment of each flutist will be off. When the alignment is off, intonation suffers. Better to spread the flutists out so each can sit in their chair properly and not bump into another flute player. Another reason for separating the flutes is to protect their hearing. Many professional flutists wear an ear plug in their right ear to prevent hearing damage. Almost all piccolo players wear one or more ear plugs. Like the trombones, flutes need their space.
Top Octave Fingerings
Of the 15 notes (C4 to D7) in the top octave, six of the notes are fingered by removing the left thumb. If students cannot remove the left thumb without the flute rolling back towards them, then these notes are out of tune (flat). If students do not remember to roll out into the proper position after playing the thumbless notes, then all of the other notes will be out of tune due to the angle that they are now blowing. Learning to keep the flute stationary in the hands is truly one of the most difficult aspects of playing the flute in tune. Just a reminder that the left thumb is straight and points towards the ceiling.
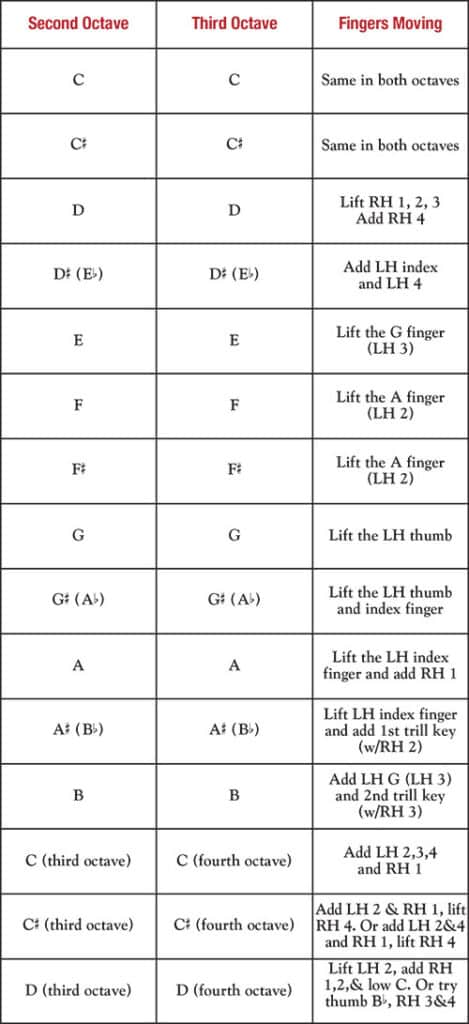
Which Fingers Move
When I was studying with William Kincaid (the legendary principal flutist of the Philadelphia Orchestra and Curtis Institute Flute Professor), he remarked when playing octaves from the second octave to the third octave, don’t think of the fingering chart, but think of which fingers move. This proved to be excellent advice. The following is a chart of which fingers move.
The Most Challenging Fingering
For most flutists, playing from the top octave F# to the top octave G# is challenging. The problem is in achieving the perfect timing between lifting and adding fingers. If the flute is slipping in anyway, intonation is affected. When lifting a key, the sound occurs sooner than when closing a key. This interchange fingering has two fingers opening and two fingers closing. To have control flutists should practice playing the chunk F#, G#, F# rest, slurred, 10 times on day 1 and the chunk G#, F#, G# rest, slurred, 10 times on day 2. Remember the F# will not sound if the thumb Bb is used.
More on Pitch
When playing in the top octave, the jaw is dropped. Another way of teaching this is to say drop your jaw so there is space between the wisdom teeth. Opening the oral cavity creates a larger space and consumes the extra amount of air that many students use in the top octave. Having less air means that the top octaves will not be as sharp.
Dynamics and the Top Octave Notes
In the early stages of flute playing, students are happy to get the top octave notes, and most of the time the note is at a forte level. As students progress, the goal is to be able to play at all dynamic levels. The first step in learning to play softly is to direct the air as if singing in a head voice rather than a chest voice. Simply directing the air up into the sinuses is the first step. Flutists should never feel that they are reaching for a high note, but instead should envision that they are creating a passageway by lifting the soft palette. It should feel as if they are over and above the note and coming down to the pitch. I practice singing in the head voice for a few notes to recall this positioning.
The other important aspect lies in the embouchure – the size of the aperture and the angle of air. Learning to make the aperture smaller may be done by watching oneself play in a mirror. When tapering a note, the aperture becomes smaller during the diminuendo. Placing a flat or oval coffee stirrer straw in the aperture teaches flutists how to grip the air stream.
For the angle of air, practicing harmonics and multiphonics are good choices. For the harmonics, slur a first octave G to the second octave G and then to the third octave D. Once on the D, alternate this harmonic with a real fingered D listening carefully to find the sweet spot in the tone. Practicing this with vibrato improves the ring in the regularly fingered note. Repeat on Ab, A, Bb, B, C and C#.
Practicing multiphonics or playing two notes at once is also beneficial in embouchure development. Start by playing a low octave G. Once the note is sounding, do not move anything (tongue, head, lips etc.) and slightly increase the air speed until the G an octave higher is heard at the same time. Repeat on Ab, A, Bb, B, and C. This exercise takes patience but the benefits are worth it.
Tuner
When working in the top octave, do not avoid the tuner. As one colleague so aptly said, “Tuning is not optional.” For best results, begin on top octave D playing a half note with a breath attack. Once students can do this in tune with the tuner, they should begin the note with the Tu attack. Finally for the third try, use the Tu and let the vibrato come in.
Several of the notes in the top octave have alternate fingerings for tuning. These fingerings should not be used on scales but rather on melodic places or single notes in the music. The most useful is for the top octave Ab or G#. The pitch will be lowered by adding right-hand 2 and 3. For flutes with the newer scale (made since the late 1980s) the top octave F# is better in tune with the right-hand 2 rather than the 3.
Buying a Flute
When trying flutes for purchase, use the tuner to check the notes Ab to Bb in the top octave. On many flutes, the Ab is sharp, and the Bb is flat. This interval of a second is noticeably too small. The Ab needs to be flatter and the Bb sharper. This is also a good interval to check when auditioning piccolos.
Top Octaves
The top octave notes won’t be conquered by not practicing them. Students should set aside a few minutes in each practice session to focus on playing them with a beautiful sound and good intonation. Since the top octave notes are out of singing range, encourage students to play passages from their music in as many octaves as they can to develop their hearing in the top octave.
If students are learning the top octave notes for the first time, remind them to be patient. Work on one new fingering a week. They can practice using a mirror to be sure to maintain a good set up position, keeping the keys pointing towards the ceiling. In a matter of months, the top octave will be something they enjoy rather than something to be feared.