Editor’s note – this gem from our archives first ran in the July 1987 issue.
Give your cellists longer endpins and they will play in tune better. Sound silly? It isn’t. You can dramatically improve your cello section if you pay attention to the basics: the player, the cello, the bow, and even the chair.
Imagine that one of your cellists is unable to play these notes in tune:

Most likely, the extension from A to C# is to small. In other words, the cellist is not stretching far enough. Perhaps he cannot negotiate the stretch because the left thumb is immobile. (In a forward extension, like the one above, the thumb should move in the direction of the extension.) Immobility occurs because the entire left hand is squeezing the neck of the cello to support the instrument. The instrument should lean against the chest, but it is leaning instead against the stomach, which is too soft to offer any support. The cause of this: the cello is to low, because the endpin is too short. A seemingly insignificant matter like the length of the endpin can affect students’ ability to play in tune.
The most frequently overlooked fundamentals are posture, holding the cello, bowing, extensions, vibrato, and the instrument itself.
A good cellist leans into the instrument slightly when playing. In an attempt to make room for the cello, many beginners lean to the right instead. The resulting stiff neck tells them why they shouldn’t. The solution is to lean the cello more to the left.
The cello rests on the player’s left knee and chest. The right leg should touch the instrument but not squeeze it. The feet should not be shoved under the chair; otherwise the legs will be drawn away from the cello and prevented from supporting the instrument properly. With cello in hand, the player should look natural and at ease, but ready for action.
Many students have trouble learning to hold the bow properly, so be prepared to devote considerable time to teaching this concept. The right forearm should be turned so that the first finger leans on the stick; otherwise the bow path will be incorrect and the tone quality will suffer. To avoid fatigue and muscle cramps, the bow should be held very loosely. (Excess tension is especially common in the right thumb.) Keep all the fingers slightly curled.
The bow should always remain parallel to the bridge. If it does not, the tone becomes scratchy and the bow tends to slide toward the bridge or the fingerboard. Remember that students cannot judge the angle of the bow from their visual perspective, so don’t ask them to watch toe bow angle. Instead, remind them that when playing in the upper half of the bow the elbow should open and close. In other words, the forearm is used. In the lower half, the whole arm is used.
Two of the most common special bow strokes are spiccato and détaché; spiccato is best performed about an inch or two beyond the wrapping. The bow should actually bounce on the string, otherwise the sound will be rough and muddy. Keep the fingers and the arm very relaxed. You cannot actually force the bow to bounce; you can only allow it to bounce.
For détaché, use the middle of the bow, moving the forearm – not the whole arm – back and forth. Think of the elbow as a hinge. Many students try to play détaché at the frog of the bow, using the whole arm. The result is that the bow can’t be moved fast enough, and the tempo slows down.
It’s important to know when to use these two bow strokes. Here’s a general rule: at metronome markings from 80 to 120, repeated eighth notes should be played spiccato; repeated sixteenth notes should be played détaché. At tempos faster than quarter = 120, play repeated eighth notes détaché.
The bow arm is not the only potential trouble spot. When the left thumb squeezes too hard, extensions, vibrato, and shifts become all but impossible. To help the left thumb relax, try playing a scale in whole notes. After starting each note, lightly tap the thumb on the back of the neck of the cello. Practice this exercise in the early months of cello playing to improve intonation. Later, vibrato and shifting will be easier to learn.
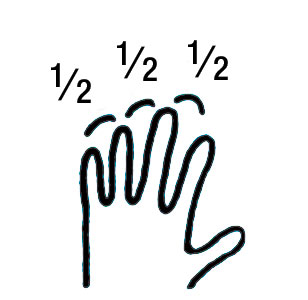
Extensions constitute an area of cello technique that often requires attention, yet most students – and many teachers – don’t understand exactly what an extension is. It is more than just a stretch between two fingers. Without extending, there is a half step between each finger:

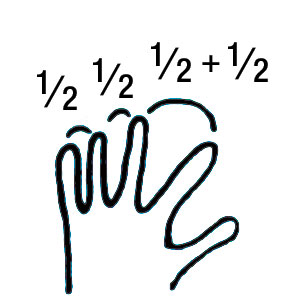
In an extension, the interval between the first and second fingers increases to two half steps.

The intervals between the first finger and each of the other fingers also increase by a half step.
To avoid playing extensions out of tune, be sure that the left hand is always pronated. In other words, the back of the hand turns more toward the scroll. When making a forward extension, such as one to four, the thumb must be mobile enough to slide down the neck and remain opposite the second finger.
If taught incorrectly, vibrato can be a nervous uncontrollable quiver, so narrow that it adds nothing to the sound. It cannot be turned on and off, made wider or narrower, faster or slower. Poorly executed vibrato creates tension in the left hand, making extensions and shifting difficult. Further-more, performed like this for many years, it is sometimes uncorrectable. If you decide to teach vibrato – and it’s no crime if you don’t – find a method you like and take your time.
Introduce thumb position early. Begin by having students practice sliding from first position into thumb position and back again, without the bow and with almost no left-hand pressure. This exercise familiarizes the students with the mechanics of thumb position without concerning them with intonation. When playing in thumb position, students should remember the following points:
• The thumb should always rest on the string.
• The hand tilts back toward the scroll. (In other words, pronate.)
• The fourth finger is not used.
If you expect your cellists to have good intonation, they need to be able to tune their instruments. To this end, fine tuners must be installed on all strings, and all pegs must be kept in perfect working condition. As discussed earlier, the endpin must be long enough – 12 to 18 inches is usually sufficient. On the other hand, the cello itself should be small enough. In fact, especially for left hand technique, it’s better for a cello to be too small for a player than too big.
The bow should be small enough; otherwise, drawing it parallel to the bridge will be impossible, or at least very difficult. If the bow hair is old or dirty, rosin will not stick to it, and the bow will glide over the strings, producing very little sound.
Even the chair a cellist sits on affects his playing. If it slopes back, the seat of the chair cannot help maintain proper posture. The chair should be high enough that the player’s thighs are approximately parallel to the floor.
Beyond wanting to improve your cello section now, think of your students’ futures. Teaching them good technique now will save them from years of frustration over poor playing. It will also save their future teachers from having to give them remedial instruction.


