Keeping piston and rotary valves moving quickly is normally a simple process, requiring only the regular application of lubricant. However, how to apply that lubricant is not always obvious, especially in the case of rotary valves, and cleaning and minor repairs still need to be performed periodically. The steps described here will help your students to keep their valves moving quickly and smoothly.
Lubrication
Basic lubrication of piston valves is very simple, and should be performed every day or two. Unscrew the top valve cap, remove the piston from its casing (partially or entirely – whichever you prefer), apply a liberal amount of valve oil to the piston itself. Then replace, taking care that the valve guide is seated in its correct position. Distribute the oil by operating the valve normally. Repeat this process for each valve. Squirting valve oil into the holes into the bottoms of the valves can work as an alternative in a pinch, but this method of lubrication is not as effective, and if the valve caps are not regularly removed they will freeze in place. Should this happen, you can loosen the valve caps by gently tapping them with a rawhide mallet. Always use soft, glancing blows around the circumference of the cap. If this does not work after a few minutes – or if you are uncomfortable tapping an instrument with a mallet – take the instrument to a repair technician.
Lubricating rotary valves is a somewhat more complex process than that for piston valves, but it does not need to be performed as frequently. Once a week or so should be enough. One key difference is that you will ideally have two types of oil on hand. One is a lighter formulation, sometimes labeled “rotor oil,” and the other is a bit heavier, and might be labeled “bearing and linkage oil” or something similar, depending on the manufacturer. Regular valve oil can substitute for rotor oil, although you might need to use a larger amount, and with more waste as excess runs out of the valve. Trombonists should detach the slide from the bell section before beginning this process; horn and tuba players will be able to jump right in.
First, remove the valve caps and place a few drops of the heavier oil on the end of each spindle.
Replace the caps (trombonists with axial flow valves will skip this step), turn the instrument over, and place a few drops of the heavier oil on the other end of each spindle as it enters the valve casing. Alternatively, you might remove the large screws from the ends of the stop arms and put the oil there.
Next, place some of this same lubricant on the various connections throughout the linkages. The object is to have lubricant placed wherever there is friction between metal parts. Finally, horn and tuba players should remove the tuning slides for each valve (trombonists will have already removed the handslide) and squirt a fairly liberal amount the lighter rotor oil (or an even more liberal mount of regular valve oil) into the valves themselves, either through the handslide receiver (trombone) or through each valve’s tuning slide receiver (horn or tuba). Move the instrument about to ensure that the oil runs into the valves, all along working the valve buttons. Allow any excess to run out of the instrument before replacing the tuning slides.
Trombonists might want to place the bell section alone on a trombone stand for a while after completing this process, so that any excess oil will run out of the bell section and onto the floor, rather than into the handslide, where this oil would almost certainly gum up the works after mixing with the handslide lubricant. Replace the slide after all excess oil has run out of the bell section.
Cleaning
A key difference between upkeep of trombone slides and that of both piston and rotary valves is that while the cream-type lubricants used on trombones demand that some cleaning take place every time the slide is lubricated, valves do not require this. Not only do many valve oils have some innate cleaning properties, but unlike slide creams, these oils will simply evaporate over time or run down through the tubing until excess is expelled along with condensation. Still, some regular cleaning is advisable and easily performed.
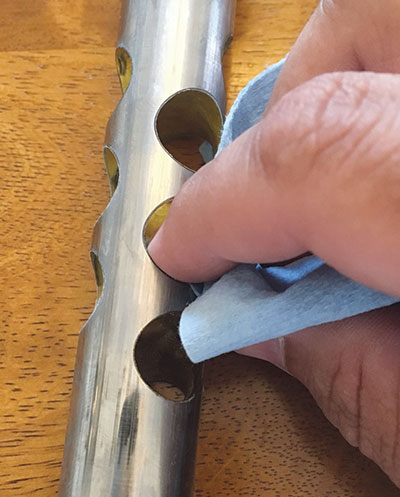
With piston valves, clean the valve casings to make sure they are free from grime and debris every month or so. Remove all of the pistons, bottom valve caps, and springs, taking care to keep the parts for each valve together. Form a clean paper towel into a thin roll and use it to wipe out the insides of each casing. Repeat for each valve. Use a paper towel also to remove any buildup from the insides of the bottom valve caps and the ports in the pistons themselves.
When reassembling, make sure to place the correct piston into each casing, or else the instrument will not function correctly. If you cannot remember which valve is which, most makers lightly indicate the number of each valve in an inconspicuous place (usually the top of the piston). Wisdom dictates that younger students remove and replace the pistons one at a time so that mixups do not occur, although this is impossible when a more thorough cleaning is needed.
If the instrument is particularly grimy, consider giving it a bath by disassembling all the valves, removing all of the tuning slides, and submerging all of the parts in lukewarm, soapy water. Make sure the water is not too hot, as hot water can damage some lacquered finishes. Also, place the pistons in the water in such a way that the felts and corks do not get wet. Use a valve casing brush to lightly scrub the insides of the casings and the valve ports to remove any stubborn debris that has been loosened by the water.
Food particles entering the instrument through the leadpipe can be particularly problematic for tubas, euphoniums, and some marching instruments, because the leadpipe enters directly into one of the valve casings. These particles can thus cause significant problems for valve action. Running a cleaning snake through the leadpipe during the bath can remove much of this, but make sure that none of this material remains in the valve casings before reassembling the instrument, and never snake out the leadpipe while the valves are assembled. For instruments where the leadpipe leads directly to a tuning slide, pushing gunk from the leadpipe into the valves is avoided simply by removing the tuning slide. Rinse all soapy residue from the instrument prior to reassembly, and be sure to lubricate the valves and tuning slides before playing.
Regular cleaning of rotary valve instruments consists only of giving the instrument a bath in much the same way as described above for piston valves. The tuning slides should be removed and a cleaning snake used to remove debris from the instrument, but the valves will not be removed. Disassembly of rotary valves and their derivatives is far more complicated than that of piston valves, and is rarely necessary except during periodic professional cleaning. This is certainly not a task that should be performed by the vast majority of grade school students. Directors can learn how to do it, but seating the bearing plates properly when replacing the valves can be tricky for those unfamiliar with the process. If you are uncomfortable with tapping a brass instrument repeatedly with a mallet, then have a local repair technician take care of this task for you. Additionally, some boutique valve manufacturers insist that rotary valve disassembly should not be tried at home at all, and ignoring this warning can void any warranty on their instruments. Despite these warnings, if you would like to try rotary valve disassembly and reassembly a number of texts for horn, trombone, and tuba explain the process in detail. Describing the process here would far exceed available space. You can find helpful instructional videos on YouTube for this process, as well.
Minor Repairs and Maintenance
If the valves still do not work well after taking these steps, the instrument may need a trip to the repair shop for professional cleaning or repair work, but minor repairs can be performed in the band room. Piston valves sometimes need to have the valve guides, springs, or corks and felts replaced. Rotary valves might need to have the valve alignment corrected by installing new bumpers, and string linkages break periodically and need to be replaced.
Valve guides are small plastic, rubber, and/or metal pieces that protrude a bit from the top of each piston and fit into a corresponding track or tracks in the casing.
The purpose of these is to keep the valves in the correct horizontal positions—if they were allowed to spin in their casings the instrument would be impossible to play as the ports would go out of alignment. When a valve guide wears down the valve might begin to stick as the guide slips out of its track, or it could begin to spin freely if the guide wears out completely. Valve guides are considered normal wear items and are easily replaced by a technician, although most teachers and advanced players can learn to do this themselves. Purchase a few extra sets of valve guides for the instruments your students use and keep them on hand so that they can be replaced without the time and expense of a trip to the repair shop. Be aware that new valve guides are sometimes a little too long and might need to be filed down slightly before use.
Springs are another item that normally wear out from time to time, whether from becoming overstretched, too compressed, or simply dirty and corroded. As with valve guides, keep a few extra sets of springs for each instrument on hand at all times. While plain metal springs work just fine, some manufacturers’ springs have a rubber or plastic coating that reduces noise, and you might consider using these for all of your instruments regardless of manufacturer.
The felts and corks that maintain a valve’s vertical alignment also degrade over time, with leakiness, stuffiness, excessive noise, or poor response being indicators (in addition to visual examination) that these need replacing.
These can often be purchased in sets measured for particular makes and models of instruments so that the correct alignment is maintained, although you might want to have a repair technician replace them to maintain the most precise alignment. This is a routine service that is performed quickly and inexpensively.
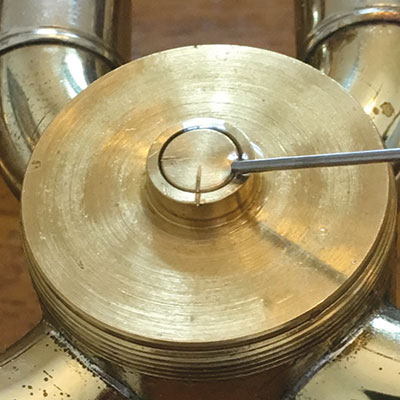
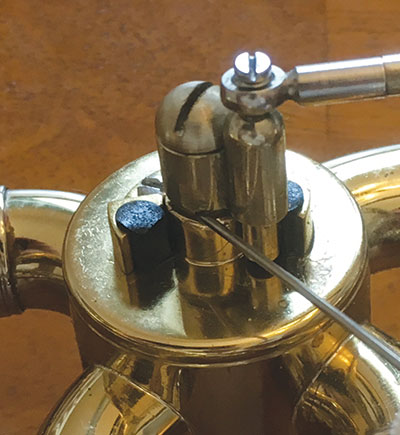
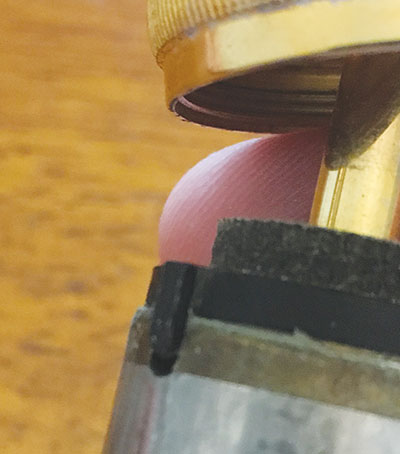
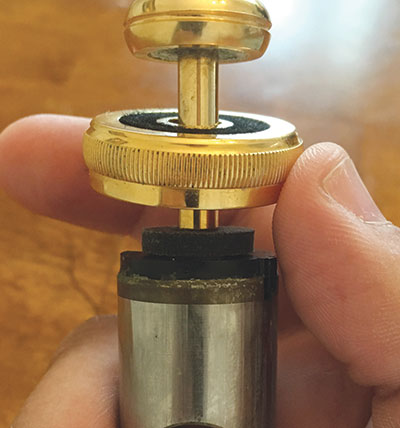
Faulty valve alignment is also a common problem with rotary valves, but it can be corrected fairly easily. A stuffy sound is the telltale sign of this problem, which is caused by normal wear and tear of the cork or rubber bumpers, or even the loss of one or more of these. To check if alignment is the problem, remove the valve cap and look at the bearing plate, spindle, and casing. You will almost certainly see two or more sets of notches, etched lines, or other indicators. One set is a notch on the edge of the valve casing, with a corresponding one on the bearing plate. Make sure that these are aligned before proceeding.
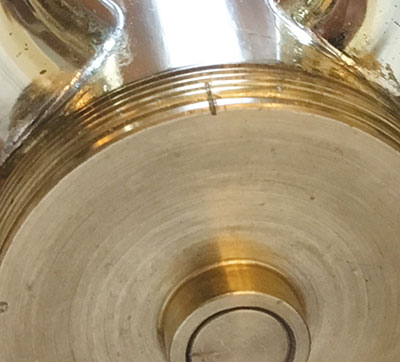
While there are sometimes variations on this setup, you should also see a pair of etched lines or other indicators on the spindle, placed at a 90-degree angle to one another, and one or two corresponding indicators on the inner edge of the bearing plate. When the valve is disengaged one of the indicators on the spindle should be aligned with that on the bearing plate, and when it is engaged the other should align with the indicator on the bearing plate.
If the valve is misaligned in either or both positions, the bumper where the stop arm rests in that position has become worn (or, more rarely, is too large) and must be replaced. To do this, cut a piece of cork or rubber to the needed shape and thickness and place it on the instrument in place of the old bumper. The correct size and shape will be that which remains in place and causes the indicators on the spindle and bearing plate to be properly aligned in both the open and closed positions. Music stores often carry lengths of rubber bumper material in various diameters which can be purchased and kept in the band room. Having several of these on hand will greatly simplify the bumper replacement process. While friction should be sufficient to hold the bumpers in place, a small drop of super glue can be added if desired.
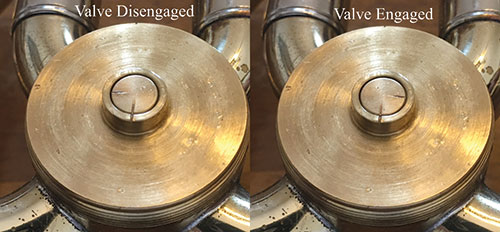
One etched line should match up with the mark on the bearing plate when the valve is disengaged, and the other should match the bearing plate marking when the valve is engaged.
The above procedure should work with rotary valves and most related valves, although checking and correcting alignment of axial flow valves and perhaps other types is more difficult. For advice about aligning those valves, or if in doubt about any of the above procedures, consult a qualified technician.
Broken string linkages are a common problem with horns, and less often with trombones, which rarely have string linkages these days. For tubas string linkages are exceedingly unusual, seen only on certain historical instruments. The diagrams below show how to correctly replace broken strings.
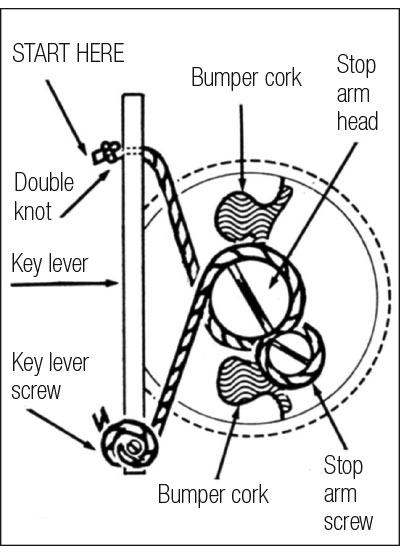
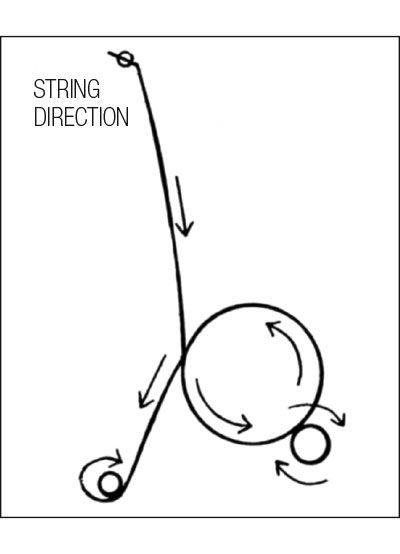
You can also consult a number of videos on YouTube for directions, or even simply compare your work to the already-strung valves on the instrument you are working on or another instrument in the band room. One additional note with horns: when restringing a valve or valves lay the instrument on a table or other flat surface and ensure that the stop arms for each of the three main valves are in the same position. This will ensure that the finger buttons remain parallel.
While instrument makers sell high-quality string designed specifically for rotary valves, you might instead purchase a supply of 50-pound test weight braided fishing line. This type of string can be purchased inexpensively at sporting goods stores, big box retailers, or online. A single purchase should yield a lifetime supply. Make sure, though, that you get the softer, braided fishing line; monofilament line will stretch and cut into the instrument over time.
Finally with regard to rotary valves, the sheer number of screws, bearings, and other small parts in the linkages virtually ensures that loss or breakage will occur periodically. As with the valve guides, etc. for piston valves, keep some of these on hand so that they can be quickly replaced. Regular lubrication as described above will make this occurrence as rare as possible.
Preventing Damage
Happily, regular lubrication and cleaning, along with occasional replacement of small parts, are normally all that is necessary to keep both piston and rotary valves moving freely. They are remarkably difficult to damage as long as players use correct finger technique and do not set the instrument down improperly when not in use. Regarding finger technique, players of piston valve instruments in particular should keep the hand curved gently (as when holding an aluminum beverage can) and place the padded part of the fingertips in the center of the valve buttons.
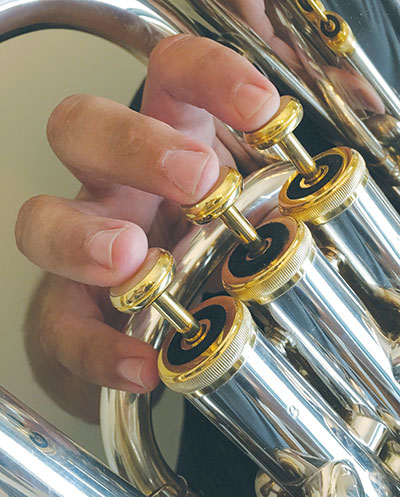
This facilitates a comfortable and efficient playing technique that keeps piston valves moving straight up and down in their casings. Excessive arching or flattening of the fingers, as well as placing the fingers off center can cause a slight sideways motion in the valve action.
In the short term this will cause the valves to rebound slowly when released, resulting in a loss of accuracy in playing. In the long term a poor hand position can cause wear to the pistons or casings. A faulty hand position is less likely to damage rotary valves, but correcting it will still lead to improved performance.
While dents or other damage to valve casings can occur due to accidents of various kinds, bent or broken valve stems or linkages are much more common. When the instrument is not in use, players must ensure that no pressure is placed on the valve stems or linkages, whether the instrument is placed on the ground, on a table, or in its case when not in use. While the proper way to place an instrument in its case might seem obvious, it is worth spending a few minutes with young students to make sure that they are orienting the instrument correctly when storing it. Instrument stands or storage racks can go a long way toward preventing costly damage, as well.
Conclusion
Unlike trombone slides, which must receive at least a superficial cleaning every time they are lubricated, both piston and rotary valves (and their derivatives) can normally be kept moving well with careful use and regular oiling. Taking the steps described here will ensure that valve action remains fast and smooth, and trips to the repair shop remain infrequent.