
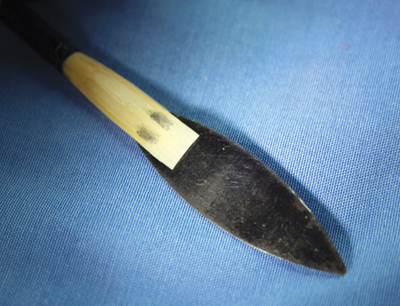
An oboe reed has a relatively short life span and the frequent need to change reeds makes it difficult for oboists to develop a consistent sound. Beginning oboists are at even more of a disadvantage because they rarely have someone to make reliable reeds or adjust purchased reeds. Furthermore, many oboe students buy inferior-quality reeds because those of high quality are considerably more expensive. If purchasing a reed, a beginner should buy a soft or medium-soft strength reed of the highest quality that is affordable. A good reed can make an inexpensive oboe in good working condition sound excellent, but a poorly made reed can cause a fine oboist playing an excellent quality instrument to sound abysmal. One way to recognize a good reed is to hold it in front of a bright light and identify the following parts as indicated in the diagram below.
.jpg)
It is rare that a new oboe reed will work satisfactorily the first time it is played. One reason for this is that the same reed works differently for different students depending on tiny variations in embouchure. It is also necessary to adjust a reed to compensate for changes that occur while breaking in a reed.
All reeds face repeated soaking and drying. This usually has a profound effect on a new oboe reed. Soaking and drying will cause the fibers in the cane to expand and contract. During the break-in period, these fibers rarely contract to the size they were before they were soaked. The reed becomes slightly thicker and its response is diminished with each repetition of soaking and drying. Because of this it must be adjusted so that response is restored. The ability to make simple reed adjustments is essential. However, learning reed adjustment techniques can pose an insurmountable obstacle for those who are not comfortable using oboe reed making equipment.
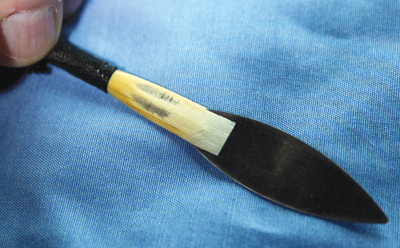
The opening of the tip is the first feature to examine. The tip on a new oboe reed tends to be more open than on that of an older reed. After soaking the reed for four minutes, compare the opening to the tip of the reed in the previous diagram. If the tip is too open, an adjustment must be made to close it. To do this, carefully pinch the very tip of the soaked reed with your thumb and index finger. Gently squeeze it closed for a few seconds. If the opening of the reed is not sufficiently smaller, carefully pinch both the heart and the tip closed, and hold for a few seconds. Be sure that the reed has been soaked for long enough before squeezing the tip closed. A reed that has not been soaked properly is likely to crack when it is squeezed. When the tip of the reed is closed to an acceptable diameter, further modifications are often not required. If the reed response is not sufficiently improved, more adjustments are necessary.
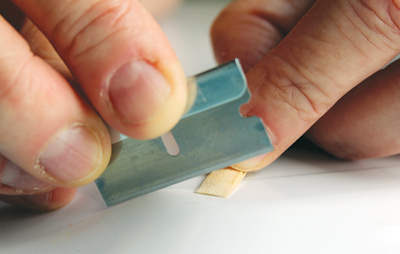
There are only two basic oboe reed adjustments. The first is to clip the tip. If the reed responds too easily, the pitch is wild, and the tone quality is too bright. Reed makers often use a cutting block and a single-edged razor blade to make this adjustment. The razor blade is anchored on one side of the cutting block to provide stability when clipping. Clip only a miniscule slice off of the tip. After the tip is clipped, play the reed. If it still responds too easily, clip another miniscule slice off of the tip. Repeat the clip and test process until the reed responds as desired.
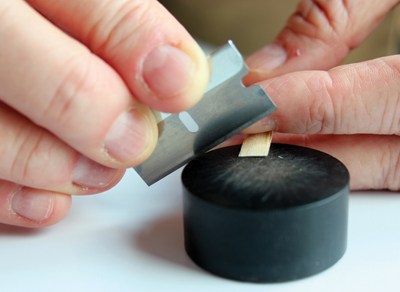
It is highly unorthodox, but entirely possible to use a flat area of a solid wooden desk or metal file cabinet as a substitute for the cutting block.
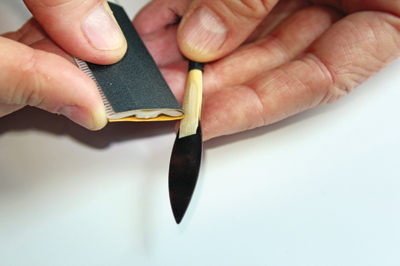
The second basic oboe reed adjustment is to scrape. This adjustment usually requires the use of a reed knife, but a small square of 400-grit sandpaper wrapped around the end of a short ruler can be an effective substitute.

This sandpaper knife is used in the same manner as a reed knife to scrape an oboe reed.
An oboe plaque will also be needed. The plaque provides stability when inserted approximately a quarter inch between the two blades.
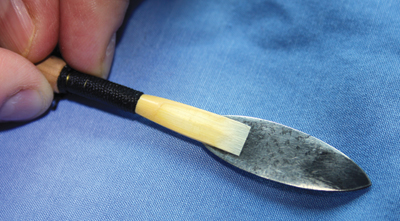
The plaque provides a smooth surface and separates the blades of the reed so that one blade can be scraped without altering the other. The plaque should not be too thick or the contour of the two blades of the oboe reed can be compromised and the reed ruined. There is no substitute for an oboe plaque as there is for a reed knife and cutting block, but oboe plaques are inexpensive and can be purchased online from a double reed supplier.
When using sandpaper instead of a standard reed knife, it will be nearly impossible to scrape the fragile tip of the oboe reed without tearing it. Any scraping should be done on other parts of the reed. One should also avoid scraping the rails and spine; adjusting these could compromise pitch stability and high note response. Staying away from some areas and scraping others can be difficult due to the incredibly small surface area of the oboe reed. To indicate precisely the areas that need adjusting, use a pencil and shade the part of the reed to be scraped. If you make a mistake while drawing on the reed, simply rub the pencil mark off with a finger under a faucet of running water and then redraw. Once the pencil shading is drawn correctly for the desired adjustment, rub the pencil shaded areas with the sandpaper knife. When the sandpaper has removed the pencil shading, the adjustment is complete. Be sure to make all adjustments to both blades of the reed. Test the reed and repeat the process as necessary to achieve the desired tone and response.
The following are the most common oboe reed adjustments requiring the sand paper reed knife.
1. The reed is quite hard and difficult to blow. Lightly scrape all areas except the very tip and the bark.
2. The reed is too hard and the response is stuffy. Scrape the sides of the heart and the blend, avoiding the spine or rails.
3. The reed is flat, especially on notes in the upper register and/or pitch is unstable. If the response is good, clip the tip. If the pitch is still flat, scrape the back, but be sure to avoid the spine and rails.
4. The tone is too bright. Clip the tip if the response is good. If the tone quality is still too bright, scrape the sides of the heart
If nothing is working, check to make sure the reed is symmetrical. As a last resort, on both blades scrape those areas that are thicker than the corresponding area on the other half of the same blade.
Although the ability to use a reed knife well is the most effective way to adjust an oboe reed, adjustments are possible without it. Sandpaper and single-edged razor blades can be purchased at hardware and home improvement stores, and a ruler can be bought at any store that sells office and school supplies. One of the easiest ways for band directors and oboe students to learn these adjustment techniques is to practice on an old oboe reed. After making a practice adjustment on a retired reed, test the reed. You might have brought it back from the brink.


