Timpani are like a pet cat – they need coaxing and training to get the result you desire. Unlike most brass or woodwind instruments, timpani do not require daily assembly to play, so teenage percussionists typically overlook the maintenance necessary to keep them in top shape. A student shows up, stands behind the drums, plays the part, and leaves. If you are lucky he covers the drums, if the school is fortunate enough to own them. Timpani are affected by weather, time, and usage, including when other well-meaning ensemble members use them as table tops to assemble their instruments.
Because timpani are typically neglected and often abused, it is entirely up to directors to be vigilant in maintaining their percussion gear. Fortunately, the job involves a few simple procedures that take place several times throughout the school year.
Timpani Heads
The timpani that are manufactured today are the result of over a century-long evolution of technology. Advances in plastics have extended the life of timpani heads, and current tuning gauges and balanced-action pedals make it easier for timpanists to keep up with the execution of modern band and orchestra literature. Timpani construction techniques have made moving the drums safer, and the tone of each instrument is now more consistent. Even with these improvements, the timpani, especially the heads, are easily damaged.
Over time timpani heads stretch and lose tone quality, so they need replacing annually or when damaged. Head manufacturers have developed timpani head models with a wide range of tonal characteristics. As a director, you should choose heads carefully, based on how they respond to the acoustic properties of your main performance venue.
Here at the Jacobs School of Music timpani tend to have a muddy or dead sound in all of the halls, so we use heads that project the sound more than average and produce a bright tone quality to compensate for this acoustic situation. Most head manufacturers have web sites that include charts or descriptions of their products to help directors in deciding what will be best for their ensemble.
Many manufacturers give you the choice of selecting heads with steel or aluminum insert rings that help with stable tone production. Because of the wide range of timpani here at Indiana University and the varying condition of the drums, we use heads that have steel insert rings.
If, for example, a drum has a counterhoop that wasn’t well constructed or had been damaged so that it wasn’t truly circular, the steel insert ring would help balance the head on the bowl, which assists in producing a clearer tone. No matter the heads you choose, it is best to use the same brand and model for the entire set of timpani.
When you receive heads from a manufacturer, check to make sure there isn’t a pucker or dent in the head where the hoop is glued together. A dent will make the head difficult to clear, meaning to tune, and reduce the tonal quality. Some manufactures place a black line across the center of the head. I won’t go into the details of why the line is there (its intended purpose is debatable), so my best advice is to ignore it.
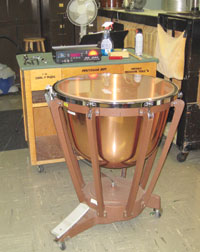
The correct head size is very important. Although most newer timpani have extended collars, older models may not. The easiest way to determine head size is to measure the diameter of the counterhoop (not the bowl of the drum), just inside the outside edge. A 26" timpani bowl may require a 28" head because of the counterhoop size.
The Balancing Tool
A balancing tool is the most important tool every timpanist should own. After the head has been changed and the timpani is in the correct range, the timpanist uses a balancing tool to check the balance of the head at all tension rod points around the bowl, being sure the height between the counterhoop and bowl is equal around the drum. Once the height is equal, the instrument can be cleared.
.jpg)
A balancing tool can be made easily from a few simple materials. It is basically a flat piece of metal or wood, roughly 5" long x 2" wide, with a bolt threaded through it. The bolt is secured by a nut to hold it in place during use.
Changing the Head
Most timpani found in high schools, private schools, and universities have either a balanced-action pedal mechanism or a post-and-clutch mechanism that are used to change the head. Balanced-action pedals are the most common. With post-and-clutch mechanisms, the pedal moves in an up-and-down direction and requires the toe of the foot to release the pedal from a locked position to change pitch. The following procedure works with both types:
1. Place a 2×4 block or similar object under the pedal plate to keep the heel of the pedal on the floor. For post-and-clutch action drums, set the pedal at its highest position, which is the instrument’s lowest pitch.
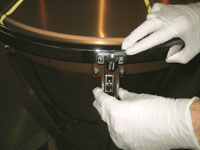
2. Using a timpani tuning key and working as evenly as possible, loosen and remove all tension rods. As you remove the rods, avoid scraping them against the counterhoop to keep from damaging the threads.
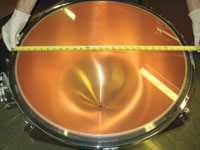
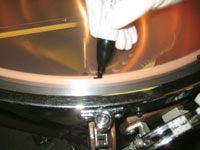
3. Remove the counterhoop and the old timpano head. At this point inspect the drum carefully, removing any items or dust that may be inside the timpani bowl. Also check the Teflon tape on the bowl rim for any nicks or breaks. Teflon tape is used to keep the action of the head smooth at the point where the head and bowl touch; it helps eliminate noise from the head while tuning.
If no Teflon tape is on the rim or it is damaged, then new tape is needed. Remove the damaged tape from the rim and clean the entire rim with a degreaser product such as Naptha or something similar, being careful not to touch the rim after this is done. Gently apply the Teflon tape (without stretching the tape or creating wrinkles) to the rim.
You should take your time with this step and apply the tape smoothly so it doesn’t develop wrinkles or dents that will affect the action of the drum. Some manufacturers sell a plastic Teflon tapelike product for their timpani. If Teflon is difficult to acquire in your area, consult your local music dealer for assistance.
4. Thoroughly clean the drum of dust and grime. You should especially clean in any hard-to-reach areas. Do not clean underneath the drum while the head is off. This should be done before or after changing the head. A can of compressed air or Windex works well for this step.
Be sure to wipe clean the inside of the counterhoop on the bottom side where it touches the metal hoop of the timpani head. You may wish to apply a strip of moleskin, such as Dr. Scholl’s, on the circumference of the counterhoop, which is the bottom side where it touches the metal hoop from the timpani head. This step is optional, but it may help eliminate any metal-on-metal rattling from the drum that may occur while playing.
5. Center the new head on the bowl. Place the counterhoop on the head with the tension rod holes aligned with the struts. After freshly lubricating the rods with 20 weight motor oil, insert them into the threaded strut casings until the lug just barely touches the counterhoop without placing tension against the head.
6. When all the tension rods are in place, make sure the head is centered on the bowl evenly. Most newly manufactured timpani have collars, the small area between the counterhoop and bowl. This area will be uniform around the drum circumference when the head is centered. If this area is not uniform, then adjust the counterhoop to center the head. Usually, eyeballing this step is sufficient, but if you are having trouble, use a tape measure to ensure the collar is the same distance at each tension rod point.
7. Work evenly to tighten each tension rod a half-turn in the order shown:
Be sure to make each turn of the timpani key at each tension rod the same. This will make balancing the head much easier. Continue until the timpano reaches the lowest pitch in its proper range.
8. Remove the 2×4 block from under the pedal plate. The pedal should stay in place. If it doesn’t, replace the 2×4 and continue tightening the tension rods until the pedal sticks in the heel-down position. Slowly engage the pedal until the toe of the plate is completely down. You will hear the crackling of the head stretching. This is normal. Once again, the pedal should not move in this toe-down position.
Generally, if the toe of the pedal won’t stay down (timpano at its highest pitch) then the head tension is too tight. If the heel of the pedal doesn’t stay down (timpano at its lowest pitch), the head is too loose. The drum is out of its range either way. Make any necessary adjustments. Depending on
the quality of the timpani, the ranges may be reduced if the drums are in need of an overhaul, in which case consult a music dealer.
9. Next, balance the head using the balancing tool. To do this replace the 2×4 block under the pedal plate with the heel to the floor. Place the balancing tool on the head next to a tension rod and adjust the bolt of the tool so that the metal or wood plate rests flat on the head with the bolt just barely touching the counterhoop.
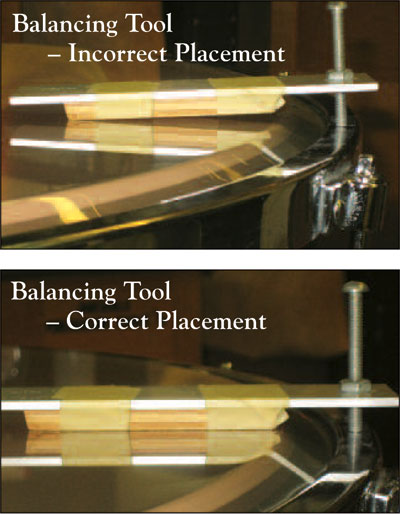
Lock the bolt into place by securing the nut against the metal plate. Place the balancing tool at each tension rod point around the timpano and with a tuning key, adjust the lug until the plate rests flat on the head and the bolt just barely touches the counterhoop as it did at the first tension rod. Tighten or loosen the tension rods as necessary, and repeat the process several times around the circumference of the drum to ensure accuracy.
10. If you made major adjustments to the tension rods in the previous step, the timpano may now be out of its pitch range. In this is the case remove the 2×4 block to check the range of the drum; the pedal should stick in all positions. If pedal moves repeat steps 8 and 9, and if necessary repeat them again until the timpano is both balanced and in its correct range, remembering to readjust the balancing tool each time you repeat step 9.
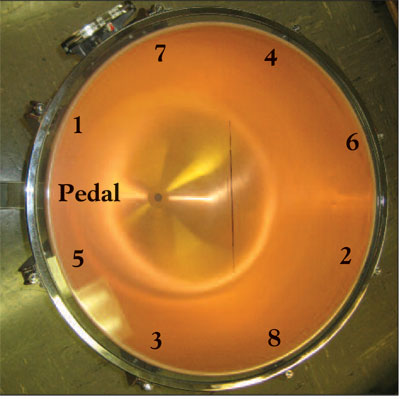
11. The timpano is now ready to be cleared. Begin by choosing a pitch in the center of the drum’s range. I usually clear timpani on the following pitches: 32" = Gn, 29" = An, 26" = Dn, 23" = Fn, 20" = An. Using a digital tuner, position the timpano close to the microphone input and at the same height with a tension rod next to the mic. Set the tuner to the appropriate pitch in the manual setting so it will read the specific pitch.
If I am clearing a 26" timpano on the note Dn, I set the tuner to a Dn in manual mode and gently strike the timpano in the playing spot in front of the corresponding tension rod from the mic and adjust the pedal so that the Dn is perfectly in tune with the tuner – or as close as possible.
Next I rotate the timpano either clockwise or counterclockwise (pick one direction and stick with it) to align the next tension rod with the mic and gently strike the head. If the tuner reads flat, I tighten the tension rods – the one in front of the mic and its corresponding rod directly across from it – each a slight turn and strike the drum again.
Even if the pitch isn’t perfectly accurate, I move on to the next tension rod. Fine adjustments a little at a time make clearing the head easier than making large adjustments. If the pitch is sharp, I slightly loosen the tension rod moving it counterclockwise. If the pitch is flat, I slightly tighten the tension rod clockwise.
12. Continue rotating the timpano and making small adjustments until each pitch reads in tune with the tuner at each tension rod point. Remember to make two adjustments each time you check the pitch with the tuner – the tension rod just in front of the mic and the corresponding rod, across the drum – both equally adjusted with the tuning key. Clearing the head is only done with small tension rod adjustments at a time, not big ones. This may take a while, so be patient.
When each tension rod point is precisely in tune with the tuner, then your head is cleared – tuned – but because the head is new, it needs to settle over the next several days. Place the timpano at its highest pitch with the toe of the pedal all the way down. This will apply the pressure necessary to help the new head stretch.
Leave the drum this way for two to three days, preferably without using it. You will then notice that the pedals may not stick at their extreme positions with the toe down and heel down. If so, the head has stretched, which is fine, but the drum is now out of its range. Repeating the process in step 9, which I call clearing the head, is now necessary. After the second clearing and a few days of use, it may also be necessary to clear the head a third time. Keep checking the range of the drums and make sure the pedals stay in place.
13. If the new head has wrinkles in the collar area and makes noise when changing pitch, you will have to use a heat gun to remove the wrinkles. Work on one area of the collar at a time by moving and waving a heat gun evenly until you cover the circumference of the timpano, removing the wrinkles. During this process do not hold the heat gun in one position over the collar for more than one second or you may melt the head.
14. If for some reason the head needs to come off and later be put back on, use a black marker to indicate the place of the head on the rim at each tension rod point.
Also, it is a good idea to write the date in the collar area as a reminder of how old the head is and when it will need replacing.
The process of changing and clearing the head can be intimidating. Such factors as the quality of the timpani and head can greatly affect the outcome of the pitch. Although changing the heads is an annual event, you should clear the heads (step 9) at least before every performance, and to keep the heads in good shape clear them once a month, depending on how often your timpani are used.
Other Maintenance Tips
My other suggestions for routine maintenance aren’t as time consuming as changing a head, but they are still crucial to keeping timpani in prime condition. Before and after each use, timpani heads should be wiped clean of all fingerprints and any other dirt. Timpani need to provide as pristine a pitch as any other melodic instrument, and dirt or grime build-up on the heads greatly reduces that ability. Use a glass cleaner if necessary, but simply rubbing down the heads with a dry cloth should suffice.
After each use, return the pedal to its mid-point position. Some people suggest that when the timpani are not in use, the pedals should be either toe all the way down or heel all the way down, but I don’t recommend either of these. If the pedal is always at the toe-down position, it stretches the head too much, shortening its life span. If the pedal is always at the heel-down position, the timpano is at its loosest position and any bump of the drum can shift the head off center. This is another reason why marking the heads is an important thing to do.
The mid-point position is ideal – not too tight, not too loose. When transporting the timpani, the pedal in the toe-down position is necessary to keep the head from shifting off center. This tightens up the timpani and better secures it for moving.
The casters of the drums should be clean of all dirt, hair, grass, string, or any other debris that is easy to pick up off the ground. A lubricant such as WD-40 can help to extend the life of the casters, especially when transporting them. I use green and red paint to color-code the “On” and “Off” positions (green = brakes off; red = brakes on), which helps to extend the use of the brakes. This is also a good idea for all instruments with brakes because it can be hard to read the engraving on casters.
At the time you change the head, check all the wing nuts, screws, washers, nuts, and bolts to be certain they are tight. This is especially crucial around the tuning gauge area. These items can become lose during transport and if the tuning gauge isn’t working correctly, then maintaining accurate pitch becomes a problem.
Pedal tension can be adjusted on most modern timpani. If the action of the pedals is too tight or too loose, an adjustment will be necessary, which is generally made underneath or beside the pedal. The owner’s manual will assist you in finding the right place. This adjustment does not affect the head tension or pitch range, only the pedal action.
Finally, it is extremely important to use drop covers, preferably the thick padded kind that almost touch the floor. When transporting timpani, especially during marching band and winter drumline seasons, drop covers protect the instrument from the weather and the normal wear-and-tear that results from moving, maneuvering, and any number of minor mishaps.
Although timpani are complex instruments, thoughtful attention will keep them functioning properly. Your students should assist with general maintenance, but it is up to you, the director, to keep your timpani in top shape, ready for the next performance – and out of the music repair shop.