Most violinists learn the fingerings to the one-octave D major scale as their introduction to left-hand technique. In the D major scale hand frame, the second and third fingers touch, creating half steps between F# and G and C# and D. Beginning violinists spend many early weeks repeating and reinforcing these comforting patterns in first position.
Left-Hand Position
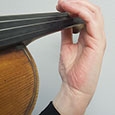
Check the student’s wrist angle to make sure it is not poking out or collapsing inward. Fingers should stay close to the fingerboard, and often the first finger can stay placed on the string while the second and third fingers climb up the scale. Finger pads should meet the strings at consistent angles, and the thumb should rest across the string from the index finger. Students should avoid flying fingers or an index finger that points out while other fingers are in use. This picture shows a good hand position with the first finger down.
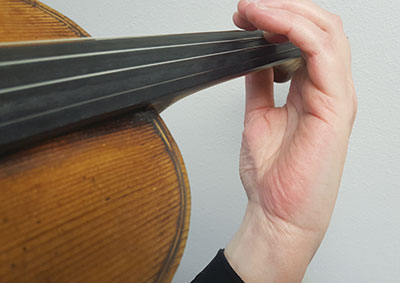
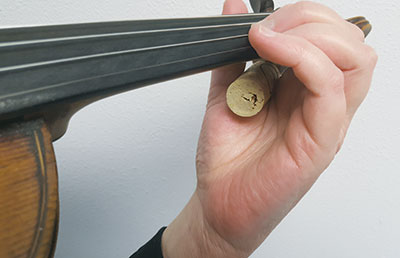
Students often want to grip the neck of the violin or rest it between the thumb and first finger. This will prevent them from shifting easily as they become more advanced. In addition to first ensuring that they know how to securely hold the instrument on the shoulder, a wine cork can be a useful teaching aid. Place a wine cork between the thumb and index finger to set up an open, flexible left hand. Remind them not to squeeze the cork but to keep their hand loose and relaxed.
Some students benefit from watching their hand in a mirror to identify and reproduce healthy left-hand technique. Another tip for students who grip the fingerboard too tightly is to ask them to gently tap the thumb against the violin neck during long note values.
Intonation Practice Tips
Even beginners can learn practice techniques that refine intonation and set up productive lifelong habits. Students can check the intonation of many notes against the open strings. For example, the third finger D on the A string can be played at the same time as the open D string to create an octave double stop.
To isolate first finger intonation have students form perfect fourths with open strings. The first finger E on the D string can be tuned to the open A string and the first finger B on the A string can be tuned with the open E string. Players hear these perfect intervals lock into place when the fingers are placed correctly. (Teachers should first demonstrate the correct sound so students understand what they are listening for.) This tuning exercise also develops the proper tunneled hand position that is necessary for successful fourth finger placement and double stops. When students do not make a tunnel with their fingers, the hand collapses on the strings. This prevents them from moving freely, and the fingers touch the string in incorrect places or lean on other strings.
Place and Play is a practice technique that develops a mental map of the fingerboard and teaches players to hold themselves to high standards of accuracy. Have a student place a finger on the string, commit to its placement, and then play it with the bow. The finger is either in the right place or it is not. They will likely want to wiggle the finger to adjust the pitch. Instead have them take the hand away, regroup, sing the pitch, and start over.
Low Second Finger
Once students are confident with pitches in the one-octave D major scale, low second finger is introduced to produce Cn on the A string and Gn on the E string. Inexperienced players may struggle to play the new notes in tune or clearly distinguish between the high and low second finger pitches. Often, both high and low second finger notes end up somewhere in the middle. Practicing the new hand patterns in a variety of speeds develops fluency and differentiation.
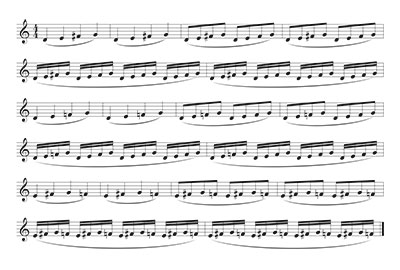
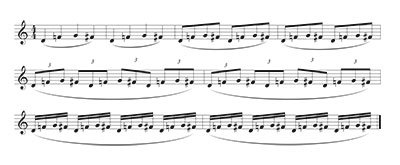
Otakar Ševčík included a three-speed practice pattern in his School of Violin Technique, Op. 1, Part 1. This exercise presents an acceleration pattern in which players tune carefully in quarter notes, develop flow of motion in eighth notes, and work on facility and fluency in sixteenth notes. Often violinists will play the quarter-note and eighth-note patterns accurately, but the half steps in the sixteenth-note pattern disintegrate into an interval somewhat larger than a half step and smaller than a whole step. A variation of this practice pattern is shown in the following example. Notice where the pitches alternate between a high second finger and a low second finger.
While working on these three-speed patterns, pay attention to bow technique as well. Students should keep the bow moving and watch how the bow is being divided. They should be exactly in the middle of the bow at the third beat of each measure. Place a sticky note or ribbon at the middle of the bow to easily identify bow distribution inconsistencies.
Some students may find it easier to practice the exercise without the bow at first to focus only on placing the fingers. Avoid excessive finger clicking and emphasize soft fingertip landings. Use the metronome to keep the patterns and pulse organized. Remind students to tap their thumbs or practice with the wine cork between the thumb and index to maintain a loose hand.
Landing practice helps students whose ears cannot identify messy intonation when working on a longer series of notes. Play through a phrase in tempo, landing or lingering on every second finger or other problematic pitch. Once the note feels like a destination, students are more likely to listen critically and make necessary intonation adjustments.
Noodle practice is fun way to develop consistent intonation in short bursts. The following is a written-out example of noodling. It is a set of five pitches presented in different orders, almost at random. The noodles should be played extremely quickly, even faster than the desired performance speed of an actual piece. Left-hand fingers should feel light and effortless. The rests between each noodle create spaces to release tension in the hands. Players who learn to generate and practice their own noodle patterns can process notes more quickly. They establish a playful ease to their left-hand technique and are more comfortable reading and playing notes that occur in unusual sequences.
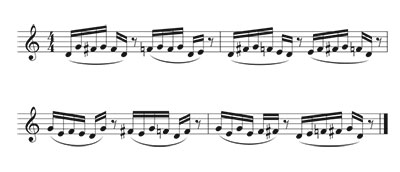
Four Speed Practice
More Advanced Exercises
Once violinists have added low first fingers and high third fingers into their technique, teachers can introduce more sophisticated scale patterns and practice methods. Understanding the physical and aural difference between a half step and a whole step is critical when refining intonation. Have students play a one-octave chromatic scale followed by a one-octave whole tone scale. The easy sliding finger pattern of a chromatic scale helps players map out the size of a half step.
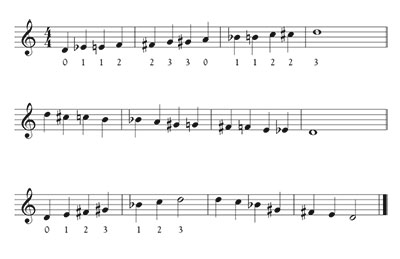
The whole tone scale is generally more difficult because few students have heard compositions that employ this harmonic palette. In particular, the lack of a leading tone can be misleading. Practicing chromatic and whole tone scales back-to-back opens the ear to new combinations of pitches. Some students enjoy practicing these scales guitar-style so that they can see the amount of space between the left-hand fingers as they play.
Advanced players who have mastered Ševčík’s three-speed practice patterns can expand the exercise to four-speed practice by including triplets, as shown above. Here a quick alternation between F natural and F# develops facility, while the changing note values hone rhythmic skills, and the long slurs reinforce thoughtful bow division.
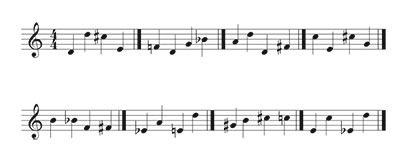
Challenge students to compose their own four-note patterns to practice in varying speeds. Advanced four-note groups may include string crossings, quick alternations between high and low second or first fingers, or leaping from open strings to third or fourth fingers. Several advanced patterns are shown below. Each of these presents a different type of physical or aural puzzle.
Working on first-position intonation in multiple ways pays off exponentially when students begin shifting and exploring other positions. Instrumentalists who have been taught to hold themselves to high standards of intonation from the beginning will become better at practicing by themselves and will learn music quickly. For advanced players, first position exercises offer simple ways to remove bad habits, alleviate tension, and delight in the glorious ring of beautiful intonation.