When teaching beginning band students, fundamentals are paramount. The initial work on posture, position, and holding the instrument affect everything that comes later in learning to play. Breathing, tone production, and music theory skills improve over time, but the first approach at instrumental mechanics should be perfect. Great musical habits start from the beginning.
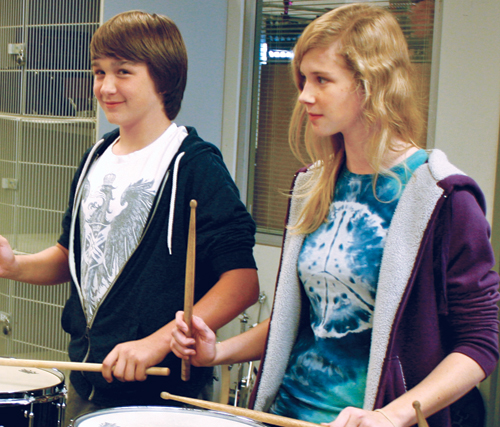
Although I am an experienced percussionist, I also teach all of the beginning brass classes at my school. The first few months of learning to play percussion and brass have significant differences, but I have found some helpful ways to apply percussion pedagogy to playing wind instruments, particularly with muscle memory and instrument position. Young percussionists can develop early bad habits, which is why it is important to learn the fundamentals of making the initial strokes correctly. These skills come from careful repetition and exercises that develop muscle memory. Once the posture and stick grip have been taught, most percussion methods use a sequence of various stickings to develop stronger technique. Some percussion books use a simplified version of exercises in George Stone’s 1935 drum method called Stick Control, a book used by every percussionist at some point. With slight variations, the patterns usually look like this:
1. RRRR RRRR LLLL LLLL
2. RRRR LLLL RRRR LLLL
3. RRLL RRLL RRLL RRLL
4. RLRL RLRL RLRL RLRL
5. RLRR LRLL RLRR LRLL
The stickings start simply and gradually become more intricate. The exercises tackle the common combinations that will appear when students begin actual drum repertoire. This exercise is so effective because it focuses strictly on developing solid technique. All of the music-reading has been stripped away, allowing students to focus on consistent strokes from both hands. Later, students will learn note reading and integrate stickings with actual notation, but initially it is more effective to keep the information concise.
I began to think about the technical issues of my beginning brass players, particularly the trombonists. There is something so unique but awkward about a trombone slide in the hands of a 6th grader. Every student and instrument is different, so there is no way to identify the exact location of all seven positions on a trombone. Indeed, some teachers begin trombonists on euphonium to avoid this problem. Beginners learn the positions slowly with assistance of their teacher, but when students begin moving between positions, poor habits develop.
Play, Then Freeze
When working with percussion students, I have them play and then freeze in place, so I can evaluate their hand positions after upstrokes and downstrokes. The motion after a stroke is crucial. Freezing the strokes gives me a chance to make sure that their technique is perfect. Without proper instruction, students may develop poor hand position while playing. The act of freezing during rehearsal makes it possible to check stick technique in action.
This same approach also applies to the trombone. In a large class of beginners it is difficult to hear which student’s slide is out of position, but asking them to play and then freeze, you can hear each student individually after the whole class plays. This method allows specific instruction for all students and lets them feel the location of the correct position.
I will employ this technique by asking students to play a Bb major scale in half notes at q = 85. Students know in advance that they may have to freeze. The second note, sixth-position C, is frequently out of tune. While the note is still sounding, I call out “freeze.” Students freeze in position regardless of whether they are correct. Still in tempo with the metronome, I listen to the Cs individually and correct the ones that are wrong. Students who have already been corrected now remain frozen in the proper position. After all trombonists have been addressed, I ask students to play the Cs as a group and see if there is an improvement in the intonation. We then return to Bb and begin the exercise again.
Rehearsing this way can prove tedious in larger classes. Be careful to use this approach when you have the utmost attention from students. A metronome can also keep forward momentum through this activity and keep the director from talking too much. Correcting instrument positioning and mechanics takes time. By making it a priority early in instruction, students realized just how important it is as they monitor their progress.
Fundamentals Come First
The first few months of beginning band are a collision of foreign concepts. We ask students to read music, breathe in a new way, hold an instrument, finger the notes they learned days before, and connect all of these dots to make music. Percussionists have an easier time in the first few weeks because all of this information is broken into smaller segments and combined later. It is essential that wind players develop good instrumental mechanics from the start. I like to approach refinements of fingering and slide positions in a similar way to initial percussion stick combinations. With the clutter of notation and pitch taken away, wind players can focus entirely on their hands and arms.
Slide Position Grid
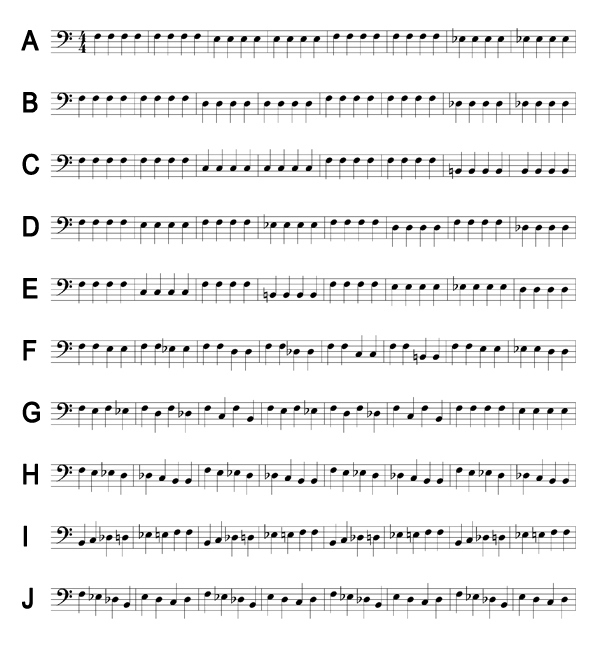
As shown previously the initial sticking grid for percussionists is a combination of commonly used passages between the right and left hand. A similar grid can be used by beginning trombone players once they have gained some skill at finding the slide positions. The teacher should turn on the metronome at a slow speed (starting at q = 85), and allowing one beat per slide position
This task may seen dull to students at first but the fun increases as the tempo does, just as in percussion class. The lines of the exercise are lettered so that certain lines can be used on certain days, or so that one line can be focused on individually. The length of this sequence allows the teacher to walk around the room and fix fundamentals. Students should move quickly and efficiently between the positions; the exercise only helps if every slide position is clean and correct. If there are repeated position problems, slow down the speed and use the play then freeze techniques again.
Trombone Slide Position Grid
G. 1213 1415 1617 1213
H. 1234 5677 1234 5677
I. 7654 3211 7654 3211
J. 1357 2464 1357 2464
A. 1111 1111 2222 2222
1111 1111 3333 3333
B. 1111 1111 4444 4444
1111 1111 5555 5555
C. 1111 1111 6666 6666
1111 1111 7777 7777
D. 1111 2222 1111 3333
1111 4444 1111 5555
E. 1111 6666 1111 7777
1111 2222 3333 4444
F. 1122 1133 1144 1155
1166 1177 1122 3344
G. 1213 1415 1617 1213
1415 1617 1111 2222
H. 1234 5677 1234 5677
1234 5677 1234 5677
I. 7654 3211 7654 3211
7654 3211 7654 3211
J. 1357 2464 1357 2464
1357 2464 1357 2464
If you have a heterogenous beginning brass class, a similar grid could be used with other brass students. It is a great way to teach quick valve motion and for students to learn not to lift up the valves between notes that share a common finger. Once the slide position grid becomes comfortable, students will be able to establish a muscle memory of the space between positions. Later, when students have become comfortable with tonguing and reading music, the slide position grid can be replaced with actual notation and playing.
Numbers Become Notation
Using this approach to improving mechanics and positioning in beginners does not mean that actual note-reading is pushed back. On our campus, students begin the first week of school with an extensive music theory curriculum that correlates to what they had already learned in elementary school. Muscle memory activities and the positioning grid are meant to be supplemental. By exposing students to all positions and valve combinations early, they learn the full capability of their instrument, not just “Hot Cross Buns” in the beginning band book. When students have outgrown the slide-positioning grid, I switch them over to a version of the same exercise that uses notation instead of numbers.
Notated Trombone Slide Position Grid
More Steps, Bigger Leaps
The application of percussion techniques to teaching beginning wind players is not all that different from the current way of doing things. It is simply a check that forces us to slow down and make sure students get off to a proper start. Without realizing it, teachers can go way too fast in the opening weeks of instruction. As teachers, getting students close to proper tone production usually satisfies us. By breaking down the initial steps and insisting on beautiful sounds from the start, students can avoid developing bad habits. For a young trombonist, slide positions can be extremely vague. When great air, a great buzz, and perfect positioning meet, students will produce a beautiful sound and make a strong start in music.