Over the years, I have tried many approaches to recruiting beginners into my band program at the three schools where I have worked. I had good success, and all of my band programs grew in size. However, the pressure of high-stakes testing and more rigorous curricula meant that instructional time was held more and more sacred. Interruptions were not only frowned upon, but in some cases, they just were not allowed anymore. Ironically, it was not until my school district ended demonstration concerts, classroom visits, and other recruiting activities during the school day, that I really started to organize my process. I improved at recruiting out of necessity. My contact with prospective students was minimal, so I had to make every interaction count while maximizing the impact of the message and persuading families to spend their own time learning about the music program. Since that day eight years ago when I was told that I could no longer recruit, the number of students enrolled in band, orchestra and choir at my school has grown by over 300 students.
An organized recruiting process benefits students and director in many ways. It sets the stage for a successful program by making a great first impression on prospective families. When families see the care you show for their children before they enter your program, they begin to imagine how wonderful things will be once they join your ensemble. Another benefit is that it makes your job as director much easier. It may be more work on the front end, but ultimately, you will save time during this time-consuming, yet essential task.
Probably the biggest benefit, however, is that you will ensure the continued success of your ensemble. Any good director knows that great beginner groups are at the heart of any successful music program. Before you can have a great beginning band, you first must get kids in the door.
When recruiting, particularly if you are in a new position or are significantly changing your approach, allow about four months to plan, prepare, and carry out the process. During this time you will build a timeline of events, determine your audience, develop your message and materials, plan how to communicate, and organize it all.
Building Your Timeline
When creating your timeline, start with the deadline for students to select courses and develop everything backward from this date. All schools are different in this regard, and if you have a pull-out program, your timeline might look quite different than one where band and orchestra are regularly scheduled classes. In my district, students begin instrumental music in the sixth grade at the middle school. They sign up for classes in the spring of fifth grade year while they are still attending elementary school. For this type of situation, a sample timeline, worked backward, might look like this:
April 1: Students select courses for the following year.
March 21-25: Instrument fittings take place.
March 7: Demo concert and classroom visits.
March 1-14: Sign-up for fitting appointments.
March 1: Send introductory letter.
March: Secure helpers and volunteers.
January-February: Preparation of materials.
In addition to the dates above, you might also hold parent meetings or instrument rental nights around the time the students have completed course requests, or shortly after.
Determining Your Audience and Message
Prospective students and their parents are the biggest audience for recruiting, but there may be other individuals who need to be educated about your program. These might include district and building level administrators, guidance counselors, and classroom teachers, who all can influence students as they choose whether to join the instrumental music program.
At this time, you will also want to develop and refine the image of the program presented to the public. Your message should include specifics about your program, important dates and events, details about the enrollment process, benefits to joining, advocacy materials, and any other important information that you want to share. How you deliver your message will depend on your audience. You will connect with students differently than you will with their parents or school faculty.
Hooking Students
Students today have a wide range of choices in activities. Your message needs to be engaging to attract them to your program. If you can present a demonstration concert to your prospective students, make sure that you choose tunes that are fun, familiar, and no more than a few minutes long. A demonstration concert is also an opportunity to perform short, engaging excerpts on each of the instruments. In addition to the concert, classroom visits and videos can also be effective. You also will want to plan time for your prospective students to get hands-on with the instruments.
Engaging Parents
Parents are often overwhelmed with all they have to do. It is easy for information to slip through the cracks, so communicate more than once, in multiple formats, with the parents of potential students. Any message must be brief, but clear, while making sure to be powerful enough that it will cut through the noise. Some ideas for parent communication include email, snail mail, websites, social media, advocacy materials (flyers, pamphlets, electronic), meetings, and telephone calls. It is important to use a variety of methods for communication as you will not reach all parents in the same way.
Educating the School
Never stop educating your administration, counselors, and classroom teachers about the value of your program. This is especially important because they may be in a position to encourage or discourage participation. In the case of administration and counselors, they can determine if the schedule makes it easy or difficult for students to participate. Keep these important people informed of the good that is happening in your instrumental music program and the benefits of joining.
Administrators live in a world of data-driven decisions, so take advantage of that and provide hard numbers when speaking to them. Face-to-face meetings and invitations to your concerts and events are a must. Remember that educating your administration is a year-round job. Do not be afraid to think outside of the box and use any opportunity to give your administrators a front row view of the great aspects of your program. In my district, the high school principal has accompanied the band on trips to the Macy’s Parade and the Rose Bowl Parade in recent years, as well as traveling to Europe with the orchestra. You can bet that he is an avid supporter of those programs, having seen first hand some life-changing benefits for students.
Organizing It All
There are a number of tools that can help you keep organized throughout your recruitment process. My three favorites are Google Forms and Sheets, Sign-Up Genius, and Mail Merge.
Google Forms
All you need is a free Gmail account to begin using Google Forms and Sheets. These tools are accessed through Google Drive and are free and easy to use. I create an online form for prospective families to complete. This form, which includes check boxes for students to pick instruments they want to try, allows me to collect contact information and learn about students’ interests. Families will also schedule instrument fitting appointments through the online form. The form pulls all data collected into an easy-to-use spreadsheet.
Sign-Up Genius
Sign-Up Genius (www.signupgenius.com) is another free tool that I have found incredibly useful. I use Sign-Up Genius to organize the parent and student volunteers for our instrument fitting appointments. Parents and current students can be great advocates for the program, and it is wonderful to have them assisting with non-musical tasks.
Mail Merge
Mail Merge is a feature of Microsoft Office and allows the user to create form letters, form emails, labels, and other personalized documents using data stored in a spreadsheet or Excel document. I use mail merge to develop personalized materials for each prospective student. If you are not familiar with this feature, there are resources online to help you learn how to mail merge including Help topics and YouTube videos. Mail merge is quick, easy to use, and invaluable for my organization process.
The Instrument Fitting
We have all worked with students who have struggled to make even the most basic sounds on their instrument. Often this is not their fault, but simply the result of an incorrect placement. Success on an instrument can be influenced by many factors including musical aptitude, shape and size of lips, formation of the jaw, and size of body, arms, hands, and fingers. Therefore, the instrument fitting is one of the most important components to your recruiting process.
I do not recommend allowing students simply to choose what to play. Instead, I give them an opportunity to explore instruments that interest them with guidance from a knowledgeable professional. Getting students on the right instrument jump starts their learning and puts them on a path to success. As a director, it is my responsibility to place each of my students on an instrument that gives them a strong chance of achieving their musical goals.
Some directors conduct instrument fittings during the school day, and that can be an effective way to connect with all interested students. However, this is not always an option. I have learned to use evening instrument sessions as a way to involve more helpers and spend more time with each prospective student while getting their parents to participate at the same time.
We arrange each of our instrument fittings into three one-hour time blocks and have families sign up for one of the blocks. Prospective students will sign in with a parent volunteer and we use our students as guides. Each student receives a pre-printed packet of forms based on the instruments they have selected to try. I use green for wind instruments, purple for percussion, and pink for strings. The color coding helps the directors keep forms organized much more easily and also helps our guides easily see which stations they need to take students to visit.
Have enough testers and allow enough time that you can spend at least 5-10 minutes per instrument with each child. Pay other directors to help if you need to, or offer to trade time. Retired directors are great for this and often enjoy coming back for a few evenings. You can also check with your local music store and see if they can help.
Stations are arranged throughout the band room using long folding tables. A set of instruments is available at each table. Mouthpieces, reeds, and sterilizing solution, along with paper towels and plenty of pencils are also on hand. Chairs are set up for both the tester and student, with additional chairs about 5 feet behind the student for their parents. This allows parents to observe the process without having them so close that they get in the way. Our goal is to make each child feel comfortable and successful, while at the same time allowing them to explore a variety of instruments to find at least one good fit.
Taking a Closer Look at the Forms
Data collected from the online form through Google is mail merged into my document and results in a personalized sheet for each student. In a matter of minutes, I can pull in the student’s name, contact information, appointment time, and instrument selections, so this information is readily available on the form.
The remainder of the form is designed for the tester to take notes about each of the instruments that the prospective student has tried, as well as general information that may be helpful as decisions are made about instrument placement. This includes a rating of each student’s focus and attention and rating of how students did on the instruments they tried. I have testers rate students on the following four-point scale developed by Chip DeStefano:
4. Able to get a good sound right away. Instrument seems to be a natural fit.
3. Required additional coaching, but was able to produce a good sound after time.
2. Unable to get a characteristic sound. Instrument seems to be a poor fit.
1. Could not get a sound on instrument, even after substantial coaching.

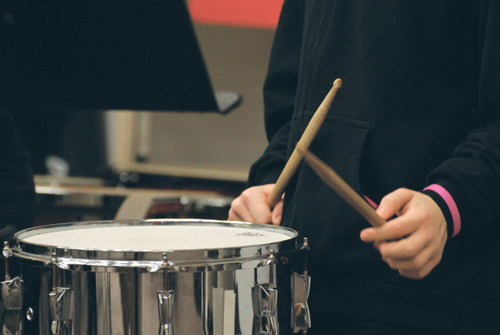
Percussion Try-Ons
My first step is to educate students about what being a percussionist means in my classroom. There are more misconceptions about percussion than any other instrument, and we have an obligation to educate families about what being a percussionist entails. For example, percussionists in my band need to know that they will be spending a great deal of time learning mallet percussion instruments, timpani, and auxiliary percussion in addition to snare drum. Drumset is not part of my first-year curriculum, and that is also important for students and parents to know. I also notify families up front that percussion enrollment is capped and that only a small percentage of students who try percussion are selected.
In addition to the one-on-one testing, I employ a rhythmic aptitude test as an additional data point. I have used the Intermediate Measures of Music Audition (IMMA) rhythm test available from GIA Publications for this purpose. It does not require any music reading knowledge, so it works well for this purpose. While I never use the results of this test alone, it does help to confirm the results I see during my testing.
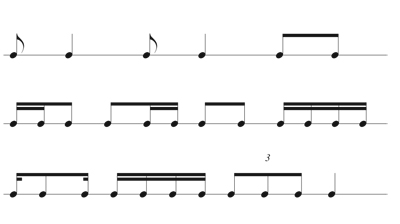
My percussion testing is broken into three components: coordination, rhythmic echoing, and melodic echoing. For each exercise, I demonstrate first and have the students mimic me. Notation is written for my purposes on the fitting form, but I do not ask students to read or understand this notation.
In the coordination section, I assess the student’s ability to keep a steady beat with the right foot while tapping quarter and eighth notes with the hands. I also teach the paradiddle (RLRR LRLL) to see if the student can memorize and perform a simple pattern. Students’ performance is rated good, okay, weak, or not at all.
In the rhythmic discrimination section, I use a practice pad and drumsticks (one for the student and one for myself). To prepare the student for this part of the assessment, I first show them how to correctly hold the drumstick, making sure that they are holding the stick between the thumb and the first finger. The remaining three fingers are wrapped loosely around the stick for control. I then ask what would happen if I dropped a rubber ball on the floor. Most students respond immediately that the ball will bounce, and this opens the door to talk about how drumsticks also bounce off the drum head. I show the student what this looks like and then allow them to practice on the practice pad until they are getting a good rebound. I will then perform the first rhythm on the form and ask the student to echo it back to me. I tell the student that if they don’t get the rhythm the first time, it is fine because I will play it up to three times for them if necessary. I then circle the correct descriptor in the rubric. I added a nearly correct category several years ago to distinguish between the students that almost get the rhythm correct and those who are not close at all.
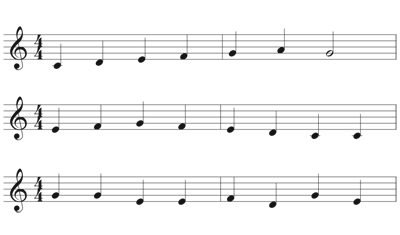
The mallet test is similar, except I use a bell kit and mallets. I perform a simple melody and ask the student to echo it. To help the student, I will also point out my starting note for each melody. As with rhyth-mic discrimination section, the third example is more difficult to identify students who may be especially well suited for percussion.
I complete a summary at the end of the percussion testing and have found that successful percussion students are characterized by an excellent sense of rhythm, excellent coordination, good organizational skills, the ability to stay focused amid distractions, and a willingness to learn and play all percussion instruments. In addition, a piano background is helpful.
Materials discussed in this article can be downloaded from Higdon’s website: www.onandoffthepodium.com
Part two of this article will include recruiting tips for the other instrument families.