Whenever I am invited to give a workshop for the flute section in a band, the conductor always says, “Can you fix up the intonation? They are so out of tune!” Fifteen minutes later he returns to the room and everything is fixed. He is astonished and asks, “What did you do?”
The Secret
The first thing I do is check the placement of the headjoint cork. In the typical flute section there are few corks that are set properly. To set the cork use the cleaning rod. When positioned in the headjoint, the line on the end of the rod should appear in the center of the embouchure hole. Some cleaning rods have three markings to make adjustment easier. There is one line for either side of the embouchure hole and one in the middle of the embouchure hole.
There are always a few students who have corks that are too loose and cannot be held in place. You can ask them to take them to the repairmen, but usually this will not happen. In the meantime, remove the crown by twisting it to the left and remove the stem assembly from the tenon end of the headjoint. Once removed, clean off any gunk and then place a strip of tape around the cork. Drop the cork back in from the tenon end and gently move it into place. If it is still loose, then repeat with another strip of tape. A properly sized cork will drop in where the end of the cork assembly (the silver plate) is in the center of the embouchure hole. The cork should be snug but not tight. An overly tight cork will flatten the pitch and dull the tone color.
The next step is to assemble the flute properly. The headjoint should be pulled 1⁄4 inch from the body of the flute. Use a ruler to find this placement.
The headjoint embouchure hole should be level when played, which requires the flutist to develop embouchure flexibility and strength. It is easier to play with the headjoint rolled in, but it will be out of tune.
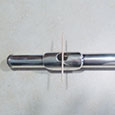
Because the keys on the body should be level or facing the ceiling, align the center of the right-hand notes (D, E, F) with the center of the embouchure hole, as shown above.
Next instruct the flutists that when playing the keys should remain level and pointing to the ceiling. One of the problems for most flutists is that the flute is not balanced well in the hands, so when a player removes his left-hand thumb (for C and C# in all three octaves and G and Ab in the top octave), the flute rolls back towards him. This makes the pitch flat. Reminding the flutists to roll out every time they remove the left-hand thumb will keep the pitch of the entire section closer together.
.jpg)
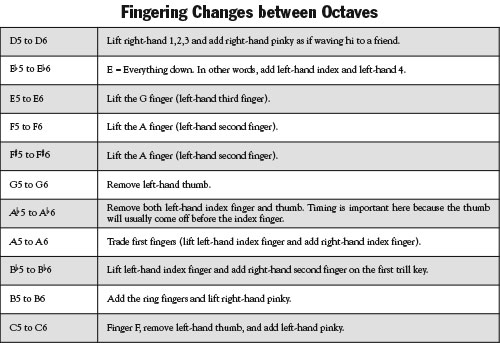
Top Octave Fingerings
These are the fingerings that most flutists learn last. In a public school setting there is never enough time to drill these fingerings as a group, so spending time in flutes-only sectionals will reap huge benefits. In addition to learning the fingerings, the flutist must become familiar with reading leger lines about the staff.
There are two ways to teach these fingerings. A combination of both produces the best results. The first is to teach the notes in succession starting with D6. This fingering is taught and then simple melodies are written to go to this note. This is repeated for each pitch. Usually the third book in a band series addresses this information.
Another way is think of how the fingering of these notes differs from those in second octave. Starting with D6 compare the difference in fingering with D5. The right-hand fingers are removed and the right pinky is added. It is almost like the flutist is waving to a friend across the room when raising the first three fingers. This chart offers more ideas about teaching these fingers. Alternate jumping back and forth between the second and third octaves. The execution of these notes requires the aperture (hole in lips) to become smaller and the airstream to be increased slightly in speed.
Chair and Stand Placement
Ideally each flutist should have his own music and music stand. The chair should be positioned 45 degrees to the right so when sitting, the flutist is aligned with the center of the aperture to the center of the embouchure hole, to the crease in the left elbow to the center of the music stand. It is essential that there be ample room between flutists.
Conclusion
These simple tricks will improve the intonation immediately and there will be less chaos in the flute section.


