Reading is one of the most important skills we ever learn. Author Louis L’Amour wrote, “A parent or teacher has only his lifetime, a good book can teach you forever.” The same holds true for music. Learning to read and notate music gives students a voice to express their ideas.
Inspiration in the music classroom can come with every milestone – holding the instrument for the first time, discovering exciting and unfamiliar music, and feeling musical goosebumps for the first time. These sparks ignite our students’ fires for learning. What if we could create those same sparks when teaching music literacy skills?
The following lessons, ideas, and resources can improve literacy in your classroom. I have used all of them successfully with my students. I teach many students with reading difficulties or negative feelings toward reading, and found I needed ways to engage them and make them love the process.
Under each topic below I describe how I present the content to students and leading questions that keep them engaged. Take as much or as little as you want. Change it. Modify it. Personalize it for your students. I hope that these ideas will help make a memorable experience for your students and light more sparks in your classroom. (All of the materials mentioned in this article can be found online at https://tinyurl.com/4h4745jy.)
Word Find (Musical Alphabet)
For this activity, I use slides that I have made or a dry erase board depending on the available technology. The activity introduces the musical alphabet and gets students thinking and engaging with the concept in different ways.
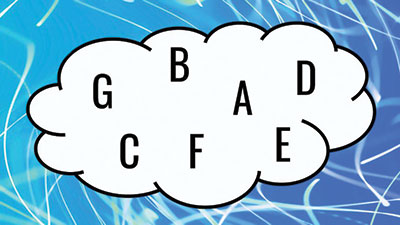
I start by projecting the musical alphabet, out of order, in a cloud bubble using Google Slides. I ask, “What do you notice about the letters? How many do you see?” Next, I have students see how many words they can make using the letters on the board. This part happens in small groups with a five-minute time limit. After the time is up, we go around the room and make one list on the board. When all of the responses have been recorded, I comment, “Even though we only have seven letters we can still say many different things.” Words that the students have found are used later as practice for spelling things out on the staff.
Next I comment, “These letters that we have been working with make up the musical alphabet. We will only use those seven letters when we play.” I display a slide with the alphabet written out to the letter G horizontally. I ask students to say the musical alphabet forward and then in reverse out loud as a class. The next slide shows the music alphabet written out vertically forwards and backwards. I ask, “What do you notice about this slide?” I have the students read out both columns and then ask, “What do you think happens after the letter G? Do you think that we always have to start at the letter A?” We discuss their ideas, and I reveal that you can start on any note and go forward and backwards when using the musical alphabet. The goal is for students to connect the order of the alphabet and moving vertically in both directions just like the staff as this sets up the process for ledger lines and spaces.
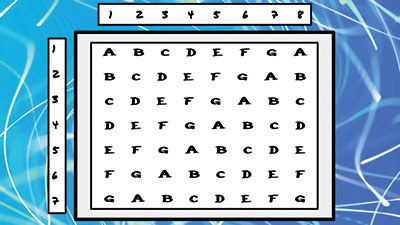
The next slide shows music alphabet typed out in a grid in which each row and column starts with a different letter for a total of seven rows and eight columns. We practice as a class first, and students select the columns and rows they want to practice. They really enjoy this slide as they do all of the different rows and columns going forward and backwards. When the students understand the concept, I add a metronome and play games in small groups while increasing the tempo. When the students are reciting all of these items, I have them point to the letter in the air as they say it to begin building the concept of steady beat and tracking.
Cloud Bubble
Musical Alphabet Grid
Five Pencils (Understanding the Staff)
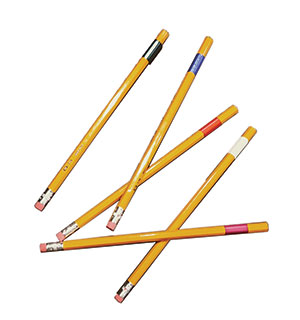
This activity requires five unsharpened pencils of the same color. Put a piece of electrical tape, different color for each pencil, wrapped around the end opposite the eraser. With this activity, the questions for students are crucial.
Hold the five pencils in one hand covering the end with the electrical tape. Ask students the following questions: What am I holding in my hand? How many do I have? How are they similar? How are they different? The goal of this line of questioning is to have the students understand that they are all the same things. Now flip the pencils over and ask the same questions. The goal of this line of questioning is to have the students understand that while they are all the same things, each one is a different color making it uniquely distinct from the others. This is similar to the lines on a musical staff. They have the same look and basic shape, but where they are located on the staff gives them their unique letter names.
Then, drop the pencils onto the floor so that when they fall most students can see them. I say, “This is an arrangement, similar to flowers. The pencils landed in a certain way. You can think of it as a picture. Can anyone think of another way to arrange the pencils to make a new picture?” I have several students try it and show the class and then continue with the following even if someone has made a staff.
I say, “There is a musical picture we can make with these pencils. Does anyone know what that might look like?” Usually, one student does, and I let them make it with the pencils on the floor. If not, I will make it. After the student makes a staff on the floor, I ask, “How would you describe this picture?” The emphasis should be on learning to analyze what they see and hear. I explain that music is a series of pictures brought to life by our choices.
After making the staff out of pencils, I demonstrate extreme high and low notes with my voice. I repeat this and have students echo me. I tell them, “In music we organize high and low sounds using clefs that we hang on the staff.” I ask if they know what the clefs are called. If anyone does, we keep the conversation going based their knowledge.
I comment, “We have a clef for high sounds and a clef for low sounds. They are always hung on the staff to the far left like the first word of a book.” I draw an example on the board or use a projector to put an example up for students to see. Next, I mention that “Sounds that are high use the treble clef and sounds that are low use the bass clef. It is similar to organizing a binder with folders for each class.”
“Each line has a name just like you and me. We are all sitting in different places, and so do the lines. So each line has a name different from the others.” At this point, I teach the names of the lines in both clefs and go through the mnemonic device for each clef. Not only do the lines have names but so do the spaces All Cows Eat Grass (bass clef) and FACE (treble clef). I have students come up with their own mnemonics in small groups and share them with the class.
If there is time remaining, students practice drawing the staff, treble clef, and bass clef. I turn it into an art lesson and let them have fun with it. The bass clef is half of a heart with a colon or a sad emoji rotated with a long lip. The treble clef is a P that continues into a low spiral. The staff is just five pencils or five straight lines. After students have practiced, they receive a sheet with three big boxes on it so they can submit an example of each. I use this as a fun competition to see which looks the closest to a printed one.
I then cover why we use names and what makes a name special. The goal is for students to understand that names identify things and different names set things apart from each other. “Each line and space has a specific name like you and me. It is how we know which note is which.”
Lifesavers and Peppermints (Reading Notes)
For this activity you will use Lifesavers, peppermints, a Tootsie Roll Pop, a Caramello candy bar, and a peanut M&M. (I leave the M&M’s in the bag due to allergies.) I have a large bag of both peppermints and Lifesavers but only one of the other candies for demonstration purposes. The goal of this activity is for students to become comfortable reading notes on the staff.
I start by holding up the Caramello, Tootsie Roll Pop, and small bag of M&M’s one by one and asking what is in the middle of each one? “How do we know? Where do you look?” I steer the conversation toward the fact that what is in the middle of the candy gives the information. I highlight that the middle is the what gives the candy its name, and that this is similar to musical notes.
While holding up a peppermint and a Lifesaver, I ask how they are similar and different. The goal is for them to observe that one has a solid center and one has a hollow center. I continue, “All of the noteheads that you see in music will either look solid like a peppermint or a hollow like a Lifesaver and you always need to look at the middle.”
I then mention that noteheads can be on a line or a space regardless of whether they are filled in or not. Digital flash cards that I have created allow students to practice with and without a clef. Students can select cards (sorted by instrument) and start answering the questions. After clicking on answer, the card tells them if they are correct or not. I use these flash cards just for student practice and not for a grade or to keep score.
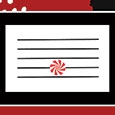
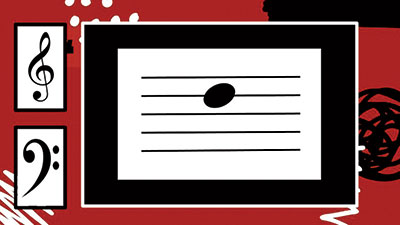
The next step is to put the peppermints and Lifesavers on the staff. The class practices identifying whether the note is on a line or a space using slides I created that show a staff with either a peppermint or a Lifesaver on it. (See below) If a student answers correctly, they get a peppermint or Lifesaver. After half of the students have answered a question, I open a new set of slides that practice the same concept but with the two different types of noteheads.
Then I review the lines and spaces of both clefs, reminding them of what was covered previously. I have another similar set of slides to practice as a class with a treble clef and bass clef on the left side. As I use these slides, I ask students to identify which clef they use when playing and then identify the note name.
Conclusion
I have many other games and activities that I use with students to engage their interest in these concepts. The new school year will have many challenges. Presenting topics by focusing on the process, teaching the students how to teach themselves, and engaging with the material in new, fun ways will be critical for success. Create and light the sparks that will keep the fires burning throughout the year.
Identifying Peppermints and Lifesavers on the Staff