It can be challenging to provide beginning instrumentalists opportunities to compose and improvise when rehearsal time is regularly commandeered for testing or the next performance is always looming. However, we do our students a disservice if the first time they try to improvise is in a high school jazz band, at which point they often struggle to generate original ideas, are overwhelmed by chord changes, and might feel uneasy improvising in front of others. With a good plan and some creativity, it is possible to incorporate improvisation into concert band rehearsals from the very first day, instilling skills and confidence that will pay musical dividends later.
This first round of I Play, You Play can happen before students even have the instruments completely assembled. Establishing good sounds on mouthpieces is crucial for beginners, and this exercise gives you a more engaging way to approach an often tedious part of early classes. Use a slow tempo and model for the students by calling out one-measure rhythms on an instrument, buzzing on a mouthpiece, or using your preferred syllables or counting system.
Begin with long tones to establish good sounds and ensure proper technique. Eventually begin varying the rhythms by adding half, quarter, and eighth notes. You can use complex rhythms because the students are responding by ear; the theoretical explanation of the rhythms comes later. If you have a homogeneous brass class, you can also incorporate sirens and simple intervals on this first day. What the students will need prior to this is the ability to articulate properly on their instruments. If your philosophy is to begin with whole notes to establish tone quality, as many method books do, this will require you to teach articulation before you normally would.
If you are counting rhythms or modeling on a mouthpiece, pat the steady beat on your shoulder with your free hand during the call portion of the activity, indicating that it is your turn to play, and conduct when the students play. This exposes students to meter before you ever get to the theoretical explanation in the book.
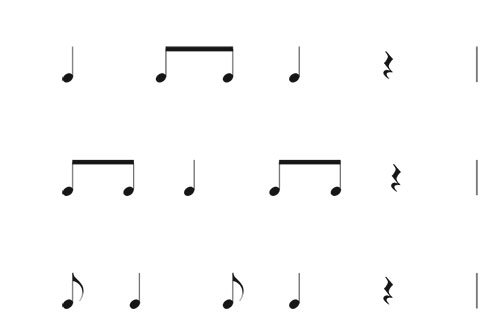
Next, create a rhythm bank on the board that consists of two or three one-measure rhythms, each one with three beats of sound and a rest on beat four, as shown in the sample bank on top of the next page. I prefer silence on beat four so students can clearly hear the beginning of your next call on beat one. Teach the rhythms by rote before showing how they look. Remember, no in-depth explanation of the theory behind the rhythms is necessary; this is aural training. The first introduction to improvisation can be a basic one by simply allowing students to choose their responses from the three rhythms that they have learned. On the first day this activity can take two to five minutes.
For the first several days, have the entire class respond in unison. This will sound chaotic, but the goal of the exercise at this point is to get students to generate ideas and be comfortable with improvisation. With everyone playing, students can be confident that they are not being judged. Timid or nervous students can hide within the ensemble in these early stages and build confidence. For the purposes of this exercise, there are no wrong answers. If you wish to assess the students on things other than improvisation (which is certainly necessary at this stage of their development), do so during a different exercise, or at another point in rehearsal.
After a handful of times through this activity, begin shrinking the number of students who respond. Divide the class into families of instruments or by gender, then by section or birth month. Eventually work your way down to quartets and trios. By this point the students will be more confident in their ability to improvise a response and will feel more comfortable doing so in front of the class. The final step is going down the line and hearing individual improvised responses.
Every time you make the exercise more complex, provide students with options to fall back on in case they get flustered, especially as the size of the performing groups gets smaller. Those who are less outgoing will find comfort in having a few rhythmic or melodic options to choose from. Another good strategy is to provide students with 15-20 seconds to practice their responses before you start the exercise. This might seem counterproductive to working on improvisation, but some students will appreciate the time to ensure that they do not embarrass themselves. You should eventually wean students off of this practice time.
Once students are confident in the process, begin offering them chances to give the call instead of just the response. Start with a section of instruments or a chamber group offering the call simultaneously. While it may be a little chaotic at first, offering specific parameters can ease the process and improve the group’s accuracy. For example, require the callers to start or end on specific notes, or give them three rhythms to choose from. Another option is to instruct the responders to focus their listening on one caller and respond specifically to that person, honing your students’ listening skills. Eventually work the size of the calling group down and reduce the number of parameters. Another way to help students get more comfortable offering calls is to pair students off and have them practice with a partner. This offers opportunities to generate ideas without the pressure of an entire class listening.
Expanding the Exercise
Because the first day’s call and response is performed on mouthpieces or headjoints, it is almost purely a rhythmic exercise. However, after students have learned more than one note, they can improvise melodic responses. For each new note that is learned, go through several repetitions of echoing, in which they replicate your call exactly to build a repertoire of rhythmic and melodic ideas, as well as improving technical proficiency on the instruments. Do this before jumping into improvising responses with those new notes.
When you give them freedom to improvise a response with multiple notes, establish parameters. For example, once three notes have been learned, require that the students only respond on do or mi to avoid dissonance, or require that they start and finish on do. After five notes have been learned, exact echoing becomes considerably more difficult, and I suggest using parameters as the students’ ears continue to develop. For example, only use three of the five notes at once (do, re, sol) or always start on mi and work around that scale degree.
Model on different instruments each day so students can get used to various ranges and timbres. Once the students are comfortable with four-count echoing, extend the exercise to eight counts. As the size of responding groups gets smaller, especially when going down the line, you might have students sitting idly for longer than you would like. Expand the exercise by having the percussion section provide a groove and assigning accompanying ostinatos to various wind sections. Better still would be to act as a facilitator and allow the students the opportunity to create their own ostinatos. By guiding accompaniment players’ ears to the individuals improvising, you can introduce the concept of balance and practice listening skills long before you get to an arrangement in the method book with melody and harmony.
If you are feeling adventurous, stray from the diatonic scale taught traditionally in most method books and teach the first five notes of the blues scale (1, b3, 4, #4, 5). The blues scale is versatile and sounds good played over any of the changes in the 12-bar blues. You can find several good backing-tracks online featuring a 12-bar blues progression in Bb. Everybody can take two measures to improvise on the blues scale at any point in the changes and have a chance to sound successful immediately. This is especially great for young players because they can sound cool without needing an extensive range or technical proficiency. As this improvisatory exercise expands, it can quickly begin to consume large chunks of time. You do not want to feel rushed once you start offering everyone a chance to solo, so plan accordingly.
Improvising from Fingering Charts
Using fingering charts as a resource for teaching improvisation can be a huge help. Rather than use the fingering chart from the book right away, provide fingering charts that only cover the notes students already know or will learn soon. For example, the first week you might pass out charts that include the first five notes they will learn from their books. Two months later they might trade in for charts that include a one-octave diatonic scale plus a few of the important chromatic notes they have learned.
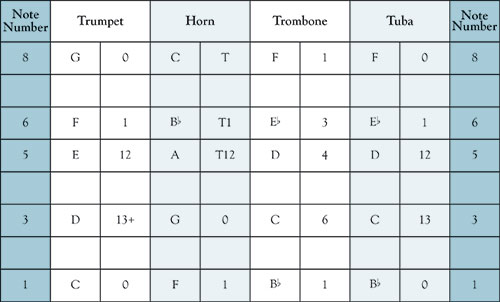
Fingering charts in tables can be projected or written on the board. This works particularly well with homogeneous classes, but is also usable with heterogeneous classes. These tables can include scale degree numbers or solfege symbols to save you from having to call out multiple transpositions, making the call portion of the activities more efficient. Notice, however, that the names of the notes are still present in the table, so the students are still being exposed to them, easing the transition from sound to symbol. Also notice in the table that the scale degree numbers are chromatic instead of diatonic, and that space has been left for chromatic notes that will be learned in the future. Leaving this space early on allows students to subconsciously recognize what might be coming later, making future theoretical conversations about intervals, scale patterns, and transposition easier.
Finally, do not limit partial fingering charts to the major or chromatic scale. A fingering chart containing only the notes in a blues scale is a valid option. Another version of this, albeit a less effective option, is to have students circle the notes they have learned and are allowed to use when improvising on the fingering chart in their method books.
For students, having the fingerings in front of them removes a level of mental processing from the activity. By alleviating the challenge of remembering how to manipulate the instrument to generate different pitches, students can focus on creating with those notes. For the teacher, having the fingerings in front of the students offers an easy way to set parameters that will help students succeed at improvisation from the beginning.
Conclusion
Art Tatum, one of the greatest jazz pianists of all time, once said, “You have to practice improvisation, let no one kid you about it.” There are no shortcuts to making your students proficient improvisers. Their skills and confidence must be seeded early and developed over time in the band rehearsal. A great way to start that process is with basic call-and-response activities, and these should begin on the first day of instrumental music instruction.