A masterclass for second- and third-year trumpet players is best spent focusing on playing fundamentals. This approach reminds players of the most important skills as they develop into intermediate players.
.jpg)
Embouchure and Buzzing
The mouthpiece should have a natural placement on the lips, centered on the face under the nose, with slightly more mouthpiece on the upper lip, although some might say the split should be 50/50. In my college secondary methods class, the trumpet professor had everyone say mm to form the embouchure; saying mm makes the lips come together in the center and positions the jaw and teeth appropriately.
After students form an embouchure I have them try to buzz the lips without the mouthpiece; not all students will be able to do this, so we quickly move to buzzing the mouthpiece. A brass player should never just pick up the horn and play without buzzing first. Students should hold the mouthpiece with two fingers and use a mirror so they can see their embouchure. I ask students to form the embouchure, buzz any pitch for four counts, rest for four with the mouthpiece off the face, and repeat.
 Next, students should buzz the same pitch; concert F works well. I like to have students sing a pitch, then buzz and match it. Younger players may have difficulty matching an exact pitch, but this is an important skill to develop. Repeat buzzing patterns using lower and higher pitches, and practice holding a pitch for four, six, and then eight counts at a moderate tempo. When students are buzzing long tones, listen for steady air and sound. Keeping the sound and air at the same level for long periods develops embouchure and facial muscles. While buzzing, students should also work on lip flexibility by buzzing sirens. Start in the mid-range, go as high as possible, and then drop to the bottom of the range.
Before moving to the trumpet, have students buzz a simple song. “My Country ‘Tis of Thee” works well because the melody has repeated notes but few wide intervals. “Happy Birthday” is another good song to try, although it is a bit more difficult.
Breathing
Although breathing is extremely important, young students want to play, so I do not talk about it right away. I start with buzzing before moving to breathing exercises. I have students say oh! and then try to get them to do it a few more times with increased enthusiasm each time. When they do this strongly enough I switch the syllable to poh and have them whisper it with as much enthusiasm as possible. Then I demonstrate how to say poh while inhaling; I place my hands on my midsection to show students how it grows larger while doing this.
When teaching a masterclass I bring pieces of one-inch diameter PVC pipe – one for each student. I ask students to put their mouths all the way around the tube and inhale. It is almost impossible to breathe through these tubes if a player is tense.
Students will be able to inhale through the tubes easily, but it is important that they take in lots of air when the mouthpiece is in front of them. The best exercise with the breathing tubes is to alternate breathing from the tube and buzzing the mouthpiece, so students get used to the kind of breath they should take.
Some young players puff out their cheeks, which is never acceptable. Show these students how they look in a mirror; sometimes this is enough to make them stop. Ask students who still puff to put the instrument down and exhale a stream of air at their palm while puffing the cheeks. Then have them do the same without puffing. Point out how puffed cheeks make the facial muscles too relaxed to blow a strong stream of air. When they blow without puffing, the facial muscles are much firmer.
Adding the Trumpet
All the work on breathing and buzzing should transfer to producing a beautiful, dark, and resonant trumpet sound. I play a G4 for the students to demonstrate a good sound, and then have students imitate me, holding a G4 for as long as comfortably possible at a medium dynamic. Students should focus on the sound, and I frequently ask them to play one at a time so I can help each one produce a clear and centered sound right away. The goal is for students to play with a good sound every time they bring the instrument up to the face. The best way to practice this is to hold a note for eight beats, then rest for eight beats. This give students plenty of opportunities to practice breathing, articulating, and holding a good sound as well as time to rest.
After long tones I like to introduce lip slurs, using this simple pattern:
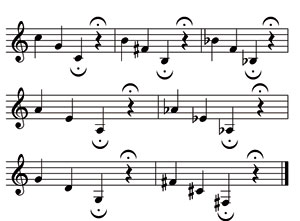
Students should concentrate on producing a clean sound through the lip slur and holding the low note for as long as possible. Students should rest for as long as they hold the low note and the rest for as long as they held the low note, and then do the next half step. If a student plays with an unclean sound or cannot match pitch, have him go back to the mouthpiece and buzz it. In fact, a good way to teach this exercise is to have half the students play it while the other half buzz, then switch.
Tonguing
Many young players have difficulty tonguing clearly. The tip of the tongue should be placed behind the top teeth right where they meet the gum. I prefer the syllable tu because it most closely follows the sound the air should make as it flows out. Review correct inhalation, then have students say tu and blow on their hands – they should feel a steady, focused stream of air. I give students simple quarter- and eighth-note patterns to keep the tongue moving. Students should play chromatically down to low C, although younger students can just play down the C major scale.
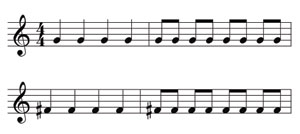
Another exercise that keeps the tongue working and the air moving is to have each student hold the top of a piece of paper in front of his mouth while blowing steady, tongued quarter notes on it. The bottom half of the paper should blow away and stay away as each student tongues. If the paper moves in and out with each quarter note, the air is not flowing and the sound on the trumpet will be choppy. It takes quite a bit of steady air to keep the paper from moving in and out. After students can tongue well, add the mouthpiece and then the trumpet. Play quarter notes on G4
Posture and Hand Position
Although good posture is important, frequently telling students to sit up may increase body tension. A student of mine once auditioned for Vincent Cichowicz at Northwestern. During band rehearsals I frequently told students to sit up, and she did, but Mr. Cichowicz told her that her posture was so perfect it was causing too much tension. If the shoulders are not relaxed breathing will be restricted. The other extreme, slouching, is equally bad; elbows should not be able to touch the hips or waist. A trumpet player’s elbows should be six to eight inches from the body. It may be necessary to give the trumpet section more space so elbows are not touching each other. Students who habitually slouch should stand until they are used to playing with good posture..jpg)
Inexperienced trumpeters tend to play with their bells in the stand or angled at the floor (as in the photo on the left). The trumpet bell should be slightly below parallel to the ground, and the bell should be out of the stand. Students should adjust the music and music stand appropriately to the correct bell angle rather than the other way around..jpg)
Young players make several common hand position mistakes. The right thumb should be under the leadpipe between the first and second valves. It should not protrude up and around the leadpipe by the first valve; this will cause the fingertips to be at an incorrect angle on the valve tops. Many inexperienced players struggle with the third valve getting stuck because of this poor hand position.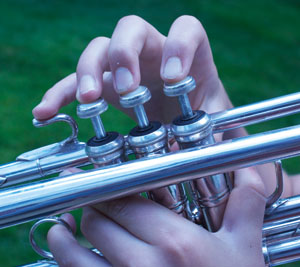
Many teachers have students place the right pinky on top of the pinky hook on the leadpipe. This is a good idea, as students may attempt to use the pinky hook to put pressure on the lips to play higher. Students should attempt to play higher by flowing faster air through the instrument rather than adding pressure.
Care and Maintenance
Every four to six months students should carefully take the trumpet apart – remove the slides and valves – and run it under lukewarm tap water. I usually hold the instrument from the bell and let water run all the way through it. Using an old rag or cloth, gently wipe the gunk from the slides and valves, while avoiding getting the felt pads wet. Purchase a mouthpiece brush and slide snake, and gently pull the snake through the slides to remove the build-up. I prefer a combination of slide grease and valve oil to relubricate the slides.
Ideally, all instruments will be in working condition before a masterclass, but so many directors have such limited time that care and maintenance might need to be part of the class, assuming supplies, including a working sink, are available. A session on care and cleaning midway through a masterclass can be a good break from playing. An alternative is to prepare a handout listing the necessary tools and instructions for cleaning the instrument.
Third Valve Slide
If students have never learned to extend the third valve slide for low D and C#, a masterclass is an excellent place to introduce this. Have students play a C scale with the slide in for D, then out for D. Then give each player an opportunity to experiment with the slide and a tuner, so everyone can see how far out the slide must go to be in tune. When each student knows how far to kick the slide out, play “Mary Had a Little Lamb” starting on E so students can practice triggering D while tonguing correctly and flowing air through the horn. If students struggle with all three of these, have them slur the song to keep the air moving.
End the masterclass by playing a song or etude. Simple duets or trios are good as well, and parts can be switched between players.