
When I teach clinics with middle or high school band flute sections, directors almost always ask me to focus on intonation. Usually the director checks back in on me after ten to fifteen minutes and asks with astonishment, “How did you get them to play in tune so quickly?” With attention to a few basics, your flute section’s intonation can improve as well.
Length of Flute: Adjusting the Cork
 The first step in getting a flute section to play in tune is to adjust the instruments so they are all the same length. This sounds simple, but if the headjoint cork is not properly positioned and the headjoint is not pulled out enough from the body, the flutes may vary in length from one another by as much as a half-inch.
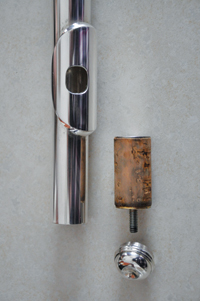
To adjust the cork placement insert the cleaning rod (the end with the line) into the headjoint. The line at the end of the cleaning rod should be adjusted so it appears in the center of the embouchure hole. Flutists refer to the crown end of the headjoint as the north end and the tenon end as the south end. If the line is south of the central position, turn the crown to the right to make the adjustment. If the line is north of the central position, then unscrew the crown a few turns and then push the whole crown and cork assembly into the flute. Then recheck the line on the cleaning rod position. In this adjustment the goal is to get the line slightly to the south of the central position so you can tighten the crown to bring the line into place.
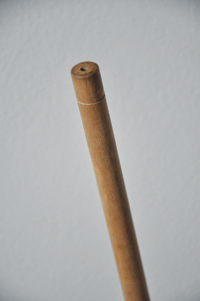
The best cleaning rods are made of wood or plastic. For many years cleaning rods were made of metal, but continued use of the metal rods scratches the interior wall of the tube which affects tone and intonation.
 Some cleaning rods have three adjustment lines. The middle line is used for the actual adjustment in the center of the embouchure hole, while the lines on either side are meant to line up with the outer edges of the embouchure hole. (Piccolo players should have a cleaning rod that may be inserted into the instrument without taking the instrument apart. This type of rod is especially useful in quickly swabbing the piccolo when water builds up in a key while playing.)
 When adjusting the cork position, you may find that the cork has shrunk so much that it is impossible for it to be kept in place. The best solution is to take the headjoint to a repair person and replace the cork. However, in the meantime, remove the cork assembly and wind a piece of plastic tape around the end. Depending on the size of the cork, it may take one or two pieces so the cork stays in place. It was once thought that you could take the cork and place it in a cup of water overnight and it would resize itself. After a lot of experimentation, most repair experts have found this unsatisfactory and prefer to simply replace the cork.
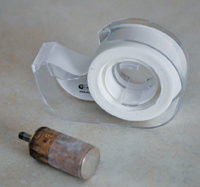
 Sometimes the problem is that the cork has swollen and is stuck in the headjoint. There is a tool to fix this that can be purchased or easily made. A hole is drilled into a dowel rod that is ¾ of an inch in diameter. After removing the crown from the crown assembly, the dowel is placed over the stem of the cork assembly. It then can easily be pushed so the cork releases towards the tenon end of the headjoint.
The cork should be removed and inserted from the tenon end of the flute because the headjoint is larger at that end. When replacing the cork, the cork should be shaped to follow the taper of the headjoint, meaning that it is be smaller at the crown end than at the tenon end. Corks should be fitted carefully so small tuning adjustments can be made. If the cork fits too tightly, the flute will sound flat and the tone will be dull. If students lose the headjoint crown they are readily available at a repair shop.
Length of Flute: Assembly of the Flute
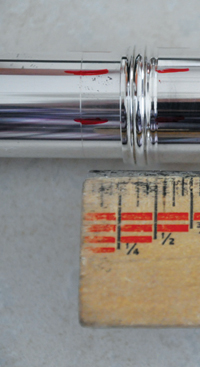 Unfortunately on many of the plated beginner flutes the plating stops at the beginning of the tenon. This means the headjoint is nice and shiny until the tenon. Fashion-sensitive young flutists often do not want to pull out the headjoint and allow the non-shiny part to show. Fortunately on step-up flutes, the plating continues to the end of the headjoint. Start the tuning process by the pushing the headjoint all the way into the tenon box on the body of the flute. Then back the headjoint out about ¼ inch. Use a ruler to check this distance. Align the center of the embouchure hole with the center of the right hand keys (F, E, D) as these three keys are inline. The goal in playing is to keep the embouchure hole level with the floor or ceiling. Once the headjoint is in position, use a red or black marker to place several marks around the headjoint and the body of the flute. These marks will last about three weeks and then it will be necessary to re-mark the instrument. The overall goal is to have the distance between the center of the embouchure hole and the center of the first key on the flute to be between 91/4" to 93/8" inches. For a while some flutes were made with engraved arrows to show the proper alignment of the headjoint and the body of the flute, but they were often inaccurate.
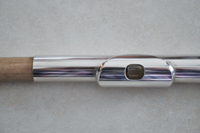
Balancing the Flute
How flutists balance the flute in their hands directly affects intonation. The flute should be placed just above the third knuckle back from the nail on the left hand index finger. This knuckle is placed under the flute to lift up the instrument.
.jpg)
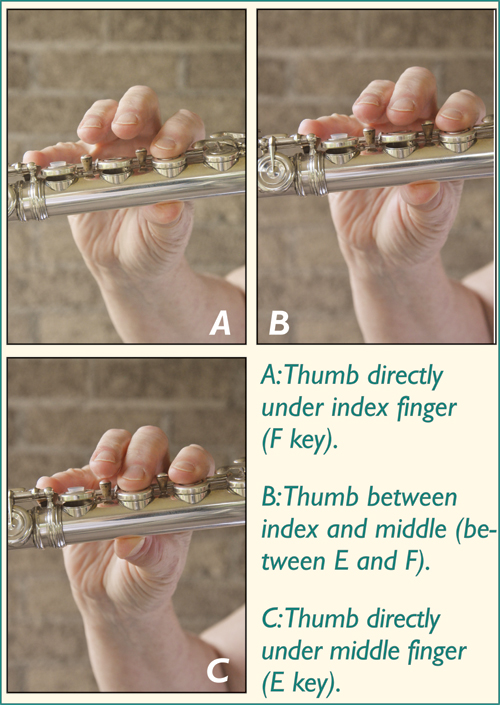
The right thumb (placed either on the back side of the tube under the F key, between the E and F keys, or under the E key) pushes the flute forward so the embouchure plate is firmly positioned in the flutist’s chin. The right hand little finger may occasionally assist in this. Flutes should never be balanced or held with the left hand thumb. The goal in developing a fabulous technique is to balance the flute so when playing, the fingers simply close keys effortlessly and there is no shifting or rolling of the flute in the players’ hands.
Since the design of the flute is heavier on the back side (the side toward the player), it naturally rolls back when a player removes the thumb from the B or Bb keys. However, when students place the flute just above the left knuckle, it sits in a small ridge or trough and will not be affected when the thumb moves. Notes that require the left thumb to be removed (and consequently can sound flat without proper balance in the hands) are C5, 6, 7; C#5, 6, 7; and G and G#6.
This tendency often causes intonation problems in the top octave. Better players figure out how to balance the flute and keep it from rolling when the left thumb is removed. However, other students will not have conquered this problem, and their flutes will be in various stages of rolling back when playing notes without the thumb. If students are still rolling back, remind them to turn the flute back into position when they replace the thumb on the flute. The keys and embouchure hole should be parallel to the floor or the ceiling. Otherwise weaker players will be flat on these notes, and stronger players will be technically in tune. However, since our ears tune pitches from the bottom up, the weaker players will set the perceived pitch, and the stronger players will sound sharp.
Once flutists understand how the instrument rolls in, they are on the way to playing in tune. Many directors have found success in turning to the flute section in places where thumb-less notes appear and saying thumbs as a reminder to compensate for the design of the flute. If said often enough, students will remember to always keep the keys and embouchure hole level with the floor or ceiling.
The Air
The three things to remember about blowing are the size of the air stream, the speed of the air stream, and the angle of the air stream. The size of the air stream is determined by how separated the vocal folds are. If the vocal folds are closed, then the amount of air coming from the lungs will be smaller than if the vocal folds are separated. Have the students pant slowly to experience the location of the vocal folds. While panting, ask the students where it would hurt if they were panting outside in negative 20 degree temps. (Alternatively, use an anatomy chart or one of the youtube.com videos to illustrate the anatomy.) Next ask students to say HO, HO, HO as the H helps separate the vocal folds very well. For years I said, “Open your throat,” until one day I began asking students where their throats were. The array of answers I received sent me back to the drawing board to find a better way to teach this concept. Learning to play with the vocal folds separated will solve many problems with tone and intonation.
The speed of the air stream is often the biggest culprit in learning to play in tune. Have students play a note using the tuner. The first goal is not to play in tune with the tuner, but to play the note so the needle or dial stays still whether it is flat or sharp. Once students can sustain the pitch and keep the needle still, then work on playing an accurate pitch. It often helps to have students play the note while sitting with their legs stretched out in front of them so the body is in the shape of a 90 degree angle. This position helps them observe how tight the abdomen should be when playing well. Learning to play with even air will improve overall tone quality and the shape of the individual notes. It also helps students build a foundation for playing with good intonation.
The angle of the air affects the tone quality and the pitch. This refers to where the air stream touches the blowing edge of the embouchure hole (opposite from the player). If the air is too high on the wall, the tone is airy and will be on the sharp side of the pitch. If the air is too low on the wall, the tone will be dark, edgy, and metallic and will be on the flat side of the pitch. Remember the embouchure hole remains level with the floor or the ceiling when playing (except for extended techniques such as pitch bending), and the flute should not roll forward or back to change the angle of air. When in proper playing position with the flute balanced well in the hands, the angle of the air is changed by the lips or the placement of the tongue inside the mouth. Have student place a hand in front of the mouth and practice blowing, angling the air from the base of the palm to the tip of the middle finger.
Target Practice
Since flutes require a higher flow of air than all other instruments except the tuba, students find it exhausting to play and continually try to find ways to avoid releasing so much air. Many can actually get a pretty nice tone by playing on a small amount of air, but generally when they do so, they are playing on the flat side of the pitch. Have students select a point or target across the room and play a note directing the air stream to the target. This visualization exercise helps them play on the exhale and keep the air moving out towards the audience.
This can be very tiring until students get used to moving large amounts of air rather quickly. I also use a toy pinwheel to test whether students are blowing the air out. If the pinwheel spins, they are good to go. If not, then they know exactly what to work on.
Posture
Intonation and tone production are directly affected by a student’s posture. In order to play the flute well, make sure students have enough space to play comfortably and pain free. Often three flutists play from one music stand with the ends of the flutes staggered in front and in back of each other. This simply is not a good solution. Each flutist should have a separate stand so when playing while sitting, the end of the flute can angle away from the right shoulder with the end of the flute in front of the nose. Compared to the oboes and clarinets, flutists should have quite a lot of room; they each need their own space.
Exercise: Learning to adjust
Have two students stand back to back. One student plays an agreed upon note but decides whether to play the note in tune, sharp, or flat. While holding the note, the other student plays the note and adjusts until he finds the pitch. Then students switch tasks. This helps the students learn to adjust to each other, and gives the rest of the class practice in discerning whether a note is in tune.
If you don’t practice something, it won’t be there when you need it. So remind students regularly to align their instruments correctly, sit properly with good posture, and practice exercises that remind them to separate the vocal folds, play with even air, and learn what to do when intonation does not match the rest of the group. At least once a month, check repair and alignment of the instruments.
* * *
Special Fingerings
• C#5 is a sharp note on all flutes. Add any or all of the right hand fingers to bring the pitch down.
• On new scale flutes the F#6 should be played with right hand 2nd finger rather than the 3rd. However, F#4 and 5 should be played with the right hand 3rd finger.
• G#6 is a very sharp note. Add the right 2nd and 3rd fingers to lower the pitch. It is preferable to use this fingering on longer notes rather than in scale passages.
• When playing C7, add the gizmo key plus half-hole the E key.


