September is when many flute teachers start beginners. New flutists have many skills to learn. Above all, be thorough and not rushed in the instruction; teach students to love a beautiful sound with a perfect attack.
Posture
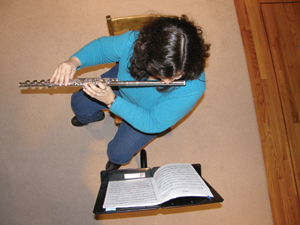
 Whether standing or sitting, have students align the body with shoulders above the hips so the body does not twist. The left foot should be at 12:00 and the right foot at 3:00. During private lessons students should stand, as there are fewer issues with body alignment. Make sure, however, that they understand the correct sitting position for playing in band and orchestra.
Music Stand
Whether standing or sitting, a student’s body should be turned 45 degrees to the right of the music stand. With the music stand parallel to a wall, the body will face the corner of the room to their right. In playing position, the flutist’s head turns slightly to the left and he or she should be able to see the music on the stand. As in the photo, the eyes, left elbow and music stand are aligned. The music stand should be high enough that the chin is level, and low enough so the conductor can be seen over the top of the stand.
Breathing
Because the flute is one of the highest air flow wind instruments, students may experience light-headedness in their first lessons. The cure is to stop playing and breathe normally for about a minute. Some students who do not understand good breathing habits will hunch their shoulders up as they inhale or breathe shallowly. Show them how to keep the shoulders down and inhale fully. A brief explanation of the mechanics of breathing may be helpful.
The diaphragm is a thin sheet of muscle that separates the heart and lungs located above it, and the organs (stomach, liver, pancreas, etc.) below. When inhaling, as the lungs inflate, the diaphragm pushes down on the lower organs to make room for the lungs’ expansion.
The expansion during inhalation can be demonstrated by having students lie on the floor face-up with one hand on the abdomen (just above the belly button) while breathing normally. Tell students to notice how the abdomen rises with inhalation and falls with exhalation. Placing a book on the abdomen provides a visual demonstration as it rises and falls. While lying on the floor, have students practice inhaling for four counts, and exhaling, started with spit-rice tonguing, for eight counts. While on the floor, other skills to practice include tonguing, both with and without the headjoint, and playing the headjoint.
Introduce the Flute
Before opening the case, students should place the case on a solid surface like a table. When this is not possible, as in group classes or ensembles, they should place the case on the lap. Show them how to safely open the case with the correct side up. It is helpful to put a piece of masking tape with the student’s name and phone number on the side that faces up, to keep flute parts from spilling out of the case when it is opened.
Students may want to invest in a case cover that fastens with zippers, buckles, or velcro. Case covers keep the case closed securely – latches on some cases tend to pop open when barely touched. Having a distinctive case cover is also a good way to distinguish one flute from another in the band room. Store a cloth swab and a cleaning rod between the case cover and the case, instead of inside the case, to keep moisture away from the flute after swabbing. Students should also keep a pencil for marking music in this location. Covers also provide some protection for the case and the flute if the case is accidentally dropped.
Putting the Flute Together
In addition to showing students the different parts of the flute, discuss the pads and how they work. Caution against touching the pads and wiping the flute vigorously where the cloth might tear the edges of the pads. Also, explain the importance of brushing teeth and washing hands before playing the flute.
Demonstrate how to safely take each part out of the case and assemble the flute. Encourage students to lift each piece from an open end and avoid grasping keys, rods, or the lip plate. Then have them practice taking the flute apart and putting it back in the case. Show students the areas without keys with room for fingers to grasp safely. These include the end of the footjoint and the barrel at the top of the center joint where the brand name is engraved.
Show students how to assemble and align the flute properly, stressing that the headjoint is aligned with the embouchure hole and the majority of the keys facing the ceiling. Double-check the alignment and use a fine-point permanent marker to put matching marks on the headjoint and the center joint of the flute. These marks will help students align the instrument consistently. The marks will need to be redrawn periodically as they wear off after a week or two.
Take a few minutes to let students explore the flute and discover how the keys open or close when pressed. Ask them to figure out how many closed keys are on the flute, and where they should press to make them open. Other explorations might be to notice that some keys are linked together. Ask them to see how many linked keys they can find.
In preparation for learning the correct hand position for playing the flute, put temporary markings on the keys that the fingers will touch. This will help students put their fingers on the correct keys. This is especially helpful if you are working with a group. Use very small round stickers (colored dots) or a small circle drawn with a permanent marker.
Headjoint
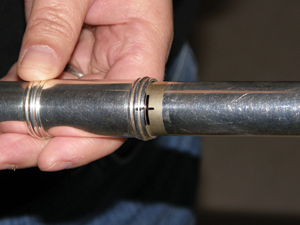
Check students’ headjoints, particularly the fitting and adjustment of the cork. Adjust the cork so the line inscribed on the closed end of the cleaning rod is centered in the embouchure hole. This encourages good intonation from the beginning. If the cork is loose, use tape to secure it in place until it can be replaced at a repair shop.
Take the headjoint apart so students can see how it works. The crown assembly can be removed with a special tool available for purchase at a music store or flute specialty shop. First, unscrew the crown from the end of the headjoint. Then use the tool to push on the threaded stem to push the crown assembly out the open end of the headjoint. Wash the headjoint with gentle dishwashing liquid, if necessary. This is a good idea especially for rental flutes or Aunt Ida’s old flute that has been sitting in a closet for years.
Swabbing Out the Flute
While playing, condensation from breath forms inside the flute. It is important to swab out the moisture before putting it away. Before swabbing, it is safest to first take the flute apart and put it safely in the case. Pieces can be removed one at a time to swab safely and avoid parts falling on the floor.
Students should have a cleaning rod and a lightweight absorbent piece of fabric approximately 10"x10" like a man’s handkerchief, or a piece of cotton fabric (woven or knit). Thread one corner of the cloth (about 2") through the needle-like opening of the rod so the cloth will not slip out of the opening. It will resemble a small bunny’s ear. Fold the fabric over the rod to avoid scratching the inside of the flute. Insert the cloth-covered rod into each section of the flute and twist to remove the moisture, and return it to the case. When finished, tie the cloth to the handle of the case or fold neatly and place inside the case cover. Avoid putting the cloth inside the case after swabbing to keep moisture and possible mildew away from the flute.
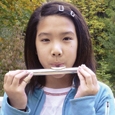
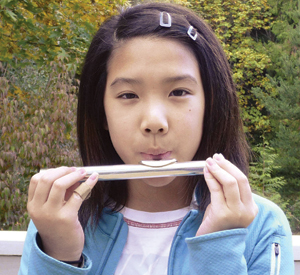
Headjoint Only: First Sounds
Before the flute is removed from the case, demonstrate pretending to spit a grain of rice off the tip of the tongue. This method of tonguing is called French tonguing, Suzuki tonguing, or spit-rice tonguing and is an effective way to start a note on the flute. The tip of the tongue peeks out between the lips when the flutist pretends to spit the rice. There will be a little pop when the tongue is pulled into the mouth, and the air is released. The air should sound very fast, like blowing out birthday candles, and the aperture should be very small. A small airstream and fast air will help students successfully produce a sound on the headjoint. Encourage them to continue to blow for at least two seconds after the initial attack.
Students may practice spitting rice with a small amount of uncooked rice taken outdoors, either during the lesson or as homework. They will find it fun to spit the rice for distance or for target practice, aiming at a bush, tree, or fence.
Students should remove the headjoint from the case, carefully grasping it by the open end, and refasten the case. Help them place the headjoint in the chin. The embouchure hole should be level and face the ceiling. The headjoint and flute always should be brought to the student (rather than bringing the face to the instrument) because the flutist is the boss, not the flute.
In early private lessons, the teacher should bring the headjoint to the students. The process of bringing the headjoint to them should be repeated several times to make sure they are not reaching the head toward the flute like a turtle. Next show students how to place the headjoint in the correct location themselves. When working with a student, the teacher should come down to the student’s height by sitting in a chair or squatting lower, so the student does not have to look up to receive instruction. The student’s chin should be level, so the head is balanced on the spine. (See box below.)
Students should be able to feel the edge of the embouchure hole under the flair of the lower lip where the lip skin and chin skin meet. The embouchure hole faces up toward the ceiling. Demonstrate the spit-rice technique to start a half note, and have students repeat it. Play for two counts and rest for two counts with the students. Repeat several times. Remind students to stop blowing for a minute if feeling dizzy.
Check students’ apertures to make sure the opening is centered over the embouchure hole. Some apertures will naturally be off to the side instead of centered, because the upper lip has a tear drop. This can interfere with the airstream. Many famous flutists do not have a centered embouchure. Apertures to the left of center yield the best results, as blowing to the right can cause shoulder strain.
If a student has difficulty coordinating the tongue to spit rice at the beginning of a note, try starting the sound with pooh (as in Winnie-the-Pooh) or tu. Once a student produces a consistent sound, try spitting rice again. Some students have success with sticking the tongue out farther and pulling it back into the mouth to release the air.
Practicing Tonguing and Tone
Follow-the-Leader is a fun echoing activity to practice tonguing and playing the headjoint. The teacher plays a four-beat pattern, and students repeat the pattern. The teacher audibly taps a foot to the beat, and students are shown how to tap along. Start with a very simple pattern, such as four quarter notes. Vary the rhythm patterns using quarter, half, and whole notes, and even some eighth notes to develop students’ aural skills. This activity aurally introduces the concept of beat and meter, and headjoint practice refines tonguing and tone production skills.
Show students how to make different sounds with the headjoint, and incorporate these sounds into the echoing activity. A low sound is produced when the open end of the headjoint is covered with the right palm. Inserting the right index finger into the end of the headjoint while playing produces a glissando. Stress the importance of spit-rice tonguing, clean attacks, and fast air to produce beautiful tone. Playing fun and varied sounds and rhythms will make headjoint practice enjoyable.
.jpg)
First Songs on the Headjoint
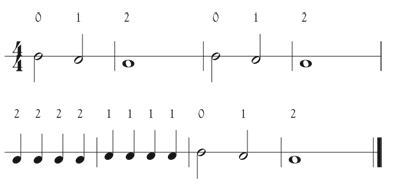
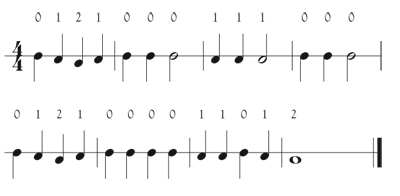
Have students insert the index finger in the open end of the headjoint to play three distinct scalewise pitches. These pitches can be used to play “Hot Cross Buns” and “Mary Had a Little Lamb.” Students hold the closed end of the headjoint near the crown with the left-hand index finger and thumb. The right-hand middle finger and thumb will hold the open end so the index finger is free to move in and out of the headjoint. The highest pitch is open position (0). The middle pitch is produced when the index finger is inserted into the headjoint approximately to the first line (joint) from the fingertip (1). For the lowest pitch, insert the index finger approximately to the second line (joint) from the fingertip (2). The songs (see below) should be taught aurally while tapping the foot to the beat.
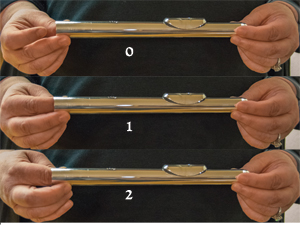
Practice fingering and saying the above finger positions in rhythm, repeating several times. Then place the headjoint in playing position and play the song, tonguing each note.
The finger positions for “Hot Cross Buns” are as follows:
The finger positions for “Mary Had a Little Lamb” are as follows:
Note Values and Notation
Introduce note values, rhythms, and basic reading skills using the headjoint only. Additional time spent with the headjoint develops students’ tonguing and tone, and makes the transition to the whole flute more successful.
After teaching and practicing the above songs, introduce the concepts of beat, note values, meter, and counting. Demonstrate tapping the foot to a steady beat, then echo four-beat rhythms, beginning with saying, “down-up, down-up, read-y, go.” This will illustrate the beat’s subdivision with the foot. Continue tapping throughout the activity. Even though eighth notes will be introduced later, this method serves as subliminal preparation for the concept of subdivision.
Introduce the notation for quarter notes and quarter rests. Write out simple four-beat patterns with different combinations of notes and rests. While tapping the foot, have students practice saying play for the length of each note and rest for the length of each rest. Then they should play the written patterns with the headjoint.
Follow the above procedure with half notes and half rests, then whole notes and whole rests. Write out a series of four-beat rhythms with different combinations of notes and rests in 44 meter. Verbally practice the rhythms with play and rest, then students should play them with the headjoint. Explain that each group of notes is a measure and has four beats that are separated by a barline, etc. Students may also write out their own rhythms to practice.
When written notation is introduced, many students confuse the half rest and whole rest. A helpful memory device is to tell them that the half rest is placed above the line on the staff and looks like a hat, which sounds like half. The whole rest is placed below the line and looks like a hole, which sounds like whole. Also, teach the students to add up the number of beats in the measure to make sure there are four.
Once there is consistency in tonguing, air speed, and tone, students are ready to move on to playing with the flute put together.
* * *
Head Balanced on the Spine
If you look at a model of a human skeleton, it is surprising to see how small the spine is without the muscles and tissue of the neck and windpipe. The skull has a large (and heavy) bony area at the top of the back of the head and there is a large jaw area at the bottom of the facial area.
When the head is balanced on the spine, it feels weightless and the neck muscles are relaxed. Conversely, if the head is not balanced, the neck and back muscles may be sore after playing the flute.
To find the point of balance, touch the chin to the chest, slowly raising the chin. Just past the balanced point, students will feel the head pull backward from the weight of the bony area at the back of the head. Front and side neck muscles will engage to keep the head from feeling like it is falling off the spine. Lower the chin to again find the point of balance.
Next, tip the head back to look up. Slowly lower the chin to find the point of balance. Just past the point of balance, students will feel the chin pull down toward the chest from the weight of the jaw bone. The back and side neck muscles will engage to keep the head from falling off the spine. Raise the chin to again find the point of balance.
With students, practice finding the point of balance by slowly nodding the head. Then practice turning the head slightly to the left, and bring the headjoint into playing position.
Assessing Progress in Group Lessons
As each new skill is added, it is important to assess students’ progress to identify and help those who are having difficulty. At the same time, it is important to keep the entire group engaged and interested in the lesson.
Seat students so you can easily reach each one to adjust posture, headjoint position, hand position, etc., as needed, while the entire group is playing. A circle or semi-circle is ideal for smaller groups, while larger groups need widely-spaced rows with a center aisle.
In groups smaller than 15, there are many activities where each student can play in turn while the other students remain engaged. If some students are shy about playing alone, assign them to play in groups of two or three. For larger groups, several students can play at the same time.
• Telephone: Similar to the children’s game involving repetition of a sentence, the teacher or a student plays a simple 4-beat rhythm, and each student in turn repeats the rhythm. This is a great way to hear a lot of students individually (or in small groups) in a short amount of time, while keeping the other students engaged in an activity.
• Songs or Scales: Each student in turn plays one note or one measure of a song such as “Hot Cross Buns” or “Mary Had a Little Lamb.” The other students finger along so they are ready to play the correct note(s) when it is their turn.
• Follow-the-Leader: Notes and rhythm patterns can be echoed by small groups randomly chosen. For example, you might call on students with brown hair, students wearing purple, students wearing sandals, students wearing jeans, students whose name starts with the letter P, etc.
Thank you to Dr. Susan Fain for the use of her illustration showing the recommended stance for playing flute.