This time of online instruction has opened new avenues for studio enrichment. In the past, most flute clubs or university studios could afford only one guest artist a year. With the ease and low cost of Zoom, major artists can be brought to your studio inexpensively because there are no transportation or housing costs involved. Many artists are offering these classes for free or at reduced fees because they want to offer something positive and uplifting to flutists in these troubling times. For many artists, their normal venues for employment are on furlough, so this may be a way for them to be partially employed.
I too have been teaching Zoom classes for university studios and flute clubs. While the medium is not as good as everyone playing together in the same room, a lot of valuable information and instruction may be shared with excellent results. Through the chat resource on Zoom, participants are able to ask questions in real time during the presentation. This article shares some of the most frequently asked questions and answers
Stance
Flutists who have grown up in a band program often think that the flute is played with the feet together and facing forward. The flute is held high with the end of the flute quite close to the right shoulder. This type of stance leads to pain if continued for long periods of time. Instead try the stance illustrated below. Since the flute and other instruments such as the bassoon and French horn are played to the right or asymmetrically, they should use this stance. An asymmetrical set up keeps the player from getting injured as can happen with a symmetrical position. Some informed teachers have their students make a foot mat using a small rug and magic markers.
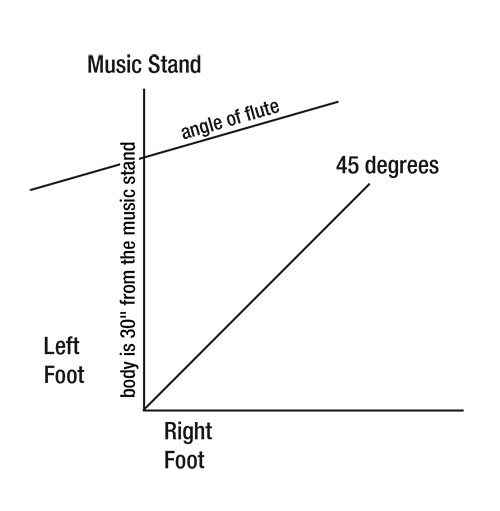
The left foot should be positioned at about 12:00, and the right between 2:00 and 3:00 – whatever is comfortable. They should be about 30 inches back from the music stand. The center of the body is turned 45 degrees to the right and the angle of the flute is angled forward from the right shoulder. Use the flute’s length at 28 inches to measure how far back the flutist should be from the music stand. If the player has difficulty reading the music at this distance, it is time for an eye check-up.
Many ask why the end of the flute is forward. In the earlier times (Baroque) the embouchure hole was a circle. In fact, the traverso could be played to the right or to the left. As time progressed, flute manufacturers began experimenting with embouchure hole shape. At one time the smaller, rounder cut was called the French cut and was known for its agility and sweet, small sound. A larger, squarer cut, called the German cut, was known for its big sound. Since the mid-1980s, we have seen the development of specialists who only cut headjoints. They incorporate upper cutting and under cutting to make the flute more responsive. The blowing edge has been brought closer to the tube to diminish resistance. With all of these new advancements, you can’t play the embouchure hole symmetrically. It should be blown at an angle. To find the perfect place, play a D in the second octave with the end of the flute close to the right shoulder. Slowly, as you are playing the D, move the end of the flute forward. There will be a place where the tone seems to blossom and perhaps is audibly louder. That is where the end of the flute should be when playing. More than likely the end of the flute will be aligned in front of your nose. For reference, I call this moving the end of the flute from east to west or horizontally. Repeat this exercise only bringing the end of the flute from closer to the floor to closer to the ceiling. I call this moving the end from south to north or vertically. Once again there will be an improvement in the sound at a certain point. The place where these two intersect (east and west and south and north) is called the “sweet spot.”

Harmonics
Most professional flutists practice harmonics to find the ring in the sound and to develop embouchure flexibility, but in many educational settings, harmonics are never mentioned in relationship to the flute. What are harmonics? Imagine a bugler. The bugle has no piston or what we would call keys, yet the bugler is able to play a large number of notes by increasing the air speed and changing the embouchure. This series of notes that the bugler can play is called the harmonic series and is present in all instruments.
Flutists already explore the basic harmonics each time they play because the second octave notes are overblown from the first octave. The third octave notes are based on overblowing again to reach the next higher partial. To make the third octave better in tune, we either add or subtract fingers to the fundamental partial.
To play the harmonic series on the flute, play a low C. This is called the fundamental or first partial. Next, overblow to the octave or a C in the second octave. The next interval is achieved by overblowing a Perfect 5th higher or a middle octave G. Continue overblowing to get a third octave C or a Perfect 4th higher. Depending on the make of your flute you can easily overblow to the sixth or eighth partial. Any note in the first or lower octave of the flute can be a fundamental.
To incorporate harmonics into your practice, first slur up the harmonic series to the third or fourth partial using low C, then C#, then D as the fundamental. As you go up, the air speed increases and the aperture (opening in lips) becomes smaller. Likewise, the reverse happens on the way down. Work for smooth even slurs. Eventually you will memorize the exact placement of the air stream against the blowing edge of the embouchure hole, the speed of the air needed, and the appropriate size of the aperture. These are valuable assets to have in playing the flute.
My favorite harmonic exercise begins with the right hand on the barrel. Playing with the right hand on the barrel helps find the exact placement of the embouchure plate in the chin. Play a low octave G and slur up an octave to a middle octave G and then again to a third octave D and return back down in reverse. Practicing harmonics with the right hand on the barrel is especially good for younger students. To focus the tone in this position, aim the air towards the left elbow bone. Keep the embouchure hole level. I practice harmonics several times a day. This helps me remember where my flute overblows at its best.
.jpg)
French or Forward Tonguing
Begin by placing a piece of boilable rice on the tip of the tongue. Spit the rice out. Repeat several times to ensure that this can be achieved on demand. Once the rice is successfully spit out then practice spitting rice on the headjoint of the flute. Place the tongue in the aperture and let the air pressure build behind the tongue, then pull the tongue back to release the air. Think about placing the tongue in the aperture or on the top lip. Of course, this means that the teeth are separated so the tongue can move forward. With forward tonguing, the beginning of the note will no longer be sharp, and it will be clear with no chips.
Most flutists who have learned in the Suzuki method are familiar with this type of tonguing; however, flutists of older generations will have been taught to tongue behind the teeth on the roof of the mouth. This type of tonguing doesn’t produce the elegance of forward tonguing. If you decide to adapt French or forward tonguing into your bag of tricks, it will take about six months of concentrated practice.
Vibrato
Many teachers have inquired when to teach vibrato. In my studio, I play with vibrato with the student from the first lessons on. About week 9, I notice the student is trying to match my vibrato. At that point I teach vibrato.
The first step is to look at the anatomy of the neck and locate the vocal folds. It is the opening and the closing of the vocal folds that creates the vibrato. You may open the vocal folds by playing a breath attack (an attack started with the air and no tongue) Hah, Hah, Hah, rest. Work this exercise on the headjoint only before adding the flute. When adding the flute, practice Hah, Hah, Hah, rest on each note of a five-note scale pattern such as Taffanel et Gaubert No. 1. Once the student is proficient, then play one group Hah, Hah, Hah, staccato and then next group Hah, Hah, Hah, rest slurred. I made a fluoroscope video to show the vocal folds in action that is available to view at fabulousflute.com under resources.
Next apply the Hah staccatos slurred to a scale placing 2, 3, or 4 vibrato cycles on each pitch. Learning to vibrato well takes drill so be patient, and in no time, you will be able to apply it to your melodies.
Fuzzy Tone Corrections
In a masterclass in Idaho, one of my students asked Michel Debost what he did when he had an airy tone. Debost responded with the following:
1. Place the right hand on the barrel and pull the flute into the chin. This gets the embouchure placed firmly in the chin. A headjoint that is moving around is difficult to control sound-wise.
2. Aim the air towards the left elbow bone. Interestingly when you suggest this to students, they immediately lift the left elbow to meet the air stream. Better to aim the air stream to an elbow that is pointed to the floor.
3. If the first two suggestions don’t offer improvement, then squeeze the left index finger around the tube. Squeezing the finger pushes the headjoint into the chin. He commented this was advice that Taffanel often offered.
When to Teach Musicianship
Shape of the Note
I believe in teaching musicianship from the very first lessons. Being a musician is more than playing the notes, knowing the fingerings, and how to count. The first musicianship rule to teach is the shape of the note. A note has three parts: the beginning or attack, the duration, and the release. In the first lessons, experiment with making different shaped notes. This negative practice is often the fastest way to help a student make a perfectly shaped note that is strongest at the beginning and has a clean attack.
Strength of the Beat
Next, teach the strength of the beat concept. In 4/4 meter, the first beat is the strongest, the third beat next strongest, with the second and fourth beats being weak and weaker. In 2/4 this is strong/weak. Beginners don’t have to play all notes at the same dynamic. It is boring and sounds like a monotone speaker.
Two-Note Slurs
When two notes of any duration are slurred, the second note is played softer than the first.
Dot = Silence
A dot after a note is placed to show duration; however, in current musical style this dot is played as if it were a rest. The only exception to this is if the passage is slurred.
Repeated Notes
Repeated notes are separated with an articulatory silence and have a dynamic design. This design is of your choice.
Musical Line
In Western music, the idea is to start playing at the beginning of an etude or piece and continue to the end without stopping as if it is one story. This is done by continuously blowing into the flute. If this is an accompanied piece, then the piano part may spell the flutist during rests, but you continue to the end.
For example, you decide to take a trip to the mountains. At the beginning of the trip, the land is rather flat like the plains, so the car is on cruise control and can move along at 65 mph. As you come into the mountains, the car’s engine must put out more energy to climb a mountain and likewise put out less energy on the descent. This is true in flute playing as well, as some passages require a faster air stream and others a slower. If you never stop while driving to your destination in the mountains, this is like playing to the end of an etude or piece without stopping.
When playing in an ensemble, the conductor is responsible for the big musical line. Your contributions are made when you are playing, but you have no control over what happens during the rests. But when playing etudes and solo works, you are in complete control.
With younger students practice this concept with simpler melodies, having them play through the entire line or lines without stopping.
Sloppy Right-Hand Position
If a student has long arms, then is it even more necessary to move the end of the flute forward away from the right shoulder. I often suggest students put their hand up in a comfortable playing position without the flute and then move the keys of the flute to the hand. The tips of the fingers align with the center of the keys. Usually the flute is at the angle suggested above. The right-hand knuckles should be the same height as the center of the keys. Michel Debost suggested pulling a horizontally placed book off the shelf and then insert the flute. All movement of the fingers on the right hand is from the third knuckle back from the nail. Set the footjoint according to the flutist’s hand size. Have the student finger a low Eb and then move the pinkie over to the footjoint to finger a low C. The right-hand thumb touches the flute on the side towards you and pushes the end of the flute forward into the chin.
If you have questions, send them to editor@flutetalkmagazine.com for some suggestions to improve playing and teaching. I encourage you to take advantage of the many zoom opportunities that are currently being offered.


