In some areas of the country there is a well-organized system of hiring specialists on each instrument to give private lessons to band and orchestra students during the school day. Usually, the school district sets the lesson rate, and students are responsible for the cost. Other programs partially subsidize the lessons through booster programs.
If your school does not have a program like this, well-run sectionals can have an equally positive effect on a program. Advance planning and structure are essential elements of a well-run sectional. Too often they are scheduled and then cancelled at the last moment. They may start late and lack a defined lesson plan. Running parts of a piece over and over again without a specific goal has limited benefits. If the director does not treat sectionals seriously, then the students won’t either.
Getting Started
Determine the length of the sectional. If you schedule an hour, plan to use the entire hour. If you release students early, parents may be upset that their student is floating around school after hours on their own. Consistency offers the best results for student, parents, and yourself.
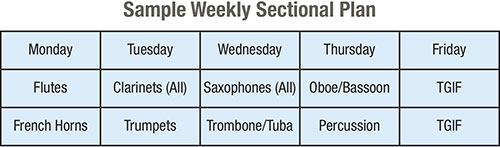
Decide whether sectionals will be offered once a week or every other week. Stick to the plan no matter what. If you have a well-planned curriculum, weekly sectionals offer the greatest benefits, especially if your district has directors with different areas of expertise, such as specialists in brass, woodwinds, percussion, violin/viola and cello/bass. If this is the case, two sectionals may be scheduled on the same day. (Since reed making is a specialized topic, try to hire an oboist and bassoonist to conduct these weekly classes.) If there is only one teacher for the entire program, then schedule sectionals before and after the school day. A typical week for a band program might look like the chart below.
Planning a Curriculum
If you are a middle school director, check to be sure the students have completed Books 1, 2, and 3 of the band method book series. As an applied music teacher, I have noticed that most programs complete books 1 and 2 and move on to sheet music. Unfortunately for many instruments, book 3 teaches the higher and lower fingerings which are needed to progress into more advanced sheet music. Without instruction and drill on these fingerings, students use odd fingerings when in high school which can severely affect the intonation of the group. So, start by finishing books 2 and 3 before proceeding with a diverse curriculum.
Objectives
A well-run sectional has several objectives. The first is to improve the playing of the individual and then to learn to blend as a section of like instruments. The final goal is to learn and polish the marching band or concert band repertoire.
Plan the hour using a format students can use when practicing at home during the week. In essence you are teaching them how and what to practice using modern chunking and rhythm techniques. Rather than requiring a certain number of practice minutes, the results will be stronger if students are given simple and direct instructions on what to practice. Once students have completed the list, they are done. This teaches efficiency in practice which is a skill professional musicians use all the time. Some students will complete the template in a shorter time than others. With repetition they learn to focus and concentrate, and the overall results are stronger.
Part 1: Warmup
(Suggestions for all except percussion)
For all wind instruments, the first step in warming up is to get the air flowing. Rather than going into a lengthy discussion on how the lungs and intercostal muscles work, concentrate on the exhale rather than the inhale. Arnold Jacobs was correct – if you can sing it in your head, the brain will figure out how to accomplish it.
Add-A-Beat
One of my favorite exercises is to ask students to extend their legs in front of them while sitting. When playing in this position, explain that this is as tight as the abdomen should be. Set the metronome on quarter note = 60 and blow one note (concert F perhaps) for one beat and then rest a beat. On each repetition increase the length of the note by one pulse followed by a quarter rest until the note is blown for 12 or 16 beats. For younger students (middle school) a good objective is eight counts. High school students should easily be able to play for 16 counts.
Remind them that the objective is to have a clean attack, even air for the duration, and an attractive note ending. When playing the ending, keep the vocal folds separated so the glottis does not close making a glottal stop sound. To teach what the glottal stop feels and sounds like have students say “uh/oh.” The glottal stop occurs between the two words in the vocal folds. Another way to teach this placement is to have students swallow. Swallowing occurs in the same location. All the muscles used in swallowing should be relaxed when playing.
To check the accuracy of an attack, have students begin a note with the tuner. If the needle is still, then the attack is good. If the needle suddenly moves to the right or goes to the sharp side of the pitch, the attack needs to be examined. To remedy a sharp producing attack, have them practice breath or HAH attacks and then mimic the air usage.
Harmonics and Wiggles
Once the air is moving, work on embouchure flexibility and strength. For flutes place the right-hand on the barrel and finger a G5. Then with this fingering slur, overblowing to D6 and back down to G5, then to G4 and back up to G5. This exercise may be repeated on the chromatic notes between G5 and C#6.
For other woodwinds, practicing wiggles (slurring while wiggling the two notes of an interval back and forth a few times) not only works embou-chure flexibility, but the wiggles exercise coordinates the timing of the fingers. For example, try FGFGF rest, FAFAF rest, FBbFBbF rest and conclude on FCFCF rest. Working the intervals up to the perfect fifth offers the most benefit because the small intervals are the ones most frequently used in melodic writing.
Scales
There are many ways to approach scales but I have had success with the following two. First is teaching scales by tetrachords. A tetrachord is a group of four notes with the first and the last notes being a perfect fourth. The tetrachord used for this exercise is constructed of the intervals whole step, whole step, half step. Combining two of these tetrachords makes a major scale. The tetrachords of the sharp side of the circle of fifths are the first four notes of a major scale or the following:
CDEF
GABC
DEF#G
ABC#D
EF#G#A
BC#D#E
If you visualize a circle of fifths, C major is located in the same position as 12:00. G is at 1:00, D is at 2:00, and so on. To construct a scale, play 12:00 (C tetrachord) with 1:00 (G tetrachord). Then 1:00 and 2:00 etc.
Create a handout with all 12 tetrachords written with letters. Have students play each tetrachord slurred five to ten times. They should experiment playing in all octaves. Once students are familiar with each tetrachord and can play it quickly, start putting them together. Soon everyone will know 12 major scales. Often this can be accomplished in about an hour’s time.
The other method for teaching scales is a more traditional approach. Using all 12 keys, play the first three notes of each scale up and down slurred. Once students can do this, play the first five notes of each scale up and down slurred, and finally all eight notes of the scale up and down slurred. Encourage accuracy, increasing the tempo from one week to the next.
The general goal is for each section of the band to be able to play by memory all 12 major scales, two octaves slurred. Then begin adding various articulation patterns into the practice session. When I was teaching at Brigham Young University-Idaho, the wind ensemble was invited to play at the music educators’ dinner at the IMEA convention. I had been teaching sectionals for the wind ensemble director, and several months earlier I had suggested a goal for the entire band to play all 12 major scales, two octaves in unison by memory. I got the surprise of my life when they came on stage at IMEA, sat down, and played all 12 major scales by memory in unison. When they started their warmup, the music educators were still talking, but as they progressed around the circle of fifths the room became quiet in amazement. At the end of the scale cycle, the audience of directors gave a standing ovation. Someone at my table said, “This must be the only band in Idaho that can play all their scales.” This scale work paid off not only in the technique of the ensemble but in tone production and intonation.
Triads
For triads, focus on major, minor, and diminished as these are the ones most used in the literature that bands play. I prefer to work one octave, in triplets, (135-853-1) first until all 12 keys are known. Start with the major triads illustrating on a white board that all the notes of the triad will be line, line, line or space, space, space. From the major arpeggio, flat the third for minor, and then flat the third and the fifth for the diminished. Eventually expand to two octaves.
Rhythm Drill
Select a key of the week. You may go around the circle of fifths, or select a key from a challenging passage in the band repertoire. Play a one octave ascending scale with a different rhythm on each scale step. First in simple meter, then compound. These eight rhythms are the most commonly used. (From The Flute Scale Book by Patricia George and Phyllis Avidan Louke, Presser.)
Simple Meter
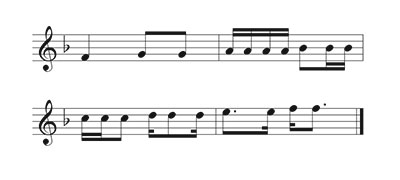
Compound Meter
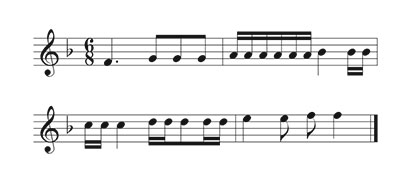
Trills
Have students play a trill that uses only one moving finger. Play this trill for 16 or more counts. Repeat until each of the fingers have been used. This exercise focuses on the saying, “If you never practice playing fast, you will never play fast.”
Articulation
Select a note and tongue four beats of sixteenths for 8, 12, or 16 beats and rest 2 beats. Repeat 6 to 8 times. Both the trill and tonguing exercises take a little bit over a minute to practice, but the benefits are huge.
Octaves
Have more advanced students play the lower note of an octave and then the upper note of the octave, working on the top and bottom notes of the range. Most band method books teach note reading in succession, and students have trouble jumping to the fingering of the upper or lower notes. Practicing jumping back and forth aids their technical development. For example, low high low high low rest. These could be slurred or articulated.
Vibrato
For instruments that use vibrato, have students play staccato breath or HAH attacks, four sixteenths = MM 60. The breath or HAH attacks occur in the vocal folds. There should be no movement in the jaw, chest or abdomen. (Except for saxophones that may use a jaw vibrato). Once players can control the HAH staccatos, simply slur the HAH staccatos: HAH-AH-AH-AH. (There are more exercises and a discussion on vibrato usage in The Flute Vibrato Book, by Patricia George and Phyllis Avidan Louke, Presser.)
Part 2: Etudes
Select an etude book appropriate for the section’s level of advancement. There are many appropriate methods on www.imslp.org which are available for free download. If in doubt as to what to select, get advice from a professional on that instrument.
Etudes are best learned using the chunking practice method. To chunk, play one beat and rest a beat working through the etude. This method ensures that students know where the beats are. Then chunk by inch followed by a rest. Chunking by inch is important because when the eye sees a grouping of notes on one line, it sees about one inch. We use groupings of numbers on many everyday items including credit cards, social security numbers, and telephone numbers. The brain sees and remembers best in recognizable chunks and patterns. In class, play the assigned etude in unison and then divide it in chunks by beat and by inch for the following week.
Part 3: Repertoire
It is generally pretty obvious what should be practiced, but over a semester of sectionals the entire piece should be covered. Use chunking by beat and by inch techniques to aid in learning. Once something is chunked five to eight times, the information goes into long term memory. Be picky about the quality of the chunks.
Part 4: Ensemble
Leave the rehearsal with something upbeat. Almost every instrument group has good chamber music, either original or transcriptions, that students will enjoy playing. Look for flute choir, clarinet choir, oboe/bassoon/clarinet/
horn ensemble music etc. Select a composition or two to practice in the final 10 to 15 minutes of each sectional. At the end of the term schedule a chamber music night (with pizza!) for the whole band so that each group can perform for their peers.
Teaching sectionals is a time most directors find quite rewarding because they can go into more depth about music than in a full band rehearsal where all students must be kept occupied. If you have not made sectionals a part of your curriculum, I would encourage you to give it a try. For students who can’t afford private lessons or in locations where private study is unavailable, it is such a wonderful gift to provide for young musicians.


