One of the most difficult points in a clarinetist’s development is overcoming the dreaded clarinet break, which is tricky and requires a great deal of attention. This is partly because most students learn to play over the break in their pre-teen to early teen years. This is a self-conscious age for most children, and squeaking on the clarinet can often cause embarrassment, leaving students feeling insecure about their abilities. This insecurity can be amplified by having to learn new notes for the same fingerings because the clarinet overblows by a twelfth instead of an octave. All this can be exacerbated if a student’s clarinet is not in in excellent working order. Before working with students on the break, be sure to check clarinets for pad leaks. It is common for the large pads on the bottom of the instrument to leak, which can make playing over the break almost impossible, regardless of how good technique is. For band directors who have not had months to focus solely on the clarinet break, there are some tips and tricks that can help this task become more manageable for students and teachers.
Hand Position
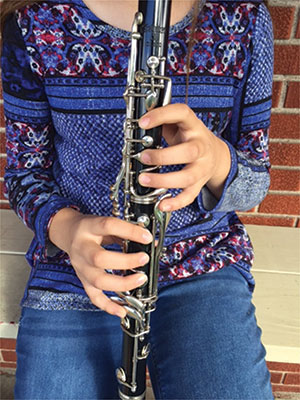
Many beginning and intermediate clarinet students struggle with hand position. Students should use the guide position, which is the proper alignment of fingers and hands on the instrument. The fingers should be relaxed and gently curved over the keys, and the left thumb should gently touch the register key, but not press down on the mechanism. The right thumb should rest under the thumb rest, with the thumb rest touching midway between the knuckle and tip of the thumb. This is a lot for a beginning musician to remember.
The weight of the clarinet can often cause young clarinet players to adopt an incorrect hand position. Students often curve their right hands up and rest them on the right side keys of the upper joint. This pulls fingers out of the guide position alignment and requires excessive movement in the right hand and fingers, which can prevent students from playing rapid passages. It also usually results in squeaking because the fingers are unlikely to cover the tone holes properly.
A second result of students compensating for the weight of the instrument is resting pinkies under the pinky keys instead of on them. This is common because students feel more secure holding the clarinet when they have fingers on the body of the instrument rather than just the keys. It can also be difficult to catch, because students rarely play notes that require pinky keys until several months into instruction. Students who develop the habit of resting pinkies under the pinky keys often get frustrated going over the break because their pinkies have to move up and over the pinky keys to get to where they need to go. Additionally, the excess movement of moving the pinky keys often causes other fingers to move off of the tone holes and cause squeaking.
One way to address compensation for weight is to encourage all beginning clarinetists to use a neck strap. They take the weight of the instrument off the hands, allowing students to develop good hand position. Additionally, check hand position during each rehearsal and lesson. Students can look into a mirror or team up with a buddy to check their hand positions.
Another common problem for beginning clarinetists is fly-away fingers. Rather than keeping fingers close to the keys at all times, many students will let their fingers rest several inches away from the clarinet. This is especially common with the pinkies, but is seen with all the fingers. Fly-away fingers create excessive motion that impedes the ability to play technical passages quickly and evenly.
The paper exercise is a fun exercise that helps students to understand how far they may be moving their fingers off of the keys. Pair students and give them a piece of paper. Have one student play a passage while the other gently holds the piece of paper over the player’s hands. The student playing will feel fingers hitting the paper if they move too far off of the clarinet. This exercise can be repeated weekly, and both students in a pair should get an opportunity to play.
Right Hand Down
The right-hand-down technique is a wonderful tool to facilitate jumps over the break. It should be used whenever the music indicates a movement from a note in the throat register, which will have a few or no fingers down, to a note in the clarion register that has most or all fingers down. If music has a note in the throat register followed by a clarion-register note, clarinetists should add the right hand fingers used for the clarion note to the throat tone fingering. Not only will this alleviate excess finger motion when going over the break, but adding right-hand fingers to throat register notes makes the tone more focused and in tune. Have students work on the exercise at the top of the page.
Air Support
The throat register notes are free blowing and non-resistant, but the notes over the break are the most resistant notes in the entire clarinet range. Beginning and intermediate clarinet players often underestimate how much air support is needed to play notes over the break. A wonderful analogy to help explain how much air is needed for the clarinet is to compare the air used when blowing out birthday candles on a cake. Have students imitate that kind of fast air. Another fun activity is to challenge students to blow enough fast air to keep a sheet of paper steady against a wall. This activity is fun for any wind player. Additionally, band directors can reward students or ensembles if they can sustain notes for a longer amount of time each week. This is a fun way to increase students’ air capacity. There is another air capacity exercies on the previous page.
Embouchure
No discussion of the clarinet break is complete without considering the embouchure. One of the most common mistakes that clarinet players make when going over the break is moving the embouchure, which usually happens because students are nervous about the jump. Moving the embouchure even slightly when crossing the break can cause squeaking. Have clarinetists partner up to check each other’s embouchures. You can also buy a mirror for students to set on their music stands and check their embouchure.
The breathe-set-release exercise is an effective tool to help students learn to keep embouchures steady. It breaks producing a sound into three easy steps. First, students focus on taking a full breath. Second, students set the embouchure slowly in four segments: bottom lips over teeth, top teeth resting on mouthpiece, chin flat and down, corners of the mouth in. Finally, students release the air into the clarinet in a focused and fast stream.
Literature
As clarinetists start going over the break, pick a challenging piece that will help students develop this skill, but also continue to choose pieces that do not go over the break. A mistake some directors make with young clarinet sections is to pick only literature that goes over the break, leaving many clarinetists feeling frustrated and unable to keep up with the band. Including pieces that do not go over the break will help clarinetists to feel relaxed and leave them time to focus their practicing on the one or two pieces that do. This will allow them to find success early on and hopefully improve retention in the clarinet section.
In the exercise below, the right-hand fingers should be down the entire time.
.jpg)
Below is an exercise to improve air capacity. This exercise should be played with a metronome. Place the metronome at q = 50. Encourage students to try to play each phrase in one breath. Once students are comfortable with that, challenge them to play two phrases with one breath. This will help to increase air capacity and stamina.
.jpg)
If your school is close to a college or university, contact the music department and invite a clarinet player who is a music education major to volunteer with your beginner band once a week. Ideally, the college student could sit within the section and play with the beginners. Additionally, the college student could provide a helping hand in checking hand position, reed placement, embouchure formation, and breath support.
You can also find a helpful high school clarinet player who would be interested in helping out. This is a great way for high school musicians interested in teaching to get early experience. The student could prove to be a mentor for the young clarinet players.