As violinists move beyond basic literature, shifting or changing positions becomes increasingly important. Proper shifting technique allows students to move smoothly and accurately between positions. Although it may seem daunting at first to leave the security of first position, with a little encouragement, students will soon enjoy exploring the possibilities of their instrument.
Shifting should be introduced as soon as students are comfortable reading and playing all of the notes in first position. While method books and school series provide shifting information, they often fail to include preliminary exercises or allow students to explore the fingerboard on their own. The following exercises prepare students for correct shifting technique.
Why Shift?
The most basic reason to shift is to play higher notes on the E string. Shifts also allow violinists to change the tone color of a note. For example, first finger F natural on the E-string has a wiry, bright tone, while the same pitch played in third position on the A-string sounds warm and round. A sustained note on an open string lacks vibrato and stands out, usually in an undesirable way, in an orchestral work. While using a fourth finger in first position is one option, young students often lack strength in that finger and cannot produce vibrato with it. Using second finger in third position is often a better choice.
Another common use for shifting is to avoid string crossing in fast passages. In the example below, the violinist would switch from D string to A and back again. Not only would this introduce a change in tone color from one string to the other, but it might affect speed and rhythmic steadiness as a slight pause often creeps in during the string change. A shift to third position allows all of the notes to be played on the D string.
Preliminary Exercise
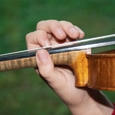
Many beginning students grip the violin tightly with the left hand. This makes it difficult to slide into a different position. Without using the bow, practice long glissando slides on one string. Place a finger on the string in first position and slide it down the fingerboard in a long, sliding motion. Use first, second, and third fingers and challenge students to see how high and how easily they can go. The A-string is the easiest string to start with for this exercise. The hand must be curved very far around the instrument for the G-string, and on the E-string, the player’s hand often falls off the fingerboard and lands on the body of the violin.
Glissandi require freedom in the hand and arm, so this is a perfect opportunity to evaluate a student’s physical set-up. Make sure students have an appropriate shoulder rest or pad so that the violin can remain stable throughout the slide. If a student struggles to keep the violin stable, hold the scroll for them. Make sure the entire hand and arm are sliding, not just the fingertip. The left thumb and elbow should move freely with the hand.
After students are comfortable moving around the instrument, add the bow. Encourage students to use long, full bows to build confidence. They should practice glissandi in different rhythms and tempos: two beats to travel up the violin and two beats to travel down (q=60-120). Then try asymmetrical patterns: two beats up and one beat down. Coordinate the bow with the shift. For example, play a down-bow for the slide up, and change the bow direction at the top of the glissando. If the left hand gets stuck sliding on the fingerboard, have students practice the glissando with an extremely light fingertip. This creates a harmonic series up and down the string. Keep this exercise fun and tell students not to worry about the sounds they produce.
Same Finger Shifts
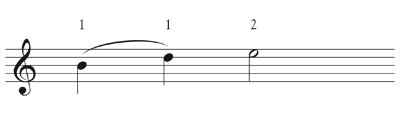
Once glissandi have been mastered, it is time to refine the sliding motion and add actual pitches. Same-finger shifts are the easiest and most basic. Start with the first finger and travel in distances of a whole step, third, and fourth.
.jpg)
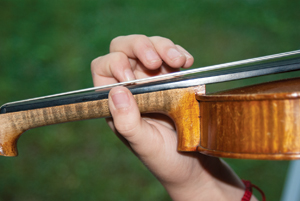
Students should check pitches with open strings. For example, the first note B natural can be tuned with the open E-string to create a perfect fourth. The D natural and E natural in measures 2 and 3 can be tuned to the open D and E strings. Periodically check the left-hand thumb. It should feel loose and flexible and travel with the hand. Often when students first begin to shift, they stretch the fingers on the fingerboard and leave the thumb behind. The thumb should be situated either directly across the neck from the first finger (as shown in picture on the previous page) or between the first and second fingers. This remains basically the same until the highest positions. Students whose thumbs are too far back or forward will have a difficult time shifting easily and accurately. Examine finger angles. The pad of the fingertip should be placed on the string, and the angle of the fingertip should stay as consistent as possible throughout the shift.
 Try the exercise shown in the previous example on different strings and at different speeds. After practicing with the first finger, start a whole step higher and use the second finger and then a third higher with the third finger. Save the fourth finger for later. The pinky is weak, and young hands should not be strained. Students playing on just the fourth finger often resort to unhealthy and unbalanced left-hand positions.
Change Fingers
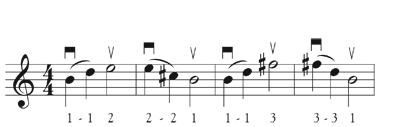
The next step is to shift to a different finger. Although the end result is to play a note with a different finger, the shift is actually made with the previous one. In other words, the shift is accomplished in the same way as the previous exercise. For example, a violinist starts on a first finger, shifts up with the first finger, and then puts down the new finger. The last finger down before the shift is the finger that leads the shift. In addition, the shift should take place on the old bow. The tone that is created in the middle of the shift is called a guide or travel note. Often called a French shift, these are the cleanest and most measurable types of shifts.
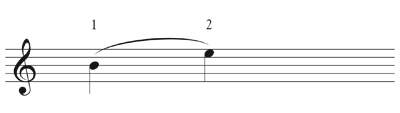
To shift from first position finger 1 (B) to third position finger 2 (E) use a guide or travel note (D).
Make sure students slide and don’t just jump up. (They glide just as in the glissando exercise.) The finger tips should feel light while shifting, but the bow should remain in the string.
Try the following exercise. Start with very slow, exaggerated shifts where the guide note is a full quarter note. You may wish to start with each shift alone and then try the whole passage. If students have trouble playing the exercise in tune, have them practice it in first position to hear how it sounds and then with the shift.
As students become more confident with shifting, the guide note becomes an eighth note or a sixteenth note. Ultimately it is not really heard, but it is always felt in the left hand.
The speed of the shift should be proportional to the speed of the music. Slower passages require slower shifts. Encourage students to play every part of the shift. Much like in math class where students are asked to show their work, the process of a shift should be heard, not just the arrival on the new note. Students often want to take short cuts and jump their fingers up to the correct note. This leads to poor intonation and jerky sounds. Proper shifting technique should be taught and required from the beginning.
Explore the Violin
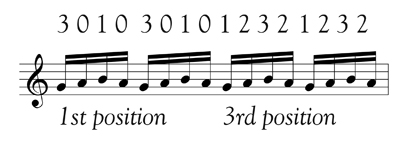
Shifting from first to third position is generally the first stage of shifting practice and should be drilled the most. However, do not ignore other positions and encourage violinists to explore different areas of the fingerboard. For example, challenge them to find how many places on the violin they can play the note A (open string, fourth finger on D string, third finger on D string, second finger on D string, third finger on G string, etc.) This exercise develops a mental map of the violin that will improve intonation and facilitate reading in higher positions. Too often students become comfortable with first and third positions and nervous when asked to play elsewhere.
Another good exercise is to practice one-octave scales all on one string in the upper registers of the violin. Try one octave scales, all with the first finger, all with the second finger, and all with the third finger. Then add a challenge by fingering the one-octave scale 1-2-1-2-1-2-1-2 and 1-2-3-1-2-3-1-2.
Once students become more comfortable with shifting, work on note reading and intonation with easy pieces that have a familiar melody. Play them in first position, then try second, third, and fourth position. Take an easy piece and see if students can find a way to play it all on one string using proper guide note shifting technique. Until players are able to recognize common shifting patterns, guide notes may need to be written into the music. However, avoid writing in all of the fingerings in shift passages. Just as in teaching notereading in first position, this leads to students who read the numbers but not the music.
Intonation
Be aware that the distance between notes lessens as a violinist moves farther down the fingerboard. In other words the space between fingers becomes closer in the higher positions. This can lead to intonation problems. Practice with scales and familiar tunes may help students hear the correct pitch. They should also know what note (letter name) they are playing so they can check it against an open string or note in first position. The E an octave above open E is a good reference point for checking intonation.
When tuning high-position passages, practice with an open-string drone tone or with a drone tone on an electronic tuner. Split students into pairs and have one student play the passage up in position while another plays it down an octave. The bottom octave should be louder than the top octave. Examine the hand position. Often intonation problems are caused when the hand is not far enough around the violin in the upper positions. If a student is straining to reach high notes, make sure that the thumb is located near the rest of the hand and that the hand is able to swing freely over the violin.
Reading Intervals
Many students feel comfortable sightreading in first and third positions, but become confused in upper registers. Students who learn to read interval patterns will be able to negotiate higher positions with ease. The example below shows a staff that is made up of fifteen lines instead of five.
.jpg)
Now the pitches have no real meaning in terms of note-reading. Have students start the example on different fingers and in different positions. For the purpose of this exercise, do not worry about key signatures. The student will fill in accidentals that seem appropriate to them, and you will find out a lot about the way your students’ ears work.
In general, step-wise patterns are easier to sightread. Students are exposed to scales from an early age, and the concept of step motion relating to consecutive fingers makes sense. With interval work, players will start to recognize that patterns of thirds are usually fingered 1/3 or 2/4 and that fourths and sixths are consecutive finger patterns. Fifths are usually played with the same finger across strings. This exercise contains intervals of seconds through fifths, so students learn to identify these common intervals. Once students have practiced the example starting on every finger, try flipping it upside down and reading it backwards.
Even advanced students should review basic shifting technique on a regular basis. After presenting a challenging shifting passage to students, back up and practice an easy shifting exercise or a piece all in third position. Students who regularly practice one-finger scales and shifts from first to third positions will have better shifting technique than those who neglect the basics.
Violinists who feel comfortable and confident in high positions learn music quickly and are strong sightreaders. Students who shift well can choose fingerings for comfort and tonal range. The development of proper guide-note shifting technique combined with fingerboard exploration allows students to change positions with ease and elegance.
* * *
DO
• Practice glissandi to work on freedom of motion in the arm and hand.
• Use light fingertips
• Use the thickest part of the finger pad to touch the string.
• Allow the thumb to travel with the rest of the hand.
• Lead the shift with the last finger down.
• Shift on the old bow stroke so that the new note is articulated on a new bow.
• Practice with audible shifting or guide notes.
• Read intervallically.
DON’T
• Squeeze the fingerboard.
• Jump from note to note. Slide instead.
• Pick up the bow while shifting.
• Play on the fingernail side of the finger tip.
• Leave the thumb behind the hand. The hand moves as a unit.
• Shift too quickly in slow passages.
• Only use 1st and 3rd positions.
• Write in all the fingerings in shift passages.