Writing drill for small marching bands can be a challenge. These planning techniques and writing strategies can be used effectively, especially when writing for a band with fewer than sixty members.
Music Selection
Great arrangements for drill writing are those that include a variety of changes within the style, tempo, key, and dynamics of the music. Each change in the music is an opportunity for a visual change in the drill. More frequent musical changes yield more variety and creativity within the staging and movement of a show. However, small bands often face instrumentation limitations that can make selecting music difficult. Arrangements that keep the melody exclusively in the upper woodwinds and trumpets might be the easy choice from an instrumentation perspective, but this often leads to the drill developing an element of sameness simply to ensure the band’s available melodic instruments are appropriately staged for best musical effect. Arrangements that include more melodic doublings in the alto and tenor voices, as well as frequent melodic shifts, will make it possible to use a small band’s instrumentation more creatively on the field.
When selecting music, also consider how the length of the show and the number of pieces performed may affect the band’s presentation. A show built around successive arrangements that are longer than two minutes are often difficult for smaller bands to sustain. The number of climactic moments in these arrangements may not be effective for small ensembles to perform over the course of a six- to nine-minute production. Smaller bands might do better with four or more shorter arrangements that fit the show concept. Multiple short arrangements create more frequent style changes in the music and a faster-paced show.

Planning
Once music has been selected, all directors and staff should fill out a flow chart similar to the one shown below to serve as a rough storyboard of how the show might look. Flow charts should also be used as a final round of checking for the director and staff to make sure good arrangements were selected prior to sending the music to the drill writer. There are many variations on what can be included in a flow chart. Below is an example that I use, which is based on the example from The System: Marching Band Methods by Gary Smith. Categories may be added or deleted based on individual preference. Rough sketching of potential formations is encouraged during this process as well.
Once a flow chart has been created, look for variety in counts, movement type, instrumentation, and staging/focal point. If there is substantial similarity in any of these categories, see if a section can be revised. For instance, be wary of 32-count transitions that use a single type of movement. Transitions of this length develop slowly and rarely match the intensity of the music. These are also difficult for young bands to march precisely. Consider breaking 32-count transitions into two separate maneuvers or creating a combination of movements within the same set. Further, multiple 16-count maneuvers should be analyzed in relationship to the music to see if any phrases can be adjusted visually in count sequences such as 12+4 or 8+8. If you find too much similarity in the movement column, consider substituting some movement choices to include more variety from the following options as the music permits: follow-the-leader, reshaping, floating, expanding/contracting, rotating, random, sequential, body choreography, or combinations of these movements. Body choreography such as horn flashes, backfield faces, and poses should be accounted for during the flow chart process even if this movement evolves overtime. When these are added later they can sometimes look contrived. If the instrumentation is too similar perhaps you can insert a drum break, make cuts in the score, or insert four counts of silence to delay certain melodic impact points and yield something new visually. If there is too much similarity in the staging column consider how the color guard is being used and if opportunities could be created to frame a section or soloist.
If you are hiring an outside drill writer, be sure a consultation meeting is arranged prior to signing a contract. The purpose of this meeting is for the writer to learn about your program and vision for the season. It is important to share the ensemble’s strengths, give a rundown of drills and shows that have worked well in the past, and discuss who your audiences will be, whether this is football parents or competition judges. It is also important to share the logistical needs of the show, including props, soloists, cuts to the score, drumline size, colorguard roster, and equipment changes. ask about the writer’s policy regarding rewrites during the season, as we all know there are variables that may affect personnel, especially in a smaller band, over the course of a season. They might not be able to accommodate the request, but it definitely is okay to ask, as we all know the variables that occur during a season.
.jpg)
Writing Drill
Directors of smaller ensembles who are designing their shows should consider the following charting suggestions when they are ready to begin writing.
Shrink the Field
Only use as much of the field as fits the ensemble well. Generally speaking, a horizontal space of 40 yards (between the two 30 yard lines) with a depth that extends to approximately the center of the football field (sixteen to twenty 22.5-inch steps behind the front hash) should be appropriate for an ensemble of fewer than 60 members. Formations should fill as much of this space as possible, but resist temptation to send students past these limitations, especially wind players. Although props are not essential, they can be effective in shrinking the field while adding greater effect to your show, and they are also useful for hiding equipment changes.
Linear Formations
When charting linear formations, use two- or four-step intervals. These provide greater field coverage while also strengthening the eight-to-five grid. For a diagonal line, use a 31.8-inch interval, which keeps the endpoints lined up with the eight-to-five grid and which, in perspective, follows a two-step interval when joining another linear formation. At the bottom of the page are several examples of linear formations charted using the grid while employing these guidelines.
Block and Wedge Formations
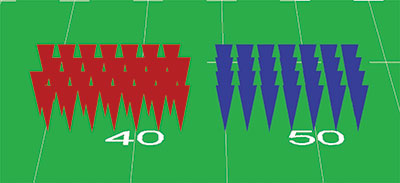
Small bands can often benefit from well-staged block or wedge formations, which are simply stacked linear formations. The same guidelines of two- and four-step intervals still apply. When charting blocks and wedge formations with a small ensemble, use windows to avoid masking members of the band. The following images are examples of block formations when viewed in various perspectives. For each example, red formations demonstrate using windows while the blue formations are examples of blocks not using windows. In perspective, the blue formation masks or screens members in the vertical lines while the red formation using windows enables the audience to see more members of the ensemble without diminishing the visual effect of a block shape.
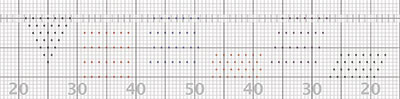
It is okay to experiment within the guidelines of two- and four-step intervals when charting block and wedge shapes for small bands. Used effectively, a variety of these formations in different scales and shapes will prevent drills from developing a sense of sameness. At the top of the next page are examples of several block and wedge shapes using various interval relationships of two and four steps.
.jpg)
Sample Block and Wedge Formations
Curvilinear Formations
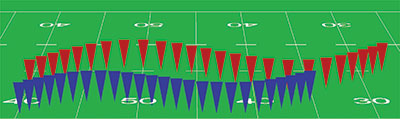
When charting curvilinear formations for smaller bands, use a three-step interval, which provides 50% more field coverage than a two-step interval, and makes it simpler to fill the space of a smaller field with a smaller ensemble. Below is an example of two curvilinear formations. The red formation represents a three-step interval while the blue formation represents a two-step interval.
Geometric Shapes
Geometric shapes should be neither subtle nor small, because subtle angles and small formations lack clarity from the audience’s perspective. Four-sided shapes, such as squares and rectangles, are ideal for smaller ensembles so long as they are charted with enough depth. Ten yards of depth, or a distance of sixteen 22.5-inch steps, on each vertical side should provide enough vertical distance for the audience to recognize the shape. Small ensembles can use perspective and masking to their advantage with four-sided shapes. Below is a rectangle using 26 performers. Each horizontal line requires nine individuals in a two-step interval, and each vertical line has been charted using only four performers in a four-step interval. Knowing that each vertical line will mask performers, designers can chart vertical formations in four-step intervals in relationship to horizontal formations of two-step intervals without impacting the form. By making these adjustments, this rectangle can be charted with ten fewer performers than the same rectangle using a two-step interval throughout. This technique helps incorporate personnel efficiently.
Difficulties Using Other Geometric Shapes
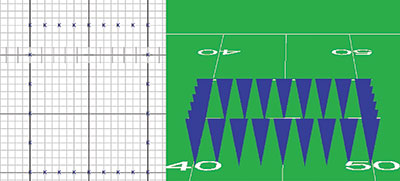
Triangles and shapes with five sides or more are difficult for small ensembles to perform. Shapes with more than four sides require subtle angles and more personnel, in addition to a greater depth of field to be performed effectively. On occasion, the music and visual variables will align where these types of geometric shapes are effective, but they are usually rare. Below is an example of a triangle using 24 performers in 2-step intervals.
When viewing the chart, intervals appear clear and the triangle shape is easily understood. In perspective though, the form is lacking the clarity of the image on the chart. More depth would be required to make a more effective formation. Elongating the shape by four steps would require at least one additional performer even when reassigning the vertical formation to four-step intervals. For small bands this may not be a possibility because of instrumentation limitations as well as staging considerations prior to and after the formation. If you are committed to a triangle formation with a small ensemble, consider a wedge instead if the transitions and staging of the ensemble permit.
In general, four-sided shapes are ideal for smaller ensembles. Squares, rectangles, and diamonds are great but explore more asymmetric and slanted forms such as trapezoids and parallelograms to create more variety when writing these shapes.
Small ensembles can form circles, but circles are among the most difficult formation for bands. Keep
the intervals to no more than two steps and make sure there is enough depth to make the formation readable. Always check perspective with your geometric shapes. If you are unhappy with their clarity, determine whether you can revise the shape without adversely affecting staging or the transitions around the formation. Reforming into a wedge or block shape is often a good solution, but small bands may find elongating a shape less practical because of their limitations of instrumentation and personnel.
Combining Formations To Create a Drill Set
When charting multiple elements in a single set, be sure to preserve the same interval within each drill element. Use curvilinear formations in three-step intervals, and use windows and occasional four-step intervals in linear formations. Keeping the same interval within an element will make the formation more readable and will also enhance field coverage for smaller ensembles. At the bottom of the page is an example of multiple design elements being incorporated in an ensemble drill of 42 field performers.
Masking and Screening
Many variables within our ensemble can mask performers and drill segments. For small bands, masking can make the group appear even smaller and less readable. Ensure that the following variables are accounted for when developing the drill:
• Height of the drum majors on the podium in relationship to the field in front of them.
• Proximity of drill elements on the field to each other in perspective.
• Height of individual marchers in relationship to others.
• Color guard flags obscuring formations.
• Front ensemble staging in relationship to the sideline.
• Sousaphone bells and marching bass drums.
• Height and width of props.
• Color of uniforms in relationship to field and yard lines. White uniforms often blend in with yard lines.
Closing Thoughts
Writing drill for your ensemble can be a fun and rewarding process as you see your design come to life over the course of a season. There will be moments of frustration at times, but there is always a solution. Here are some final tips:
• Chart your opening set no closer than 16 steps from the front sideline.
• Be cautious of using cluster pods or fragments in an opening set of a show, as these make a small band appear even smaller.
• In real time, the opening set is often the longest held formation of a show; use a formation that covers the field but does not further invite attention to the smaller size of the band.
• Ensure the brass and drumline remain in relatively close proximity throughout the drill.
• Fill the space of the smaller field.
• Asymmetric formations and curvilinear formations have a lower degree of error. Symmetrical forms and geometric shapes have a higher degree of error, but have phenomenal impacts when accurate. Use the latter judiciously.
• Keep transitions simple, especially when you are featuring another section. Transitions can take attention away from the focal point of the show.
• Make sure focal points in the formations match those of the music.
• Always keep the music and scores available when designing and teaching. The visual production should enhance the musical arrangements.
Do not let the computer screen stifle creativity or tempt you to write something too advanced for your ensemble. Seek out drum corps performances in your area and keep your eyes trained on single drill elements within these shows for ideas. Happy drill writing.