Back in the days of chalk and erasers, the progress of the school day could be measured by the gradual buildup of chalk on the board. Squinting to distinguish math problems from the gray powder of dust surrounding them, I knew that it must be close to lunch time. Each day we looked forward to knowing who would be chosen to clean the board with a wet sponge, which would magically reveal a glossy, pristine black surface.
As brass players, we too often fall into a comfortable fiction, believing that our instruments are clean inside. After all, the outside looks so shiny. The ugly truth is this: what goes into our instruments stays there. Sugar in our saliva, particles of food, and whatever else that tooth brushing missed remain.
Red Rot
The brass used to make instruments is an alloy of zinc and copper – usually in a ratio of 30% to 70% respectively. In the most extreme cases of neglect, trumpets or other brass instruments will develop red rot, a breakdown of the zinc portion of the alloy, leaving the metal weak and fragile.
Red rot typically first shows up as a reddish blotch on the outside of the brass. However, this is just the visible evidence. In reality, the pipe is being eaten away from the inside out, and eventually holes will develop. Once detected, red rot can be slowed, but eventually the affected tubing will need to be replaced.
The lead pipe is the most common place for red rot to develop. This is the first stop for food particles, minerals, and acid in the saliva leaving the mouthpiece. Most larger food particles get deposited here, although some continue through to other parts of the trumpet. Besides the lead pipe, other areas prone to corrosion are the tuning side crooks and the crook attached to the third valve casing.
To prevent red rot or to slow its progression, students should try to remove as much moisture from the trumpet as possible whenever they finish playing. A thorough cleaning once a month is also key to preventing a problem with red rot. These practices will also help to maintain the overall health and playability of the instrument.
Share these simple guidelines with your students:
• Always carry a toothbrush, and brush your teeth before you play.
• If you can’t brush your teeth, rinse your mouth thoroughly with water.
• Empty all water from your trumpet after each practice and performance.
• Run a clarinet swab through the lead pipe and tuning slide before putting the instrument away.
• Run a mouthpiece brush through the mouthpiece twice a week.
• If possible, do not eat before playing.
• Avoid acidic beverages like tea, coffee, lemonade, and soda before you play.
• Also avoid milk-based beverages before playing, because these thicken the saliva and can cause sticky valves.
Cleaning the Trumpet
To clean the trumpet, students will need to have a cleaning kit (available from the local music store) and a few common household supplies. The following items will be needed:
• Mouthpiece brush
• Two clean, dry bath towels
• Cleaning snake
• Hand towel
• Slide grease
• Valve oil
• Soft, lint-free cloth (no paper products; wood fibers damage the finish)
• Liquid dish soap (with minimal additives)
• Plastic tub large enough to comfortably fit trumpet and slides.
When cleaning and polishing the outside of the trumpet, remember that the brass is protected with either clear lacquer or silver plating. Acids in our perspiration break down this plating. If students do not wipe their instruments after playing, their sweat will dissolve the plating and eventually eat through the brass itself. To protect the finish, students should wipe the trumpet clean after each practice session using a soft cotton cloth (e.g. an old t-shirt) to remove the oil and acid left by their hands. Students should also polish their instruments monthly using a cloth designed specifically for their finish (such as a lacquer polish cloth or silver polish cloth).
Liquid silver or lacquer polishes are also available, but these should be used only every six months or so, because the strong chemicals in these polishes will wear down the finish if overused.
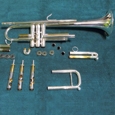
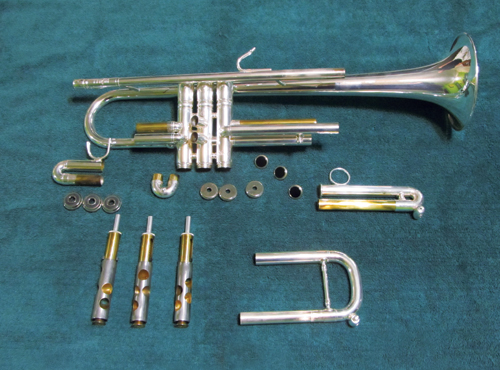
Removing the Valves for Cleaning
Students should bathe the trumpet once each month to clean out the bacteria, food particles, and saliva deposits (acid) that are placed in the trumpet each day. If students clean their trumpets monthly, the instruments will perform better, and they also will smell and look better.
If you are serious about having clean instruments in your band, you will want to walk your students through the cleaning process during class. Although some of this instruction can be done verbally, one step you should be sure to show them is how to safely remove the valves, since this is an especially delicate procedure.
When the valve is inserted correctly, the holes of the valve will line up with the holes in the valve casing. Have students observe this for themselves by pressing down the valve key, removing the corresponding valve slide, and looking into the valve slide opening. If the valve is in the wrong casing or if it is facing the wrong way, the holes will not correspond, and this will obstruct the airflow.
As you instruct students on how to remove the valves, be sure to let them know that the valves are the most delicate part of the trumpet. Students should understand that dropping a valve can have disastrous consequences. Instruct your students to place the trumpet on their lap, with the bell facing to the right. Next they should unscrew the top valve cap on the first valve, and then slowly pull the valve straight up, halfway. There may be a small 1 stamped on the valve, signifying that it is the first valve.
Ask your students to look for the valve guide, a small piece of plastic or brass located near the bottom of the spring inside the valve. Both sides of the valve guide protrude from the valve, locking it into place when the valve is inserted into the valve casing.
Students should observe that one side of the protruding valve guide is a little larger than the other. They should identify whether the large or small side of the valve guide is facing them, because this information will be needed to re-assemble the trumpet. If they make a mistake, the holes in the valve will not line up with its slide, and the air will not be able to pass through.
Students should practice this step with you. Make sure that all questions are answered, so they feel confident in bathing their instrument at home, with their parents’ help.
Preparing a Trumpet for the Bath
As you walk students through the process of bathing the trumpet, emphasize to them that they should use only liquid soap, not detergent. The strong chemicals in detergent are not safe for the instrument, and they may scratch or damage the finish.
Students should run a lukewarm bath for the trumpet in a large plastic tub or bath tub. A moderate amount of liquid soap should then be added – just enough to make the water sudsy. There is a tendency to think that more soap will make the instrument cleaner. In fact, the opposite is true; too much soap can make it hard to get all of the soap off the trumpet. The residue from the soap can lead to sticky valves and slides, which will leave a foggy film on the plating or lacquer.
Next, instruct students to place a folded bath towel next to them on a stable, level surface. Students should also have a hand towel nearby for the parts of the instrument that will not be bathed. There should be two places for the trumpet and its parts: a bath towel for the parts that will be washed, and a hand towel for parts that will need to remain dry.
The parts of the trumpet that do not need to be washed are the top valve caps, finger buttons, pads, and third valve slide stopper. The pads located on the valve stem must remain dry. If these pads get wet, they will become misshapen and will not fit properly.
The parts that should be washed are the three valve slides, the valves, the mouthpiece, and the bottom valve caps. Disassemble the trumpet (using the steps described below) and carefully transfer each part to the appropriate towel. Each part should be handled with great care, since even a tiny ding or dent can cause the trumpet not to work properly.
If any of the valve caps (top or bottom) become stuck, students should run hot water over them, and then use a rubber grip to carefully remove it. If this does not work, warn students not to proceed any further: destruction is imminent the moment that pliers enter the scene. Instead, when this problem arises, students should take the trumpet to a qualified repairman, who will have the professional tools needed for this purpose.
Disassembling the Trumpet
The first step in disassembling the trumpet is to examine the cork on the water key, which is located on the tuning slide. (Some trumpets will have an additional water key on the third slide.) Make sure that the cork is in good condition and seals correctly. Gently rub a drop of valve oil into the cork; this should be done once every week.
Next, unscrew each finger button from the valve stem. Unscrew each top valve cap and slide it over the stem.
Place the finger buttons and top valve caps on the hand towel, keeping all of the hardware for each valve together.
The next step is to remove the felt pads from the valve stem and set them on the hand towel. The pads will need to stay dry. Keep them well away from the cleaning area to avoid splashes.
Unscrew the nuts or screw on the third valve slide stopper and carefully put them on the towel. Make sure these small parts are safe and cannot slip down the drain. (If these parts are lost, students can obtain replacements at the local music store.)
Place the valves themselves on the bath towel. Then place the mouthpiece on the bath towel. Next remove all three valve slides and place them on the bath towel. Finally, place the bottom valve caps on the bath towel for cleaning. Be sure never to remove the first, second, or third slide on the trumpet without depressing the valve of the slide you are removing. If you forget to do this, the air pressure you have released will create a pop and the metal will expand rapidly. Over time, this expansion will become noticeable, and the slide will no longer make a proper seal.
The tuning slide may be moved freely without the need to depress any valves, since it is open at the lead pipe.
Trumpet in the Bath
Place the trumpet and the contents of the bath towel into the bath. Let these soak for about 15-20 minutes to loosen dirt and deposits.
Run the cleaning snake or mouthpiece brush through each trumpet pipe, valve slide, and mouthpiece. Be careful not to scratch the inner or outer surface of any trumpet part.
Next, run the snake through the tuning slide from both directions to remove all dirt and deposits.
Soak the trumpet and parts for five more minutes to loosen any remaining deposits.
Then drain the water out of the trumpet, turning the instrument in different directions as you do so. Run lukewarm water through several times to rinse out any remaining particles. Drain the trumpet and carefully shake out excess water.
Finally, return each cleaned piece to the bath towel, including the trumpet itself. Dry each section of the trumpet thoroughly with a lint-free cloth.
Reassembling the Trumpet
Make sure there is no standing water in any pipes or slides, and then allow the trumpet to air-dry for two hours. Apply slide grease to the raw brass portions of the valve slides and re-insert. Then apply slide grease to the raw brass portions of the tuning slide and re-insert.
Apply valve oil to the first valve and insert it into the casing in the correct orientation. Replace its felt pad, top cap, stem, and finger button. Repeat these steps for each of the remaining valves. Then insert the mouthpiece. Play a few notes to make sure everything is in place.
Valve Alert
If students discover that air cannot pass through the trumpet after they have replaced the valves, the first item to check is that each valve is in the correct casing, using the numbers printed on the valves. Students should turn each valve until they hear a click and the valve is no longer free to rotate, which will indicate that the valve is in place.
If air still cannot pass through, lift the valve out of the casing and rotate it 180 degrees. The students should again hear a click as the valve guide protrusions fit into place. The valve should now be in its correct position.
Do-It-Yourself Acid Bath
Even if regular cleaning is done (and especially if it is not), trumpets will accumulate deposits in the pipes that cannot be removed by a regular bath. An acid bath helps to get rid of mineral deposits, stubborn buildup and oils, and any corrosion in the pipes.
An acid bath should be completed at least once a year, and this is especially important for students whose trumpet hygiene may be inconsistent. A professional acid bath may cost around $130, but students can do this process at home, which will save money and substantially increase the life of the instruments.
Supplies needed for an acid bath include those needed for a regular bath, plus a plastic tub (which reduces the amount of vinegar needed to a manageable amount), four gallons of white vinegar, and baking soda.
Here are the key steps in the acid bath process:
• First perform a regular trumpet cleaning with soap and water.
• Fill a plastic tub with 4 gallons of pure vinegar, and immerse all of the just-washed parts for 15-20 minutes.
• Do not add water. This is the acid part of the bath.
• Pour out the vinegar and rinse everything thoroughly with water, including the tub itself.
• Add baking soda gradually to running water, stirring constantly. If the baking soda stops dissolving, stop adding! Any undissolved baking soda will leave grit on the slides and in the trumpet.
• Soak the trumpet and slides for 15-20 minutes in the baking soda solution in order to neutralize the vinegar residue.
• Thoroughly rinse the trumpet and slides in clean water.
• Bathe the trumpet once more using soap and water. This ensures that all vinegar and baking soda deposits are removed. Please note that all residues of both chemicals must be completely rinsed from the instrument.
• Reassemble the trumpet following the process described above.
If a trumpet will be stored away for a long period of time, make sure that the valves and slides are well-oiled and greased to ensure they will not become locked from lack of movement. Slides should be fully pushed in to make sure that the raw brass is not exposed to air.
When storing a trumpet for long periods, ideally it should be placed in a sealed bag with as much air removed as possible. Keep the case in a clean, dry environment, and place reminders on your calendar to check the instrument every six months and perform any maintenance as needed.
When a brass instrument is correctly cared for, there is no reason it should not last for fifty years or more. Proper daily, monthly, and yearly maintenance routines will help to ensure preservation of your valuable investment.