
This fall as lessons begin with new and returning students, there are several basic items to check to ensure a productive year. First check each student’s flute. This includes checking the condition and fitting of the cork, the placement of the cork in the headjoint, the alignment of the three parts of the flute, the sealing of the pads, and condition of the felts.
Cork
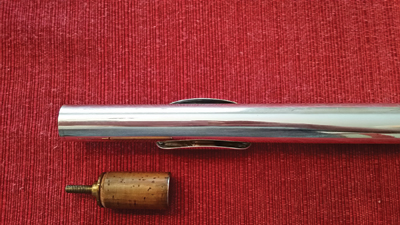
Depending upon the climate in which you teach, the cork may need to be replaced as often as every six months to every few years. The fit of the cork is very important to the ring in the sound and the pitch of the flute. Since the headjoint is tapered (gets smaller) towards the crown end, the cork should be fitted with the same taper. The flutist should be able to make small adjustments to the placement of the cork, so the cork should not be waxed into place. A well-fitted cork should be dropped in from the tenon end of the headjoint and find repose with the plated end of the stem assembly in the center of the embouchure hole.
Placement of the Cork
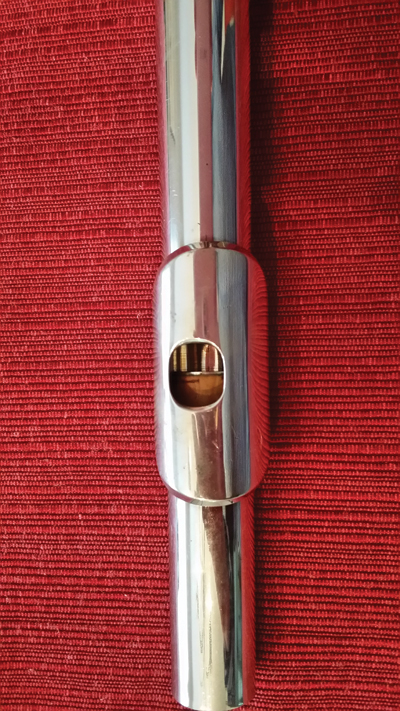
Use the line on the flute cleaning rod to position the cork. The line should be in the center of the embouchure hole. However, you may find that moving it a quarter turn in either direction will improve the intonation and response of the flute. This is true for the piccolo too.
Wash the Headjoint
If you feel comfortable removing the cork/stem assembly, wash the headjoint. I prefer Dawn dishwashing liquid because it takes the grime and stickiness off quickly. I usually wash my headjoint weekly. I like the sound better and the feeling of it staying anchored in my chin because it is not greasy. I wash the headjoint more often if I have been sick.
Alignment of the Flute
Check the tenons to be sure they are round and have no dents. Clean the tenons and the tenon boxes with rubbing alcohol to be sure they are clean and grime free. Do not get any alcohol on the pads. Give students a gentle reminder to carefully align the tenon and box straight on (not at an angle) before assembly as this will help the tenons stay round.
Through a lot of experimentation I have found that the headjoint works best when the embouchure hole is level and pointing up to the ceiling. However, it is easier to play when the embouchure hole is pointed back towards the lips. There are two problems with this alignment: pitch and the lack of the higher harmonics in the tone. Flutists enjoy playing in this position because it is easier. Playing with the embouchure hole level means that the flutist must be in good shape and practice embouchure flexibility and strength exercises daily. I think this is a small price to pay for better intonation and a ringing sound.
To play fast it is better to have the keys of the flute level just like the embouchure hole. This means when the finger is lifted, gravity helps put the finger and key down. If the keys are rolled back towards the flutist, the flutist will have to do all the work of lifting and lowering the fingers. With the keys level, flutists gain a nanosecond here and there which can make technique seem easy and fluid.
If the embouchure hole and the keys are both to be level, align the flute using a yardstick with the line in the center of the D, E, and F keys and the center of the embouchure hole. Mark on the headjoint with a red or black marker to make aligning the flute easy and accurate each day.
The headjoint should be pulled from the body approximately one-quarter of an inch. Use a ruler to check this measurement as most people easily confuse one-quarter of an inch with one-eighth of an inch. I often mark a series of quarter inches at the top of the first page of the student’s warmups. If he looks at this distance day after day, eventually he will memorize the distance to pull the headjoint.
Align the footjoint so the little finger easily fingers a C fingering. This may mean the rod on the footjoint is farther away from the flutist rather than being in the center of the right-hand keys. Since flutists play more Cs than Bs in performance, it seems logical to align with the notes flutists use most.
Check the Pads and Felts
Play each student’s flute to be sure all of the pads are sealing, and felts are still in position. If you find any issues, refer the student to a repairperson. Most student flutists should have a COA (clean, oil and adjust) at least once a year. Professionals may schedule COA’s every few months depending upon playing demands.
Check the Case
If a student is playing a hand-me-down flute, very likely the parts in the case may have come unglued allowing the flute to rattle around. The flute should fit quite tightly in the case so it is not damaged in transit. Either re-glue the parts or send the student to a repairperson who may have replacement parts for the case. Periodically flutists will need to replace the case. A case cover greatly enhances the life of a case and the safety of the instrument. Just as all flutes vary somewhat in design, cases vary in design too. It may be best to buy a case from the same maker who made the flute.
Vacuum the case. Most flutists have never vacuumed their cases. The dirt, lint and whatever else is present in the case can easily get into the key mechanism and cause problems. A clean case is an easy thing to do to help keep a flute playing properly. Tell students to vacuum their cases every few months.
Check the Cleaning Cloth and Flag/Mop
Cleaning cloths should be washed periodically. I have four or five cloths that I rotate bi-weekly. I prefer 100% silk because of its absorbency and lack of lint. Since silk scarves are rarely sold in department stores anymore, check resale shops such as Goodwill etc. Most of my favorite cloths were purchased for 50¢ or less. If you use a flag or a mop-type cleaning stick, replace it yearly or more often for sanitary purposes. After a cold, be sure to wash or replace your cleaning tools.


