Every teacher has encountered a student who moves too much when playing. The movement is unstructured and may be rhythmic, arrhythmic, or eurhythmic. When encountered, the usual comment from the teacher is “Don’t move.” While this solves some aspects of the problem, movement is healthy for musicians, and lack of movement promotes tension and perhaps eventually injury. According to Susan Fain, DMA and DPT, “Muscles are designed to work in pairs; when one contracts, the opposing muscle relaxes and vice versa. When musicians force themselves to be still, tension occurs as pairs of muscles contract at the same time. The excess work leads to earlier muscle fatigue and depletion of oxygen reserves. If, however, a musician assumes a relaxed standing position and moves in a thoughtful way to enhance the expression of the music, the muscles of the body will contract and relax during movement as they are designed to do. The body does not work against itself.”
First Steps
The first step in teaching movement is to teach students to pat the foot. While many teachers oppose the idea of foot tapping, I think it is an important skill to learn. Since flutists, unlike pianists and string players, are unable to count aloud, students should learn to play with some structure such as the foot and the metronome. When teaching foot tapping be sure the foot rocks on the heel with the toes lifted from the floor. The heel of the foot is never lifted from the floor as that movement requires moving the entire leg, and the ultimate goal is minimal movement. Care should be taken to be sure students tap their feet to the beat and not to the rhythmic pattern they are playing.
Students often lack the body awareness to tap their feet articulately. If this is the case, have them practice an exercise called “shoot your feet.” I learned this exercise from watching a modern dance class for young children. I often use it with older students when they do not move their feet in time or with simplicity.
In this exercise students sit on the floor with their legs outstretched in front. Tell them to make a fist with both hands and extend their index fingers (like a pretend gun). Next they use both index fingers to shoot their feet at the same time. As they make this motion, they point the toes and then return them to the upright position. After moving both feet together, repeat the exercise by alternating shooting one foot and then the other so that one foot is pointed while the other is upright. This exercise may be practiced with recorded music in simple time (2/4 or 4/4) or with a metronome. This exercise helps students become aware of how each foot moves at the ankle. The movement should be articulate and controlled. Once students can do this, they are ready for normal foot tapping. Have students practice this exercise and normal foot tapping with the voice feature on a metronome. The auditory reminder helps them learn to count silently.
Teaching Intelligent Movement
Intelligent movement uses the muscles as indicated above, but also helps to clarify the musical line for both the performer and the listener. When movement is taught before students have an intellectual understanding of line in music, it can hasten this development, and young players are able to comprehend tricky phrasing problems much sooner. Movement gestures in the practice room should be quite large, but in performance will be much smaller.
Compass Rose
A compass rose is the figure or icon on a map that indicates north, south, east and west. The movement used in playing the flute uses these cardinal directions. Notice there is no southeast or northwest in these examples.
Down/Up or North/South
The down/up gesture is the one flutists naturally do as cue to another instrumentalist to begin playing with them. When cueing, notice how the flute remains firmly in the chin while the chest and arms lift as the air enters the lungs. Teach students to do this movement to each beat with the metronome set at quarter = 50. The intake of the air is done on the upbeat or preparation beat with the flute lifting slightly, and then on the exhale the flute returns to the starting position. Flutists should learn to use this gesture on each beat for coordination purposes. Later it will only be used for cueing purposes. Have students practice the gesture with foot tapping. Later, omit the foot tapping. However, when students encounter difficult passages later in their studies, encourage them to revisit practicing both foot tapping and the down/up gesture to assist in their understanding of how to play the rhythmic passage.
The down/up gesture is indicated by the down-bow icon used in string performance. This movement is used when a musical idea begins on a beat. Practice the movement on the following musical example.
.jpg)
Each chunk of notes is played slurred and on one blow of air. Be sure students are not pulsing the individual beat with the air stream. During the rest, the chest and arms return to a natural position. This exercise may be expanded to play many notes on one gesture. The movement of the end of the flute should be in a straight line, similar to the compass rose N and S markings on a map. At first the movement will be several inches tall, but with practice, over time the movement will be huge in the performer’s mind, but quite small, perhaps less than an inch, in performance. This gesture is primarily used in playing early music. This style of music is based on the idea of dancing and follows the stylistic goal of the beat hierarchy in which the first beat is the strongest and the other notes in the measure are played more softly.
Forward Flow or East/West
The forward flow or east/west gesture occurs when flutists shift the weight from the back right foot to the left front foot. When moving forward, this gesture is notated with the up bow string icon adding an F for moving forward and a B when moving back. The flute should remain stable in the chin. Teach students to do this movement to each beat with the metronome set at quarter = 50. When sitting, students move forward shifting the weight from the right bone to the left. This movement is used when the musical idea begins off the beat. Practice this movement on the following musical example.
.jpg)
Each chunk of notes is played slurred and on one blow of air. Be sure students re not counting the beat with the air stream. During the rest, students may stay in position and then shift the weight back for the next grouping of notes, or if the rest is long enough, return to the right back side. This exercise may be expanded to play many notes on one gesture. The movement of the end of the flute should be in a straight line similar to the compass rose E and W markings on a map. At first the movement will be several inches forward, but with practice, the movement will become quite small, perhaps less than an inch in performance. Eventually most phrases will be played forward flow with flutists shifting weight onto the left front foot. This gesture is primarily used in playing Romantic music, which is based on the idea of singing in which all notes lead to the first beat of the measure.
Putting It Together
Once students can clearly use the down/up and forward flow gestures, they are ready to combine the gestures together. The following example presents four down/up gestures on a forward flow movement.
.jpg)
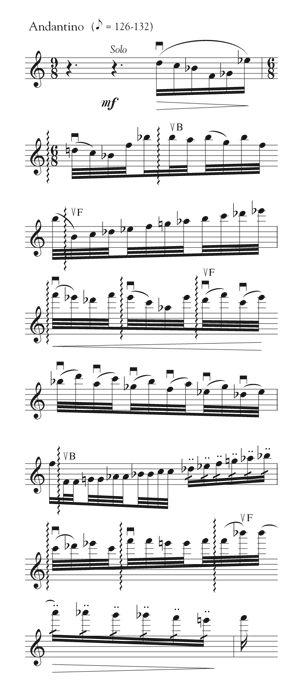
In the following excerpt (Sinfonische Metamorphosen by Paul Hindemith) the chunks are indicated by a curvy line. Have students play each chunk followed by a rest moving as indicated (down/up icon or forward flow icon). Notice on beats three, four, five and six of measure two, the flutist moves forward while thinking the down/up gesture on each of the two-note sigh figures.
Many years ago as I was developing this method of teaching musical line, I read The Art of Practising the Violin by Robert Gerle (E.C. Schirmer, 1983). In the first few pages he discusses bowing strategies and writes that he choreographs every movement he makes. In his case, he was considering where to play a down bow or an up bow, how much bow to use and in which part of the bow to play the passage. I decided to add his suggestion in my own practice. At first I marked each passage with either a down or up bow, but eventually was able to play the passage without marking anything on the page. Remember there is no one way to phrase a passage. The goal is to be sure that you play it a way.


