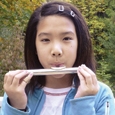
Once students have a firm foundation in tone production and posture, as well as an understanding of the care and assembly of the flute (see September, p. 16), they are ready to learn proper hand position and the first fingerings. At this point, the flute may be assembled without the footjoint to lessen the weight of the instrument for young students. The headjoint should be pulled out about ¼" from the body for improved intonation. Be thorough and not rushed in the instruction; teach students to love a beautiful sound with a perfect attack.
Left-Hand Position
Since the left hand position may feel awkward for young flutists, demonstrate the following steps before having students give it a try.
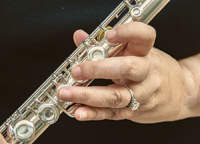
1. Make a fist to organize the hand. Place the left-hand middle finger on the A key, the index finger on the C key, and ring finger on the G key. The pads of the fingers touch the center of the keys.
2. Once the fingers are in place, turn the flute over so the thumb key is on the top and the other keys are on the bottom. Bring the index finger to the tube, touching on the soft tissue of the index finger just above the third joint back from the nail. Drop the thumb onto the thumb key. The thumb should be straight with the first joint back from the nail even with the bottom of the thumb key.
3. After setting the left hand, the flutist places the right hand on the barrel. The early lessons are played with the right hand on the barrel to help balance and support the weight of the flute.
Introducing the First Fingerings
With the left-hand fingers in place and the right hand on the barrel, have students rest the headjoint on the left shoulder to practice fingerings for B, A, and G. In this position movement of the fingers can be observed.
Students should be comfortable with left-hand position and changing fingerings before playing the first notes. Start with fingering B, and practice adding one finger at a time to play A and G. Next, finger G, and practice lifting one finger at a time to play A and B. Remind students to keep their fingers close to the keys.
Students should say the note names as they practice fingerings. Practice notes in sequence several times, then in random order. Saying note names aloud and watching fingers change notes reinforces the connection between notes and fingers, particularly to students who are visual and auditory learners.
A mirror, either a wall mirror or a small mirror on a music stand, is helpful for self-assessment of tonguing, embouchure, and hand position during the lesson and for at-home practice.
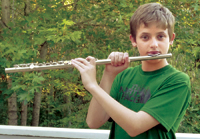
Playing BAG
Flutists should turn their bodies 45 degrees to the right of the music stand and then turn the head slightly to the left as they bring the flute into playing position. A flutist’s aperture, embou-chure hole of the flute, crease in the left elbow and the left big toe should align with the center of the music stand. Students should place the flute in the chin so the back side of the embouchure hole is placed at the point where the lip skin and chin skin meet. The keys of the flute are level, and the thumb is straight and points to the ceiling. The teacher plays B using the spitting rice tonguing technique and students echo the teacher ping pong style. Repeat with A and G fingerings.
When first learning, most students will play first octave G, A, and B, but some students will naturally play notes in the second octave. While playing in the second octave is preferable, either is fine. Students who play in the second octave first usually develop a more soloistic sound. It may take a week or two for students to control the octaves. The goal at this point is to learn these three fingerings, practice starting the notes with the tongue, and using fast air.
Follow-the-Leader
Teach students to tap their feet with the toes (not the heel) lifting from the floor. Count out loud in fours (one, two, three, four). Then the teacher plays a four-beat rhythm pattern using quarter, half-notes and whole-notes on a B. Students mimic what they have heard. Repeat this dialogue on an A and a G and eventually create patterns that change pitches. Further expand the activity to use written notation for quarter, half, and whole notes and rests while playing a note designated by the teacher.
Rote First Songs
After reviewing fingerings for B, A, and G, teach the notes for the song Hot Cross Buns by saying each note name for the written number of beats, while fingering the correct note. With the right hand on the barrel, and the headjoint resting on the left shoulder, have students finger and say the note names in rhythm for Hot Cross Buns. Repeat several times before playing the song. There are numerous three-note songs that may be taught in this fashion.
Transition to Reading Music
Introduce students to the staff and treble clef, along with mnemonic devices for the position of note names on the staff. Explain the seven-letter musical alphabet and it may help to use the sayings for the line and space notes on the treble clef staff. (E-G-B-D-F can be Every Good Boy Deserves Fudge or Every Good Band Deserves Flutes. For the space notes F-A-C-E, I use the saying Space = FACE.)
After a general introduction introduce the written notation for B1, A1, and G1. Start with B’s location on the middle line of the staff and write out four-beat rhythms using B and rests. With the right hand on the barrel and the flute resting on the shoulder, finger and say the note names in rhythm, then play. Do the same with A and G and combinations of B, A, and G. Many beginning method books have examples of these types of activities.
To continue music reading practice, present students with a written copy of Hot Cross Buns or another three-note song already learned aurally. The following practice method serves as a method of learning to read and play new music:
1. Say the note names 3 to 5 times or until accurate.
2. Say the note names in rhythm 3 to 5 times or until accurate.
3. Finger the notes while saying the note names in rhythm 3 to 5 times or until accurate.
4. Play the song or exercise 3 to 5 times or until accurate.
Before moving to the second octave, introduce the fingering for C and include it in both aural and notereading activities along with B, A, and G. Practice sequences such as G, A, B, C and C, B, A, G, as well as other patterns. With intervals larger than a second, fingering practice with the headjoint resting on the shoulder helps students coordinate moving multiple fingers together before playing. Students continue to hold the right hand on the barrel when playing to provide support and balance.
Introducing the Second Octave
When introducing the second octave G, A, B, C, remind students that the fingerings are the same as the first octave, but the opening in the lips becomes smaller and the angle of air changes.
Directing the Air Stream
Practice directing the air stream by placing the palm of the hand approximately six inches from the mouth. Using a flute embouchure and starting the air stream with a spitting rice tongue, direct the air into the middle of palm. Then without moving the head or hand, direct the air stream up to the tips of the fingers and then down to the heel of the hand. Discuss what a flutist can do to change the direction of the air. Eventually students will discover that the lower lip controls the angle of the air. For the high notes, students should blow the air higher on the wall of the embouchure hole at a slightly faster rate with lips pursed as if saying Pooh as in Winnie-the-Pooh. Repeat the pattern several times with G and then with A, B, and C. Play Follow-the-Leader exploring register changes such as low, low, high; high, high, low etc. Then play three-note songs in each octave.
Building a Technique
Several activities can be introduced to students at this stage to develop fluency and faster fingers in the first and second octaves. One of the best is to have them trill between G and A, A and B, and B and C. This exercise teaches students to play more notes on one long blow of air. To practice the technique, have students wiggle between two notes followed by a rest in the rhythm “I am go-ing home.” The wiggle is slurred and the inflection or stress should be on the I and not on home.
Practicing fast scale patterns slurred on one blow of air helps the notes flow like ocean waves. (GABC, rest, CBAG, rest) When E and F are learned, this activity can be expanded to (E F G A B C rest) and (C B A G F E rest).
Right Hand Position
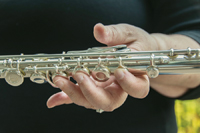
Students should leave the footjoint in the case at this stage. Have them make a fist with the right hand, placing the middle finger on the E, the index finger on the F, and the ring finger on the D. Place the right hand pinky on the tenon of the body of the flute. Eventually when the footjoint is added, the pinky will be placed on the D# key. Bring the thumb forward to touch the back side (not underneath) of the flute. The thumb may be comfortably placed under the F, between the F and E or under the E. Have the student pick up a soda can to find this natural thumb position.
Many students tend to bring their right thumb too far forward, often jutting past the side of the flute, especially when they have long arms. To correct this, push the end of the flute forward until the thumb is in the correct position. Most flutes actually sound better when the end of the flute is forward in front of the player’s nose. Sometimes it helps to place a tactile aid, such as a small piece of masking tape, on the flute in the correct position for the thumb. Introduce the E and F in both octaves repeating the pedagogical suggestions listed above.
Introducing Second Octave D
After introducing the fingering for the second octave D, the challenge is executing the fingering between the C and D where every finger moves in the opposite direction. Notice the left index finger and the right hand pinky are lifted for the second octave D. With the headjoint on the left shoulder, finger the D and point out that these fingers are the first and the last on the flute. When these two fingers are raised, they resemble football goal posts. These are also the only two fingers used for C2. To change from D to C, suggest that students move the goal posts to isolate which fingers should move. Emphasize that the fingers should move as a team, at exactly the same time. Repeat many times both aurally and with written notation. When students are successful with this fingering combination, repeat the process with D2 to B1.
Once students have reached this point, they are ready to play the C major scale as well as many more songs and exercises to practice their reading skills, and to learn more fingerings. Enjoy the journey.