Which is easier to read accurately? The string of numbers 1029384756473829 or the same exact numbers written in chunks – 1029 3847 5647 3829? Most would agree that the numbers arranged in chunks are much more accurately read. This is why your social security, phone, and credit card numbers are written in small groups with spaces between the numbers. This chunking technique facilitates reading and memory. Using the same concept also improves music reading and performance.
How the Eyes Focus
Robert Jourdain writes in Music, the Brain, and Ecstasy “when we view the world, our eyes gather light from an arc spanning 200 degrees from side to side…. This is the visual field. Only a small spot at the center of the retina (the fovea) is packed densely enough with light-sensing cells to provide the acuity necessary for identifying objects. It spans only 5 degrees of the visual field…. Moving in a succession of starts and stops, our eyes scan the world like a video camera in the hands of an amateur. But somehow our brains integrate the chains of fixations into a static, seamless visual field much larger than the few degrees that are actually in focus at any instant.”
When playing the flute, the player should sit or stand about 30" from the music. A good way to check this distance is to place the flute, which is about 28" long, between you and the music stand and then move back another 2". At this distance the fovea takes in an area of notes or information about the size of a quarter. This focus is called a fixation and occurs in about one quarter of a second before the eyemoves on to a new spot. The hop from one fixation to the next happens in about a 20th of a second and no information is taken in during the hop. In music reading, the size of a quarter may take in one measure, four 16ths in simple time or six 16ths in compound time.
Get a ruler and mark your music in one inch chunks. In two-stave reading, such as in piano playing, the eye does not move in chunks from left to right but in a series of up and down patterns following the structure of the music.
Background
I first read about this concept in John A. Sloboda’s The Musical Mind: The Cognitive Psychology of Music (Oxford: Clarendon Press, 1985) in 1985. My immediate thought was that I had been teaching reading incorrectly for the past 33 years, and I should try this new technique with a group of beginners. Because there were no specific materials available then, I had students play a measure in 2/4 time followed by a rest. The 2/4 measure became a 3/4 measure. If the measure was in 4/4 time, then a rest was added after beats 2 and 4, making the measure a 6/4 measure.
When they advanced to playing 16th notes, we placed a rest after each group of four 16ths. The results were astonishing. Not only did they learn to read and play much faster than any group of beginners I had ever taught, but the quality of their playing, especially in tone and physical control, was spectacular.
It was a few months later that I learned that physical acts are also learned in chunks. For example, gymnasts learn floor routines as a series of movements made up of smaller chunks. We do this when we read as well. For example, read this sentence: I am going home to eat some food. We might process it as: I am (chunk #1) going home (#2) to eat (#3) some food (#4). Each of the larger groups (I am), is also made up of a smaller chunk (I & am), which in turn are made up of individual letters.
Many of us have watched our children at soccer, basketball, and football practices. Each maneuver with the ball is practiced separately and then put together into a play. A series of plays makes up a game.
Pedagogues
I have often thought that the best practicers probably use techniques that educational psychologists have yet to discover and analyze. Because musicians think on so many levels when playing a phrase, they should find practice strategies that work, and work quickly.
To play one note you have to know the note name, the fingering, how to produce a tone, the articulation, the dynamic, the style, the duration etc. Even the most elementary flutist is already an expert in multi-level thinking. Each of these elements, such as producing a tone, is constructed of several individual chunks.
To produce a tone you have to think about how to take a breath and angle the air against the embouchure hole wall. Another aspect is where to place your tongue and when to use it. There is the placement of the headjoint on your chin and where the embouchure hole touches your skin. These many chunks combine together to make the larger whole of producing a tone.
Several of my friends studied with Gaston Crunnelle at the Paris Conservatoire. When he asked how they were going to practice an assignment, they replied: “Start with the metronome on 40 and work my way up to performance tempo.” He said: “No, no. Play in small rhythmic units in performance tempo, several times a day for a week and then put it together.” He was advocating the chunking technique long before it had been officially discovered.
My first teacher, Frances Blaisdell, was known for the words that she sang while students played scales in 2341 or Kincaid note groupings.
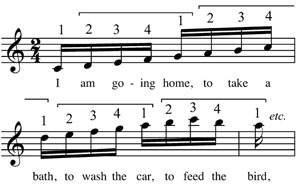
She sang: I (chunk #1), am going home (chunk #2), to take a bath (chunk #3), to wash the car (chunk #4), to feed the bird (chunk #5) etc. throughout the entire two octave scale–ascending and descending. She was teaching me to chunk in the late 1950s!
Meadowmount School of Music
The Meadowmount School of Music for string players was founded by Ivan Galamian, the most famous violin pedagogue of the 20th century. Located in a remote part of the Adirondack Mountains in New York, the facilities are primitive and students have little to distract them from the task at hand, which is learning to play like a concert artist. There is a saying that in the seven weeks you spend there, you will learn a year’s worth of material. How do they accomplish such a feat?
Writer Daniel Coyle visited while doing research for his book The Talent Code (Bantam, 2009) and found that the teachers at Meadowmount take chunking to the extreme. Students photocopy an entire etude or concerto and cut the music, measure by measure, into horizontal strips. These chunks of music are placed in an envelope and pulled out at random. Then the work begins.
They analyze each segment and break them down into smaller groups by playing the notes in a variety of rhythms or smaller musical units. Each one is dissected until it is thoroughly understood. The dissection not only encompasses the musical elements of reproducing the notes, but also the physical elements used to produce the music. By the time both the musical and physical elements are learned, they have memorized the measure. The memorization is done with understanding and thought, not just mindless repetition. When they have learned the individual measures, they put the etude back together.
This technique is much like making a quilt. First you make all the patches and then you sew them together. If each of your squares is perfect, the finished quilt will be square too.
Another Meadowmount trick is to slow it down. Coyle reports that one teacher he interviewed said: “If a passerby can recognize the song being played, it’s not being practiced correctly.” I recall hearing Julius Baker practicing very slowly, truly at a snail’s pace. However, in performances he stunned us with his beautiful sound, perfect articulation, incredible technique, and fabulous tempos.
Putting Chunking Into Practice
In learning to read, you must first learn the alphabet. In flute playing, start with one note. Play the one note as well as you can, thinking about the attack, duration, and release. After that one note, rest before trying again. During this rest you can evaluate your performance and prepare for the next note. Think about what you must do physically to produce the one note. Learn how you must be physically set up to play this one note and how to use this process to play efficiently and without tension.
During the rest there is no hurrying or feeling that you must begin to play before you are ready. In rushing to play, you could teach yourself to play with tension. When you are not as organized as you should be before beginning to play, you make decisions that might be bad ones.
Sometimes I think that the best motto is: Can you play it really well slowly? If so, then it is easy to speed it up. Actually the trick when playing fast difficult passages easily is to practice every way that you can think of so that in performance, you feel like the passage is going by very slowly. You never feel rushed. You stay in real time.
Beginners taught with the chunking technique learn more quickly. They also play with better tone production, have more confidence, and have a clearer understanding of what they are trying to accomplish. They are also relaxed, organized players.
A Chunking Project
The “Preludio in C major” by Anton Bernhard Furstenau (1792-1852) from 26 Exercises, Opus 107, Volume I is short in length and provides plenty of material to use the chunking technique.
A preludio or prelude is a short piece that establishes the pitch for the following piece as in a Prelude and Fugue. In this case, the Preludio is setting up the key of C major for the following C-major etude. Most preludes sound improvisatory through the use of easily executed scales and arpeggios, turns, trills, and fermati.
They are meant to be played with only a few breaths, much like a Baroque or Classical concerto cadenza. With no barlines or time signatures, their interpretation is left to the performer. This makes them a good choice for our project. We can chunk in many ways and still be correct. 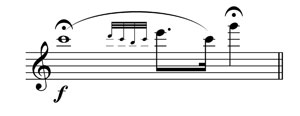
The tempo marking is Con fuoco. Con means with and fuoco means fire, so the instruction is to play with fire. Already that sounds like fun. I have divided the Preludio into five sections or large chunks. Each large chunk is divided into smaller chunks. Where to chunk is based on melodic contour, rhythmic ideas, and chordal material. There is not one way to do it. You just want to find a way. With time and practice, you will begin to see music in many different ways. This is good. Variety is the spice of life and what separates the artist from the common man.
The first chunk begins on a second octave C. Because this note is a whole note with a fermata at a f dynamic marking it should be played with brilliance and energy. The note should sparkle and call attention to the fact that you are beginning something important.
There is a turn at the conclusion of this note that leads into another chord tone, the third octave E. It would be best to end the long C a bit softer so that the turn can start softly leading into the E. Overall in this larger chunk you want to bring out the C, E, and finally the G – arriving at the top with the most energy.
So, let’s assign four counts to the whole note C plus one more count for the fermata; that makes a total of five counts. Practice playing this small chunk of one note forte for four counts and then on the fifth count make a diminuendo. Practice this several times until you can execute the note exactly the same way several times in a row. As you do this be sure that the flute doesn’t roll in toward you as you lift the left-hand thumb for the C. Check the C’s pitch with a tuner. Practice this note until you are sure that you can nail the pitch and tone color every time. A wide stance may help convey the feeling of strength.
The 32nd notes leading into the E make up the second little bit. While the turn notes lead into the third octave E, you could also look at these first five notes as a gruppetto. Gruppetto is the Italian word for a group of notes as in a turn. Usually the pitch contour of a gruppetto is to begin on a note (C), rise one note higher (D), return to the first note (C), then descend to the lower note (B) before returning to the initial note (C). Practice playing the C and the little notes two ways: as a gruppetto and as a group of notes leading into the E.
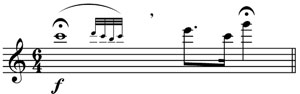 For the first way there will be a silence before the E. In the second one, you will have a silence after the E.
 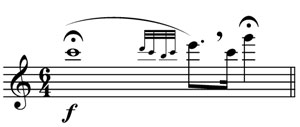 The E is a dotted eighth note. A good rule of phrasing is to diminuendo or decay the dynamic to the rhythmic placement of the dot.
The third little chunk is the 16th note C to G. Play the C softer and crescendo to the G, which is the most important note of the phrase. It is a quarter note with a fermata, which means it is held for about two counts. End the G without tapering to make it more exciting and declamatory.
To learn the next phrase, play each of these chunks with a silence or rest between them. Make each chunk the best playing that you can muster. When you feel confident that you are playing exactly the way that you want each note to be shaped, with the planned dynamic and vibrato, put the three small chunks or grouplets together as a larger chunk or unit. Practice the unit until you are satisfied that you are doing your best.
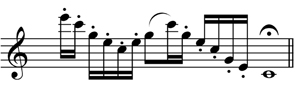
The next chunk is a descending C major arpeggio that lands on a first octave G. .jpg) Break this into five smaller chunks by using ruler phrasing.
Break this into five smaller chunks by using ruler phrasing.
Ruler phrasing is a term I made up for my students to teach them to follow the contour of a melodic line. Usually when the contour changes directions you are in a new grouplet. The ruler helps students see the contour better. It is like connecting the dots in a children’s puzzle.
I place the ruler to the right of the last note head of a grouplet and ask the student to play until I have to move the ruler. This gives students a good visual on how to direct the air and what to do with the line. In this case you would first play three notes before moving the ruler. Then you could ruler phrase three groups of four notes and finally one group of three notes.
Practice these chunks with a rest in between until each note has the same timbre or color. Because the line descends, you have a choice of whether to begin softly and crescendo to the bottom or start loudly and diminuendo to the bottom. There is no correct answer. You might want to do it one way one day and a different way the next. Be creative and use your judgment to make the decision. Once each chunk is amazing, put the five chunks together into one unit. Practice this until it meets your goals.
The third chunk is an ascending G Mm7 chord that lands on the seventh at the top (with another fermata) and descends landing on an first octave A that resolves to a first octave G.
.jpg)
Apply the same rules from Chunk #1 to the gruppetto here; however, in the end I think you will want to think of these turn notes as a pick-up to the major/minor seventh chord. They should start softer as they lead into the G.
Decide whether you want to start the first arpeggio softly, make a crescendo to the top and diminuendo back down or whether you want to do the opposite. Practicing both ways will help you develop your embouchure and flexibility. Listen to the timbre of each note to be sure that each has a core or resonance.
Choose the speed for this material. You might consider starting slowly and accelerate to the top followed by a slowing at the end. There are many possibilities; that is what makes playing preludes fun. If your G Mm7th chord is not facile, break it into chunks of two, three, or four notes. You might also practice the notes with dotted rhythms. Be sure to taper the final G.
Chunk #4 is composed of arpeggios alternating between the tonic C major and the dominant G major.
.jpg)
The last chord or five notes include an F, which is the seventh degree of the scale. Divide this chunk into eight smaller sections and practice each one until your tone is beautiful and fingering is clean. Remember that there should be silence between each chunk. The silence gives you time to think and prepare. Then put them together.
The dynamic contour of this phrase should start softly, crescendo to the top, and diminuendo back down to the low E. Then crescendo until the first note of the next large chunk (#5), which is shown below.
If you use a color vibrato (faster, narrower vibrato) on the first note of the slur, you will sound like a more experienced player. The staccato notes should be separated or unglued.
This final chunk is a C-major arpeggio that concludes on a low C. Divide it into two smaller chunks. The first begins on the third octave E and concludes on the G eighth note. Then make a group that begins on the C and concludes on the low C. Play the contour of these chunks. The ending should sparkle and finish with a strong vibrant low C.
After you have learned each of the five larger sections well, practice putting them together. Place silence between each group so that the audience thinks that you are making this prelude up on the spot. At this stage of practice, I have my students face in a different direction at the end of each chunk. This helps them have the confidence to wait and not feel hurried.
Record yourself and listen for any problem areas. The kinds of things you want to listen for are quality of the attacks, vibrato speed, clear technical maneuvers, great slurs, dramatic dynamics, intonation, and a virtuoso tempo when indicated. Making a video recording of your practice also helps. Ask yourself whether it looks simple and logical when you are performing.
This theory can help us learn anything if we are patient and break the material into small enough chunks. If you enjoyed this preludio, there are 26 more in this series of etudes. They include all keys.


