When I studied with Barbara Conable (who wrote What Every Musician Needs to Know about the Body, Andover Press), she mentioned that people often use their bodies in the way they think they are put together. When someone has a problem, she has them draw how they think the joint works and not how it actually does. Based on what they draw, she can often see where the incorrect mapping is occurring.
I had an adult student who had an excellent setup with the left foot in front and the right foot in back. However, as soon as she began playing, suddenly her feet adjusted until they were side by side. Week after week I reminded her where she should place her feet, and she would nod in agreement. Then I remembered what Conable had told me and asked her to draw a map. This is what she drew:
.jpg)
.jpg) When I saw her drawing, I knew what was incorrect. I showed her photos of a hip joint, and she quickly recognized that hip joints are on the sides and at a different angle than she had drawn. Remarkably, she stood correctly while playing from then on. Conable was correct – we tend to use our bodies in the way we think they are put together. The amusing part of this story is that she was a kindergarten teacher. We realized that she had drawn a stick figure just like the ones she watched her students draw each day. No wonder why she had an incorrect map.
When I saw her drawing, I knew what was incorrect. I showed her photos of a hip joint, and she quickly recognized that hip joints are on the sides and at a different angle than she had drawn. Remarkably, she stood correctly while playing from then on. Conable was correct – we tend to use our bodies in the way we think they are put together. The amusing part of this story is that she was a kindergarten teacher. We realized that she had drawn a stick figure just like the ones she watched her students draw each day. No wonder why she had an incorrect map.
When I taught at the university level, I hired a professional repair craftsman to teach a weeklong basic repair class for my students during the summer. I thought this was important for my students because Idaho is geographically large, and the nearest good repair service was usually many miles away. I noticed that some students caught on quickly while others struggled. I think that students who grew up on farms watching repairs of equipment had a better knowledge of tools and how things work. After the class, however, it was evident that everyone (including me) played the flute better. The reason why flutists play better after taking a flute apart may go back to Conable’s observation. Perhaps we play the flute in the way we think it is put together. For example, certain technical issues may be easier to solve when a flutist understands which keys are involved in playing the passage.
Drawing the Flute
This is an experiment I have tried that yields outstanding results. First, I give students a blank sheet of paper and ask them to draw the footjoint without looking at the flute. This is what one student drew.
.jpg)
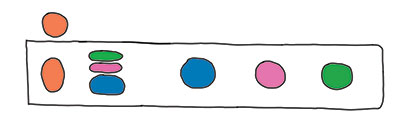
Notice that she drew only the paddles and no keys. I found it interesting that she drew a flute with a B-foot because she plays a flute with a C-foot. When I asked her about the keys, she shrugged and said she did not know exactly where they should go.
Next, I added the keys to the drawing and asked her to color the paddle and the key that went together. Her drawing then looked like this. (The colors show which paddle goes with which key pad.)
Then I had her play a chromatic scale from low C to low E followed by a Db major scale watching for the slide between the Db and Eb key. In both cases her fingers moved with clarity and control. The improvement now that she had a better understanding of how things went together was obvious.
We moved on to the body of the flute. Before reading further, take a blank sheet of paper and draw all of the keys on the body of the flute. On the next page is a student’s drawing. Compare it to yours and to your flute.
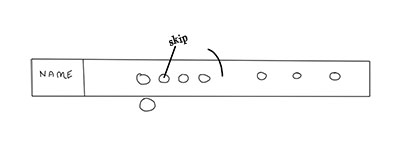
Notice that she drew the keys where her fingers are placed and also added the upper A. She probably added this one key because in the early lessons of the flute we enforce that in placing the fingers there is a skipped key between the left index finger and the middle finger. When I start beginners, I put a sticker on that key so students remember to skip that key when practicing on their own.
By Twos
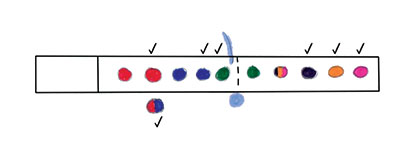
Next, we looked at my flute as I demonstrated that the keys of the body of the flute operate by twos. The drawing below illustrates this. Then as a review, we added check marks to the drawing indicating where the fingers are placed.Notice how the upper F also works with the E and D keys.
At this time, teachers could discuss how some manufacturers either make the lower G smaller in diameter to improve intonation or partially close the key with a plastic donut that is glued in or with a crescent that is soldered in. Explain why this is commonly called having a split E (the name for the note it affects) or perhaps the more correct split G (which is what happens in the construction).
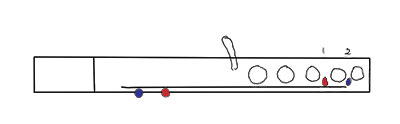
Trill Keys
Without looking at your flute do you know which trill key the first paddle opens? The second paddle? Most flutists haven’t a clue. Once you know though, your intonation and quality of the tone on the trilled notes will be better.
Further drawings may be made of the headjoint, rods, and C# trill key. This experiment should be repeated as students become more proficient. The old adage the more you know, the better you will play certainly applies. Try this with your students and let us know how it goes. We welcome drawings and comments sent to: editor@flutetalkmagazine.com


