Since the 16th century musicians have been fascinated with alternating from one note to another. This alternation, called a trill, can be either a half step or whole step. Originally, trills were placed at cadential points, but later composers and musicians added them as ornaments throughout the music. The number of repetitions or rotations was left to the performer.
Trilling from the Beginning
As soon as beginners learn two notes, I teach them to trill between them. The first reason for doing this has to do with how flutists are often taught in a band class. Generally flutists are part of a class with clarinets, trumpets, trombones, and percussion, and the class tends to move at a certain speed in order to keep all students involved. What this means for flutists is they play slowly for too long of a time. This leads to poor hand positions and to not developing independence between the air stream and fingers.
Trilling helps develop proper hand position. To trill efficiently between two notes, the finger moves from the third knuckle back from the nail (except for the left index finger). As a flutist increases the speed, the fingertip stays closer to the key which is what should happen as students advance to scales and arpeggios. They will learn that when they balance the flute well, gravity will help put the finger down, and that lifting the finger takes a little bit more effort.
Starting beginning flutists this way, the first trill taught will be A to B in either the first or second octave. Then I move on to the G to A, F to G, and E to F. Practicing these trills in chunks aids muscle memory. I use the words, “I am go-ing home” followed by a rest for the trilled notes. Each trill is repeated eight or more times. With subsequent repetitions, the tempo is increased. For successful trills at any level of advancement, students should stabilize the flute in the chin. The embouchure plate cannot be moving in any way.
The other reason to teach trills early in a flutist’s development has to do with learning how to separate the movement of the fingers from the air stream. Once again in a band class situation, the flutes play very slowly. When playing each note so slowly, without guidance, young flutists may begin to count longer notes with the air stream. The sound of this is one all teachers have heard and identify as a beginning band sound – but, it does not need to be.
When playing that slowly it is easy for students to stray from the ideal shape of the note to one shaped more like a football. This means the air speed is slowed while getting ready to move the finger, and then once the new note is fingered, the air speed is increased. It is better to teach even air speed while changing notes. Start by teaching trills and then slowing the process so students learn that air speed is a separate function from the fingers.
Trill Charts
If you Google trill charts, you get over 435,000 results. There is no excuse for students not printing one to keep with their flute music and in their band folder. As you compare trill charts, notice that as the notes go higher there are more options listed. This has to do with the differences between flute brands. With experimentation, flutists should be able to find a trill fingering that works well on their particular instrument. The goal is to have the best possible pitch on the two notes and play them with a clear sound.
The most common trilling errors involve trilling from C to D, C# to D and C# to D# in both the first and second octaves. The chart below may help students remember which trill keys to use.
Another thing to consider is the use of the thumb Bb. Many trill charts list options for using the thumb Bb and also for the long fingering. The choice comes down to personal preference and ease of execution in the passage. Students often have problems reading trill charts because they do not know the enharmonic spellings of the notes.
| First Octave | C to D | 1st trill key |
| First Octave | C# to D | 1st trill key |
| First Octave | C# to D# | 2nd trill key |
| Second Octave | C to D | 2nd trill key |
| Second Octave | C# to D | 1st trill key |
| Second Octave | C# to D# | 1st and 2nd trill keys |
Which Fingers
Students often ask me which fingers should be used on the right-hand trill keys. I think this should be consistent with how they finger the lever Bb, the top octave Bb, and top octave B. If you decide to do something different, then you have one more thing to add to your practice routine. (See exercise below.)
When string players trill, they often squeeze the finger next to the trilling finger down a little firmer to free the trilling finger. This works well on the flute too as it stabilizes the instrument. So, if trilling from E to F, squeeze the F finger, trill the E and then release the tension on the F when the trill concludes.
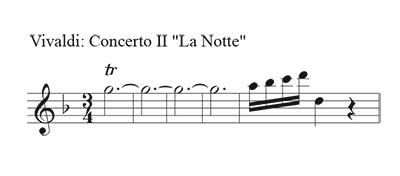
We have all had the feeling that trilling a long note can cycle in speed. This is especially problematic at the end of the first movement of the Antonio Vivaldi Concerto No. 2 “La Notte” where the solo flute trills a G to an Ab for what seems like an eternity.
I finger the G but trill the G# or Ab paddle with my right middle finger. This produces a beautiful trill. If you decided to make a trill crescendo (starting slower and increasing the speed) or diminuendo, trilling with the right-hand middle finger aids this process.
This concept of using a different finger than usual may be used on trilling A# to B in the first and second octaves and trilling from F# to G in the first and second octaves.
Use the right middle finger to depress and trill the upper A.

Use the right middle finger to depress and trill the upper F#.

With some experimentation, you can become a pro at doing this. In making a decision to use these unconventional fingerings, be sure that you can comfortably get to and depart from the trilled note.
***
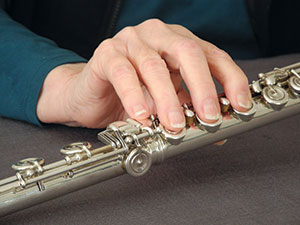
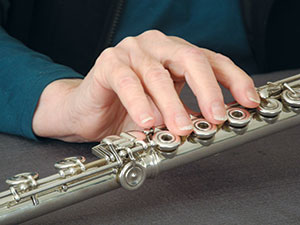
Frances Blaisdell, the legendary flutist and pedagogue, had me practice the following right-hand exercise. First, I placed my right-hand fingers on the key (picture on left). Then I placed them on the Bb lever, the first trill, and the second trill and rotate back and forth. There is a slight pivoting on the top of the right thumb (picture on right). She said I should follow this movement when deciding which fingers to use when trilling. I like the consistency that this exercise practices.