
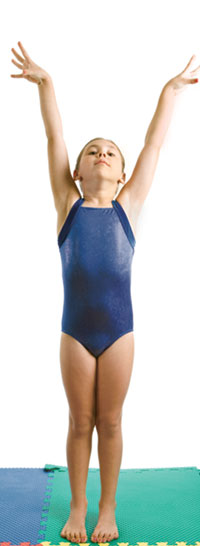
 When watching a gymnastics competition, we marvel at the breathtaking routines which incorporate complicated flips with twisting and turning. At the conclusion of the routine, the gymnast’s goal is to land with his feet together and his arms up in the air as if making the letter Y. This is called sticking the landing. If the gymnast does not stick the landing and takes a step or two to regain balance, points are deducted from the final score.
Flute playing has “stick the landing” moments too. For me, these moments occur on the final note at the end of a passage or movement. More than likely the final note is a high one (perhaps a third octave F# or G#) marked pianissimo. It probably has a fermata printed above the note and a diminuendo underneath. This note is the conclusion to a glorious passage and you really want to stick it and not crash and burn. If you can always accomplish this, then you have done your homework. If not, this article offers suggestions to help you learn to do this consistently.
Check Your Flute
If the flutes keys are not sealing properly, all the practice in the world won’t help. No matter what you do, a small leak will let the note drop down to the next harmonic partial. If you are having problems, have your flute checked by a flute repairman.
If you are on a desert island and no repairman is available, Harold Bennett (former Metropolitan Opera principal flutist and teacher) suggested blowing on the pads to add moisture. This added moisture helps the pads seal temporarily. Blow on those pads that are closed most of the time such as the two trill keys, the G# key, the C# trill key, and the D# key. If you are still experiencing difficulty, blow on the rest of the pads. It is a quick fix, but it will not last.
Gilbert’s Ghosts
One of the exercises in Angeleita S. Floyd’s book The Gilbert Legacy: Methods, Exercises and Techniques for the Flutist (Winzer Press: 1990. page 48) is called ghost harmonics. Geoffrey W. Gilbert (English flutist, 1914-1989) used this exercise to develop proper breath pressure and to loosen the embouchure in the third octave. Gilbert’s instructions are as follows:
1. Finger top B3
2. Blow gently to obtain the lower harmonic –d#2. Keep the embouchure still and loose.
3. Continue blowing more air, using only breath pressure…to reach the next harmonic – C#3. Do not squeeze the lips or change the embouchure to obtain the harmonic.
4. Continue increasing the (air) pressure until reaching the proper top B3.
5. This exercise can be repeated descending by half-steps.”
Practice this exercise until you can play it well. The ghosts are the notes that you will drop down to if you do not stick the landing. Learning where these notes are will help you prevent them from sounding.
High And Soft
The question is always how do you play high and softly? There are several things to consider. First consider the size of the aperture. The aperture is the opening between your lips. The higher the note is in the flute’s range, the smaller the aperture should be. The lower the note is in the range, the larger the aperture should be. To learn to vary the size of the aperture, gather three straws. One should be a large straw suitable for drinking a shake. The second straw is a smaller one for drinking a soda and the third is a coffee stirrer straw.
One at a time, place each straw in your mouth while looking in the mirror. Learn what you squeeze or relax to hold each straw in your mouth. This will teach you how to control the size of the aperture. Once you are familiar with the feeling of the aperture with each straw, imitate the feeling without the straws. I find the words: See for a larger aperture, Sue for a medium sized aperture and Pooh (Winnie-The-Pooh) for the smallest sized aperture helpful. The angle of the air stream is an important consideration in playing high notes. Because each flute’s embouchure hole is slightly different, experiment angling the air against the opposite wall in various spots to see what gives you the best results. There is no one answer. Each flute responds differently.
The speed of the air is another contributing factor to successful high playing. Most flutists err on the side of not keeping the air stream moving when playing softly in the third octave. Choose a spot on the opposite side of the room from where you are standing and think about sending the air to that spot as if you were aiming for a target. This exercise is called target practice.
Lip Attacks
Many flutists have difficulty getting the aperture small enough. If you experience this problem, practice lip attacks. To execute a lip attack, start with your lips closed. Then, as if saying the letter P or B, gently open the lips while blowing to attack the note. No tongue is used in playing lip attacks.
Plucking
Once you can successfully coordinate lip attacks, practice plucking any third-octave note out of the air very softly. First try a D in the third octave because it is one of the easier notes to pluck and control. Finger the D, attack the note with a lip attack (using P or B) while blowing a steady stream. Play the D as softly as possible (ppp) for about six seconds. To practice this exercise successfully, use a metronome set on quarter = 60 and a tuner. Keep the vocal folds separated. Continue this exercise randomly choosing notes from the third octave.
For the first several weeks, stop the air for the note ending. Then after a few days of practicing plucking, end the note with a slight taper by making the aperture smaller. Practice this exercise with and without vibrato cycles. Once you are successful with the plucking technique, progress to working with notes in succession.
Arpeggios
Ascending arpeggios and seventh chords are some of the best note patterns to use when learning skill (See Patricia George’s Extras on Flute Talk website for downloadable major, minor, diminished and augmented arpeggios.) It is much more difficult to ascend with control on the flute than it is to descend. In addition, most places in the literature, whether solo or orchestral where you will be required to stick the landing will be the last note of an arpeggio or seventh chord.
.jpg)
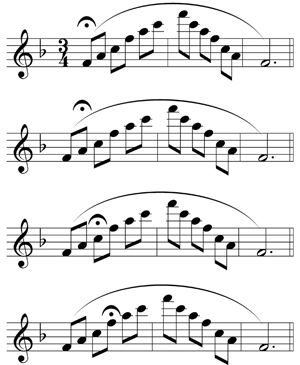
Exercise 1: Traveling Fermata
When practicing the F major arpeggio slurred, place a fermata on the first note and then proceed with the next 12 notes. Then move the fermata from the first note of the arpeggio to the second note and play the remaining 11 notes. Repeat until you have played the arpeggio with a fermata on each note of the triad ascending and descending. The goal is to make the most beautiful note on each fermata and to develop your embouchure so that you can stop on any note of the phrase. Sticking the landing has a lot to do with being still when you land on a fermata.
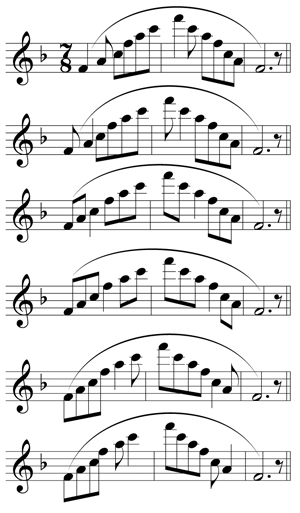
Exercise 2: Linger And Go In 7/8
Play the arpeggios in the following seven rhythms. Once you can play the arpeggios lingering in time on the quarter notes, play this exercise freely as if in a prelude or performing a cadenza. This exercise develops embouchure stability.
Exercise 3: Harmonic Tune Up
Before playing the arpeggio, play the highest note (F in the third octave) by overblowing a Thumb B flat fingering. Notice the position of your lips when overblowing the Thumb B flat fingering. This is the position the lips should be in when you reach the F in the third octave arpeggio. Play the entire arpeggio with the lips in this position. Joseph Mariano, the legendary American flutist, remarked in a lesson with me: “you can play low notes on a high note embouchure, but not high on a low embouchure.” This exercise puts his idea into practice. When you progress to the next arpeggio, here are the harmonic-to-regularly fingered note pairings:
C1 to G2
C#1 to G#2
D1 to A2
Eb1 to Bb2
E1 to B2
F1 to C3
F#1 to C#3
G1 to D3
Ab1 to Eb3
A1 to E3
Bb1 to F3
B to F#3
C to G3
C# to G#3
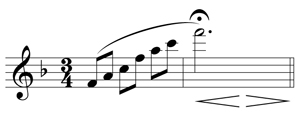
Exercise 4: Five Notes and a Tapering Fermata
.jpg)
Play the first five notes of a major scale slurred. Place a fermata on the last note. Set the metronome on quarter = 60. Start the five note pattern mf. When you reach the final note, make a diminuendo lasting 12 counts from mf to ppp. Start this exercise on a D in the second octave and repeat on each ascending chromatic step through the third octave. Use vibrato cycles on each note. Do not let the vibrato stop and start as you change from one note to the next.
Exercise 5: Stick the Landing Arpeggios, With a diminuendo and messa di voce
.jpg)
After working on the previous exercises for a few weeks, you should now be able to open and close the aperture, have a good idea where to angle the air and be able to keep the air stream moving. Not it is time for the final push to polish your landings.
Play the arpeggio ascending very slowly slurred. Start in F major (then repeat the exercise on each ascending step until the highest note is C in the fourth octave). On the top note diminuendo for 12 counts (q = 60). Use the metronome and the tuner. The goal is to land on the top note exactly in tune and keep the needle or dial still as you diminuendo. If you have difficulty, repeat the previous exercises. Some of the third octave notes are easier to control than others. Practice what you cannot do, rather than what you can do.
On alternate days, practice a messa di voce on the top note. A messa di voce is when the final note begins pianissimo and then swells to a fortissimo and returns to a pianissimo over several counts. Practice this concept with and without vibrato cycles. Use a tuner and a metronome.
Expression and Nuance
These exercises help develop control over the shape and dynamic of a note. In order to accomplish this task, use a mirror to check the aperture size regularly. Experiment with changing the angle of the air with the lower lip and the tongue placement. And, most of all, keep the airstream moving at all times. Play on the air.
The good news is these exercises will help you learn how to “stick the landing” with success and confidence. However, the bad news is that once you have learned to do it, you will need to continue practicing these exercises several times a week so that your muscles, air and finger co-ordination will alway be in top shape. Record yourself regularly to be sure that you are producing the finest product.


