
Masterclass #1 (October, 2008) focused on playing with the headjoint alone and provided basic tone production, tonguing, and vibrato fundamentals. Masterclass #2 (November, 2008) added the flute body to the headjoint while playing with the right hand on the barrel of the flute – a position that stabilizes the lip plate on the chin and frees students from the added weight of the footjoint. The exercises addressed vibrato, articulation, and embouchure development.
Masterclass #3 adds the footjoint to the flute. Because flutes come in one-size and flute players come in many sizes, footjoint alignment should fit the individual player. For many years the standard setting was to align the footjoint rod with the center of the D key on the flute body, and that is a good place to start.
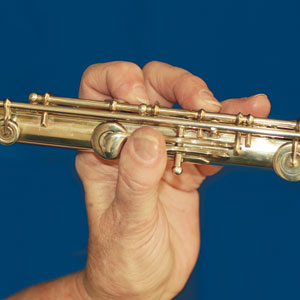
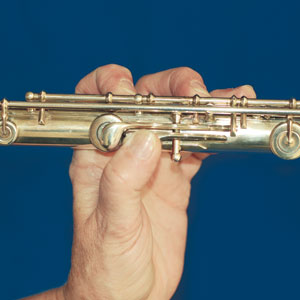
For a custom fit, ask the student to make a fist with their right hand. Then, stick the right-hand pinkie out and place it on the D#/Eflat key. Moving up the flute from the far end inward, slowly place each finger on the flute D, E, and F. When the fingers are on those keys, bring the right hand thumb to the back side of the flute.
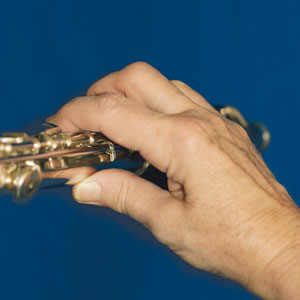
Align the footjoint so that the pinkie finger can easily play the low C when moved or slid sideways to the right. For most students, this means that the footjoint rod is turned slightly farther out than it would be when aligned with the center of the D key.
.jpg)
The goal is to align the footjoint for a low-C fingering rather than a low-B fingering, because in real life, students will play many, many more C#s and Cs than Bs. They should be able to finger the C# and C with the least amount of change or interference to the right hand’s normal position.
When Students Grow
As children grow during elementary and middle school years, certain adjustments will be necessary and the footjoint alignment will require change. Monitor the student’s shoe size, which is about the same length as the distance from the left elbow to the wrist. If this length is longer than a women’s size 7 to 7.5 shoe, the left wrist will need to be slightly bent (think palm under the A key), so that the aperture, embouchure hole, and crease in left elbow (with both arms hung) align with the center of the music stand. The left-hand thumb should be straight and point toward the ceiling.
Many students play on the tip of their left thumb.
When the hand is small this is fine, but in order to prevent future injury, most students’ left thumbs should touch the key closer to their first knuckle. This will prevent an outward arch at the wrist.
Stance
If there is enough room in the classroom, arrange the chairs so that students may easily stand during class. Many middle and high school students lack the ability to focus for great lengths of time; alternating teaching curriculum between standing and sitting help them pay better attention.
Because the flute is played off to the right side of the body, it is considered an asymmetrical instrument. That means that the left foot should be in front and the right foot in back with about a foot or more between them. Some teachers call this the 12:00/3:00 stance. Players shouldn’t feel stuck in this position. It is merely a baseline position or returning point.
Likewise, when sitting, turn the chair about 45 degrees to the right of the music stand. Align the left knee to the center of the music stand. The upper body faces to the right with the head turned slightly to the left.
.jpg)
Marching Band or Artistry
The position discussed above produces the optimum flute performance. Unfortunately, it has nothing to do with how flutists are instructed to stand in marching band competitions. This is something to clarify with the students and band director when teaching in the public schools.
Hopefully, one day the artistic world can convince the marching band world that the flute, along with many other instruments, should not be played symmetrically and that this should be reflected on the football field. In masterclasses for band directors I often alternate from the marching band stance to the artistry stance several times. When they laugh, I know that they understand the difference.
Flute Malfunctions
Most flute damages occur when students are taking flutes out or putting them in the case. Because students will assemble the entire flute in this masterclass, take a few minutes to illustrate how to remove and assemble a flute properly. This small discussion can save many dollars spent in repair shops replacing pads and straightening key work.
With the flute in the case, I begin by placing my left-hand index finger in the end of the footjoint to release it from the case. Then hold the footjoint at the very end where there are no keys. Next, release the body of the flute with the right index finger and thumb. Holding the flute body with the right hand on the barrel, carefully join the footjoint and body so that the footjoint tenon is not bent in any way. Slowly twist the footjoint on and align it.
Then hold the flute body/footjoint combination at the barrel with the left hand and slowly place the headjoint into the body. Once again, avoid bending the headjoint tenon. For good performance the headjoint must fit well into the body. Push the headjoint all the way in and then back it out about a quarter of an inch. Align the headjoint by looking down the flute from the D, E, and F keys. For a classic line up, draw an imaginary line through the center of the D, E, and F keys and the center of the embouchure hole. Custom adjustments can be made to reflect individual needs. You may want to mark a small line indicating the correct lineup with a permanent marker or finger nail polish. Then the student can refer to the mark when practicing at home. At the end of the class, teach students how to swab out the flute without scratching the inside of the tube.
Add-a-Beat
This exercise teaches students to use their air in a relaxed way. I like D for this exercise because it is one of the most incorrectly fingered notes on the flute. By starting the class with the correct fingering each time, students eventually begin to finger the note correctly. Remind them that the jaw and arms should hang and that the keys should face the ceiling.
With the students sitting, ask them to extend their legs out in front with their heels off the floor. With a metronome set on quarter =72, ask them to tap their feet in the air to the tick of the metronome. When all feet are tapping together, play D in the staff for a quarter note followed by a quarter rest. On each repetition of the exercise, hold the D one quarter note longer than before, followed by a quarter rest. Repeat until the D is held for 12 counts.
This exercise has many benefits. First, when the feet and legs are extended off the floor, the abdomen has the correct amount of relaxation/tightness for good air use. Also, students must count – not just feel the pulse – but actually count the numbers 1, 2, 3, 4 to play the rest correctly.
Harmonic Basics
With the right hand on the barrel, play a quarter note followed by a rest on each of the following notes: low-octave G, A flat, A, thumb B flat, B, C, and C#. Repeat an octave higher and then lip up to the third partial, which will sound D, E flat, E, F, F#, G, and G# above the the staff.
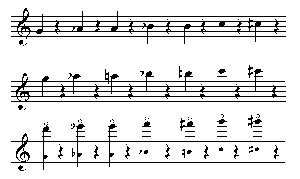
This exercise not only helps students learn which octave they are in, but it also develops the embouchure. The embouchure setting for the first octave is similar to saying the word see. For the second octave say Sue, and for the third partial say Pooh as in Winnie the Pooh. The lip opening or aperture becomes smaller as flutists ascend in this exercise. Once students are comfortable finding these pitches, slur from first octave G to second octave G and finally to the third partial D. Repeat on each of the above notes. You can create variations on this exercise by using counted vibrato on each note or various articulated rhythms.
Balancing the Flute
To play the flute well, the hands have to be equal. The keys on the flute are arranged in what repair craftsmen call stacks. The upper stack includes the notes of the left hand and the lower stack those of the right hand. This exercise alternates between the two stacks, and when students are successful in playing these two trill sequences without any flute movement, they have found how to balance the flute between the two hands.
Play a three count trill in the second octave from F to G followed by a rest on the fourth beat. Move the F finger from the third (or hand) knuckle. Keep the finger as close to the key as possible for economy of motion. The third knuckle should be at the same height as the key for optimum speed. After several repetitions of the trill, repeat the exercise using G and A. Then alternate between an F and a G trill and a G and an A trill.
If there is someone in the class with a fast trill, have the other students watch the player’s finger. We have mirror neurons in our brain that can help develop great technique. In a nutshell, it is similar to “monkey see, monkey do.”
Minute of Tonguing
Obviously, most flutists cannot tongue 16th notes for a minute or more because they run out of air. However, tonguing for a longer period of time helps students build strength and perfect attacks. When the brain realizes that you are going to tongue for a long period of time, it finds the most practical way for the tongue to work.
Set a metronome at a comfortable speed, such as quarter = 80, and have students single tongue eight counts of 16ths on a second octave B; then rest two counts before repeating the sequence several times. Encourage students to increase the metronome marking each week along with the number of counts of tongued 16th notes. Most of my students find the greatest benefit with the metronome set at 96 and tonguing five sets of 16 counts of 16th notes. Practicing this exercise just twice a week provides enormous benefits.
Minute of Vibrato
Players should control their vibrato, and not be controlled by it. Practicing counted vibrato twice a week keeps your vibrato under control.
Generally we calculate vibrato with a metronome setting between 60 and 80. For beginner students, practice three pulsations per tick on low D for eight to 16 counts with a rest in between each set. Strive to increase the number of vibrato cycles from four to five on each metronome setting. Finally, with the metronome set on 60, practice six vibrato pulsations – 1 pulse, then 2, and then 3 pulses. Be sure that each cycle is a clone of the previous one.
Five Note Patterns
.jpg)
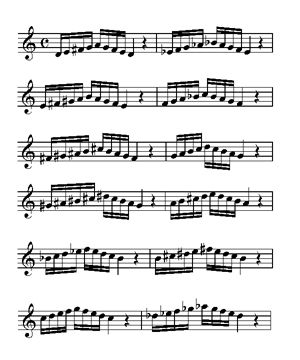
Rather than launching into a long discussion about the construction of scales, keep the class focused by using the first five notes of each scale to lay down a foundation for scale study. These note patterns will be the pitches on which we do many variations. Hand out a sheet with these patterns written in alphabet letters rather than music notation. I always teach note-reading with alphabet notation first and then music notation. You would think that this would help poor readers best, but I have found that it actually helps the brighter students the most. I speculate that this strategy provides two pathways to learning rather than just one.
Notice that the patterns start on D rather than C. When teaching tone or technique work, begin with the right hand in the functioning position. This means that the lowest note should be a D. If you begin on low C or any other footjoint note, then students are working outside of their normal playing position. Until that normal position is set in their hand, they will progress more slowly. Note that Daily Exercise # 1 from Taffanel & Gaubert’s 17 Big Daily Exercises for flute starts on D rather than C.
With each masterclass, focus on teaching these notes in a one octave span only. Teach the low octave, then the middle, and finally the high. For the first variation on these notes, have students place three vibrato pulsations (hah, hah, hah) on each pitch while slurring the nine notes. Not only will this improve their vibrato, but vibrato pulsing helps students learn to subdivide each pulse. This process also improves note connections because the subdivision in the counting controls when the finger moves.
Challenge
At the end of class play the five note patterns fast and slurred 16 times. Challenge each flutist to be able to play many repetitions of these patterns slurred on your next return. Encourage them to start slowly by learning to play one repetition very fast and then adding two repetitions, and so forth.
As before give each student a one-page handout to take home. Remember to include your name, contact information, and a short biography.


