
Every teacher has had a student who complains, “One day I sound great and the next not so good.” This happens to everyone at some point. Let’s take the mystery out of this situation and learn how to have a fantastic sound every day.
Clean, Oil, and Adjust
A flute should be regularly checked for leaks. Pads that do not seal properly prevent players from achieving a clear and focused tone. For the casual player, a clean, oil and adjust (COA) should be performed yearly. For the professional player, schedule one every six months. When flutes don’t seal well, players usually squeeze the keys tightly to achieve a clear sound, which can cause physical harm to the player over time. Air conditioning and dry climates take moisture out of pads. At the N.F.A. Convention in New York City, James Galway suggested blowing on the pads to add moisture to them. I have found that blowing on footjoint pads and those pads that are closed all the time (the trill keys, and the G-sharp key pad) makes the keys seal better and improves the flute’s response.
Align the Headjoint
There are three basic ways to align the headjoint with the flute body. The first is the classic alignment in which the center of the embouchure hole is aligned with the center of the D, E, and F keys on the body. This alignment was championed by American flutists, Frances Blaisdell, Joseph Mariano, and William Kincaid. Paul Taffanel (1923) agrees with this in-line position but suggests that the embouchure hole might be slightly inclined or turned in for certain lip types.
The second alignment, referred to as the modified alignment, is a slight turning in of the embouchure hole. Henri Altes (1880) suggests aligning the outer edge of the embouchure hole with the center of the keys. He goes on to say that according to the length of a pupil’s fingers, the headjoint can be aligned along the center of the embouchure hole and not along the outer edge of the embouchure hole.
The third alignment is the Rockstro position. R.S. Rockstro (A Treatise on The Flute, 1889) advocates turning the headjoint in a greater amount. The chart below is based on his thoughts from the article, “Authorities for turning the Mouth-hole inwards.”

While the classic alignment suits me well, find what is best for you. Whatever you select, set up the headjoint the same way each day. With a consistent alignment, you will use the embouchure muscle groups in the same way every time you play. The goal is to develop and maintain a flexible, strong embouchure.
Align Yourself
This could also be called your set-up, and it includes how you stand, balance the flute, and move when you play. With a good set-up you will be able to practice and perform without pain. Over the years I have asked students where they place their feet when they play, and most have no idea. I have also asked if their aperture is centered, off to the right, or off to the left. Again, most don’t know. The answers to these two questions and other similar ones can greatly influence how you use your body when you play. Learning to use your body well can mean that you will sound great and never play with discomfort. If you are experiencing problems, seek the help of music performance specialists. There is a growing field of physicians, physical therapists, and musicians who are dedicating their time to finding answers to our questions.
This new field has already changed the way that we stand and sit. We now incorporate into our set-up the fact that the flute is played off to the right side. We have learned that playing the flute symmetrically, that is, with the shoulders parallel to the music stand, produces a crick in the neck. However, by rotating the body to the right 45 degrees and turning the head to the left, we can keep the head balanced on the spine and in an upright position. No longer do flutists have to suffer neck and shoulder pain.
Alan H. D. Watson, a senior lecturer in anatomy and neuroscience at the School of Bioscience, Cardiff University, Wales and professor of music biology at the Royal Welsh College of Music and Drama has published an important book for musicians. The Biology of Musical Performance and Performance-related Injury discusses posture and the back; the shoulder, arm, and hand; breathing; the voice, the embouchure and wind playing, and the structure and organization of the brain. Included in the book is a CD with excellent anatomical illustrations of topics in the book. This book provides many of the answers to better flute playing and playing without pain. Because this is a new field and covers subjects that are rarely discussed in music school curriculums, I would encourage you to seek out the book. The bottom line is: the better you are set up, the better you will play.
Where to Blow
One of the challenges of playing the flute well is learning to angle the air at the riser wall (the far side of the embouchure hole). When the air stream is angled just right, the tone is focused and has a ringing quality. When the angle is not right, the tone is either airy or dull. This perfect blowing place is called the sweet spot. Every headjoint has its own unique sweet spot.
To find the sweet spot, choose your best note and play it for several counts. Repeat the note again, only this time slightly raise your right-hand knuckles (third back from the nail) while playing. If your tone is better with your knuckle in this position, you need to blow higher on the blowing edge or embouchure hole wall.
If you had positive results, you may be tempted to play with the right hand knuckle high, but this is an unnatural position for the hand and may cause injury over time. It is better to put the knuckle back in its normal place and figure out how to raise the air stream higher on the wall with your lips. Some teachers have students hold a hand directly in front of their face and make a straight line with the air stream from the heel of the hand to the tip of the middle finger. This helps students understand how much work the bottom lip must do. Remember that the bottom lip is the bottom of the aperture or opening in your lips.
If your tone is too airy, then you are angling the air too high on the wall. Learn to adjust the angle of the air so that the tone is focused. Experiment by blowing the air toward your left toe or your left elbow. Also experiment by varying the size of the aperture and the position of the tongue in your mouth.
Joseph Mariano encouraged his students to practice long notes with the tongue in the position of each vowel, using both the long and short pronunciations. This exercise will teach you how and where to place your tongue. Some people find that they get swollen lips from food allergies. Be sure to avoid foods that affect you on days when you will perform.
I find that I have the best tone when my embouchure is in shape. This means that it is flexible and yet can stay quiet if needed. Practicing harmonics is another way to develop a flexible embouchure and a ringing tone.
Harmonic Series
The harmonic series is a succession of tones consisting of a fundamental note and the consecutive notes that are produced by it. The fundamental is also called the first partial. On a flute with a C footjoint, the lowest fundamental is C4 or middle C on a piano. When that C is overblown, the series will be Partial #2: C5, Partial #3: G5, C6, E6, G6, B-flat 6 and C7.
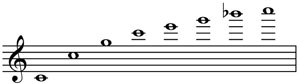
On a flute with a B footjoint, the fundamental is low B followed by the same intervallic skips of an octave, 12th, 15th etc. It is the interval of the twelfth or the third partial that we will use in these exercises.
Left-Hand Partials
With the right hand on the barrel, play a low G. With a low-G fingering, overblow to the octave above and the fifth above that. These three notes are partials 1, 2, and 3.
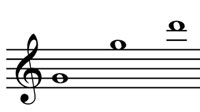
Practice these three partials tongued or slurred; each way offers different challenges. Slurring requires embouchure flexibility, while tonguing requires the correct partial with no reference point. Once you are comfortable playing these three partials, alternate their playing order: 231, 321, 213 etc.
Repeat using the A-flat 4, A4, B-flat 4, B4, C5, and C-sharp 5 as the fundamental. Placing the right hand on the barrel will keep the flute securely in your chin and facilitate the playing of the harmonics.
Right-hand Partials
When you are secure with the lefthand harmonics, practice the righthand harmonics using the following notes as fundamentals: D, E flat, E, F and F sharp. I did not include the footjoint notes because playing the footjoint notes requires the right-hand pinkie to be out of the position of function.
To find this position, simply place your hands in front of you and turn the palms up. This is a natural or neutral position of the hand. The hands and fingers should be in this neutral position when playing. Extending your right hand pinkie to reach the footjoint notes can cause tension in the hand. When practicing tone work, get rid of as much tension as possible.
In my own practice, I would never do extended tone work with my righthand pinkie extended. I like to believe Taffanel & Gaubert had the same thoughts, because they could have written Daily Exercise #1 (the five note patterns) beginning on a C rather than a D.
Harmonics and Vibrato
Once you have practiced counted vibratos on a harmonic note, you will instantly know that it is much more difficult to vibrate on a harmonic than on a regular note because there is more resistance. You can use this extra resistance to improve your sound. Some of my favorite music to practice counted pulses “on the third harmonic partial” includes:
Taffanel & Gaubert, 17 Big Daily Exercises, Daily Exercises #1, keys D through F sharp;
Marcel Moyse, De La Sonorite, “Suppleness in the Low Register”, pages 10 – 14
I also like to practice with simple melodies. Here are three to play at the third harmonic partial. Practice counted pulses on each note and your tone will begin to ring.


