When I was a student, Rudolf Serkin was one of the reigning piano soloists of the day. He also served as the Director of the Curtis Institute of Music. During an interview someone asked how much he practiced each day. He replied that after you become a professional, you should be able to do what you need to do in about two hours a day. If it takes you longer than that, perhaps you are in the wrong field.
Many of us teach long hours for many days in a row. We do not have the luxury of setting aside two hours a day to practice. In fact, we are lucky when we find 15 minutes here and there throughout the day. This article offers some suggestions for how to keep your playing at a satisfactory level in a minimum of time with Maintenance Practice.
Relax
When you have only 15 minutes to practice, the temptation is to tense up and get to work. This is counter productive. After a long day, your jaw may be tight and your shoulders tense; your toes may be curled, and your feet may hurt. Your eyes may be tired from over-head fluorescent lights.
Turn off the fluorescents and try a more soothing lighting or even darkness. Take a few minutes and breathe. One-nostril breathing is great to get you centered. Simply close one nostril with your index finger and breathe a few times on one side only. Then switch sides. After a few cycles, breathe normally. You might even close your eyes during the process. Let your jaw and arms hang loose. Separate your toes and enjoy taking up more space with your body. This is your time of the day. Learn to practice smart and relax.
Headjoint Octaves
As the reed is to the oboe, clarinet, or bassoon, the headjoint is to the flute. It holds the secrets to fine playing. When you have limited practice time, practice octaves on the headjoint alone. The parabolic curve of the headjoint causes the octaves to be out of tune. The lower A will be sharp and the upper A will be flat. So goes it.
.jpg)
Start on the low A and play several counts with a good spinning vibrato. Then scoop up to the upper A. Be careful that the vibrato does not stop and start anew as you land on the upper note. It should be continuous throughout the two notes. Enjoy the beauty of the lower A and then the energy of the scoop up to the higher A. Try to make each note ring as much as possible.
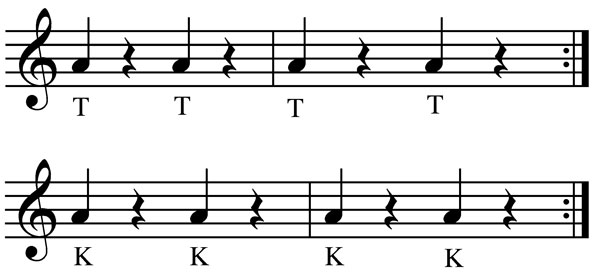 After a few minutes, practice some tonguing, still only on the headjoint. Start with a single-tongued quarter note followed by a rest. Think perfection. You want to create a beautiful beginning to the sound. The tongue releases the air. Be sure that the air does not precede the tongue. A hooting effect results when the air comes before the tongue. After a few single strokes, practice the back stroke of double tonguing. I prefer the Key sound for the K rather than a Ka or Koo. The K should be as far forward in the mouth as possible.
Once you have been successful on both the T and K strokes, do a series of TK on one breath. Remember to keep the vocal folds separated. If these two exercises are all that you have time for, then be pleased that you have now worked your embouchure, vibrato and articulation.
Run the D
This is one of the best exercises for checking that your lips are in the optimum position to produce a ringing sound. Finger from low D up to the second octave C# chromatically while overblowing to the third harmonic partial.
Play this 12-note scale several times on one breath, slurred up and down. 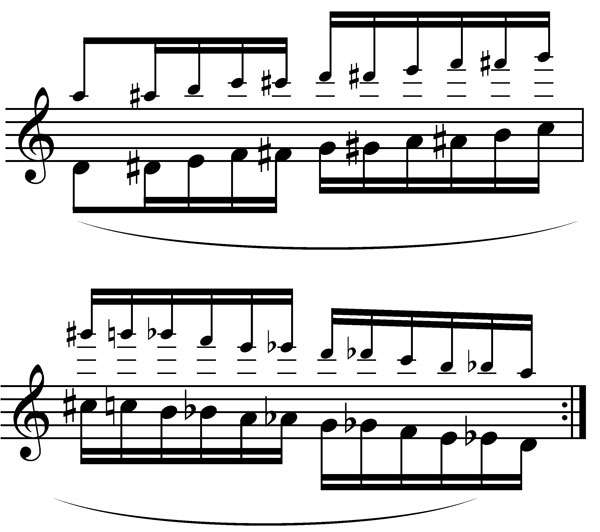 Once you can do it well without any notes dropping to a lower partial, you know that your embouchure is in the best position to play with a ringing sound. I suggest inserting this exercise into your practice session every few minutes to be sure that you are always playing with the best possible sound .
Balance the Flute
Much of my practice is dedicated to balancing the flute well. We should avoid holding the flute mainly with the left or right hand. It should be balanced between both hands. The fingers should move from the third knuckle (except for the left index finger), and there should be no movement of either elbow. Remember to let the arms hang. When you are tired and stressed out, the tendency is to lift the elbows and let the shoulder rise.
Play Fast
Most of our time during a long teaching day is spent playing with students, who tend to play slowly. Slow playing can be our enemy, because we leave our fingers down too long and use too much finger pressure. Kids play slowly because that is all that they can do. Professionals, on the other hand, should practice playing fast.
You need to remind your body that you are a professional. Start by practicing a round of trills that switch from one hand to the other. For example: play an F to G half note trill (in first or second octave) followed by a G to A half note trill. Place a rest in between each set. The F finger is a strong finger, while the G finger is a weak finger. The strong finger tends to lead the weak finger to move more quickly. After a few sets of these two trills, progress down and up the flute by trilling E to F and then A to B. The last set will be D to E and B to C. 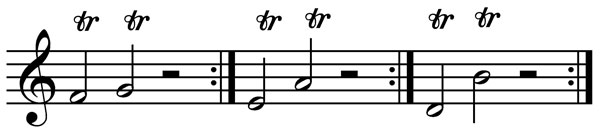
When you have completed each cycle, make up a pattern so that you can practice moving any finger on the flute with no excess movement in the elbows. Be sure to put a rest in between each trill pattern. This rest helps you remember to play on the exhale. Then insert the Run the D exercise to calibrate your embouchure.
Round of Scales
If you play scales in 16ths at a metronome marking of 96, you can play all the major and melodic minor scales in about two minutes. Little time to practice is no excuse for not practicing scales every day.
Vary your practice by playing scales using the following skills: single-tongued T, K, double-tongued TK, HAH (throat staccato), and slurred. Experiment with the dynamics. Try forte on the ascent and piano on the descent. I like to practice all the scales grouped in six notes, up and down three times in one breath. As before, insert the Run the D exercise to calibrate your embouchure.
Five-Note Patterns
When pushed for time, practicing five-note patterns in major keys offers the most benefit. Most students start these patterns on the first octave D and ascend by half steps. For advanced practice, start the five note pattern on the third-octave G, which will take you up to the fourth octave D. Then repeat each five note pattern descending by half steps.
.jpg)
This is also beneficial for maintaining breath control, one of the first things that goes when we don’t practice. Starting at the top of the range and working down uses great air from the beginning of this exercise. Then, insert the Run the D exercise to calibrate the embouchure.
What Else?
During a three-day practice cycle, you should be able to cover chromatic scales, thirds and sixths, arpeggios (major, minor, and diminished), and seventh chords. Portion out the material with the time that you have. Taffanel & Gaubert’s 17 Big Daily Exercises is an excellent source for this material.
Preludes
In his magnificent book The Flute, Ardal Powell reports that Hotteterre describes the prelude in L’Art de Preluder (1719) as a “spontaneous musical form suited to intimate or even solitary performance.” This type of music was made up on the spot by performers, who first announced the key and then began playing. During this improvisation players might modulate to several keys before returning to the primary tonality.
These little snippets of music were rarely written down, and the gestures included in them ran the gamut from virtuosic to slow and expressive. Sometimes performers played several preludes before performing the announced composition, or they might play a prelude before each movement of a sonata. I have often wondered if they improvised a prelude as a way to warm up the flute and their lip or if the technical feats developed in this style influenced the modern etudes that we play today. I suppose we shall never know. Preludes are very similar in style to cadenzas.
Before you begin improvising your own preludes, examine those written by Gariboldi (Art of the Prelude) and Furstenau (24 Exercises, Caprices and Preludes, Op. 125 and 26 Exercises, Op. 107). I especially enjoy the Op. 107, because each prelude is followed by an etude in the key of the prelude.
Benefits of Preluding
Whether you create your own or play preludes by Gariboldi or Furstenau, the gestures in this genre offer wonderful rewards for flute players. The first note of a prelude is a usually a whole note under a fermata, which gives you ample opportunity to let the note blossom and then decay or taper. There are also opportunities for color or timbre changes. Most preludes incorporate arpeggios, gruppettos, chromatic scales, wide leaps, trills, dotted rhythmic figures, rests or silences for expressive purposes, wide-range leaps, and repeated notes that either increase or decrease in speed. In essence, they include everything for a dramatic, virtuoso, expressive performance. Because these preludes are only a few lines long, it doesn’t take a lot of time to work on one. I have found that playing a few preludes during my practice day increases my flexibility; then when I start practicing solo repertoire, I am truly warmed up. They are also fun and satisfying to play. After you have explored the notated preludes of others, try composing some of your own.
Monthly Rotation
As teachers we want to demonstrate for our students, but if we don’t practice the standard etudes, solos, and concertos regularly, we may be embarrassed by how we sound. Most days I rotate through four to ten etudes. My favorite etude composers are Berbiguier, Andersen, Altes, Hugues, and Casterede. I also rotate through the J. S. Bach and K.P.E. Bach sonatas, as well as the Mozart concertos and French Conservatory pieces. If your students are working on the major concerto repertoire, you should add those works to your list. This type of practice rotation not only keeps us up to date, but is a reminder of how satisfying it is to play this wonderful music.
On Your Stand
There should be something on your music stand that you just love to play, so that at the end of a practice session you have a nice reward. This composition can also serve as the impetus to get you through the repetitive parts of maintenance practice. While we may not get two hours straight to practice, we can become the artists of several great 15-minute practice sessions each day.


